Blending modes for layers control how each layer blends with or interacts with layers beneath it. Most blending modes modify only the color values of the source layer, not the alpha channel. You can’t directly animate blending modes by using keyframes. To change a blending mode at a specific time, split the layer at that time and apply the new blending mode to the part of the layer that continues. To blend colors with a gamma value of 1, select File > Project Settings > Color and then Blend colors using 1.0 gamma. Deselect this option to blend colors in the working color space for the project.
Some effects include their own blending mode options. All blending modes described in this section are available for blending between layers. The blending mode menu is subdivided into eight categories based on similarities between the results of the blending modes. Options are Normal, Dissolve, and Dancing Dissolve. The result color of a pixel isn’t affected by the color of the underlying pixel unless Opacity is less than 100% for the source layer.
Categories and Core Blending Behaviors
Options include Darken, Multiply, Color Burn, Classic Color Burn, Linear Burn, and Darker Color. Options are Add, Lighten, Screen, Color Dodge, Classic Color Dodge, Linear Dodge, and Lighter Color. Options include Overlay, Soft Light, Hard Light, Linear Light, Vivid Light, Pin Light, and Hard Mix. Options include Difference, Classic Difference, Exclusion, Subtract, and Divide. Options include Hue, Saturation, Color, and Luminosity. Options include Stencil Alpha, Stencil Luma, Silhouette Alpha, and Silhouette Luma.
The stencil and silhouette blending modes use either the alpha channel or luma values of a layer to affect the alpha channel of all layers beneath the layer. Using these blending modes differs from using a track matte, which affects only one layer. Stencil modes cut through all layers, so that you can, for example, show multiple layers through the alpha channel of the stencil layer. Silhouette modes block out all layers below the layer with the blending mode applied, so you can cut a hole through several layers at once. Options are Alpha Add and Luminescent Premul.
The Color mode family contains the result color being the source color, with several variations that either keep the underlying color or blend it in specific ways. The result color for each pixel is either the source color or the underlying color. The probability that the result color is the source color depends on the opacity of the source. If the opacity of the source is 100%, then the result color is the source color. If the opacity of the source is 0%, then the result color is the underlying color.
Color channel operations include: color channel value, and for each color channel, multiplies source color channel value with underlying color channel value and divides by maximum value for the project’s color depth. The result color is never brighter than the original. If either input color is black, the result color is black. If either input color is white, the result color is the other input color. This mirrors the idea of combining colors like drawing with pens or placing gels in front of a light.
Subtractive, Additive, and Complex Modes
Subtractively, modes darken the underlying color by either choosing darker values (Darken, Darker Color) or by comparing channel values to yield a darker result. Multiply-related modes scale down brightness based on channel values. Classic Color Burn and Color Burn increase contrast based on the source layer’s color, with order of stacking influencing the final look. Color Dodge, Classic Color Dodge, and related modes increase brightness and can produce dramatic highlights.
Additive modes push brightness upward: Add, Lighten, Lighter Color, and Screen. Screen is essentially the opposite of Multiply, projecting many colors onto a light medium and often used to preserve bright details. Linear Dodge and Color Dodge variants contribute different brightness and contrast dynamics depending on opacity and stacking order. Hard Mix outputs only one of eight primary colors and is usually used in specialized compositing scenarios. Difference-based modes (Difference, Classic Difference, Exclusion) create striking color shifts by subtracting color values, and are particularly useful for identifying differences between similar frames or layers.
HSL and Matte Modes
HSL modes keep hue or luminance or saturation from the top layer while borrowing other components from the bottom layer, enabling creative color manipulations without entirely discarding underlying information. Matte modes (Alpha Add, Luminescent Premul, Stencil Alpha, Stencil Luma, Silhouette Alpha, Silhouette Luma) primarily affect transparency. They function similarly to track mattes but can act on multiple layers below the matte layer. Alpha Add helps eliminate edge seams caused by anti-aliasing in composited edges, while Luminescent Premul addresses issues with premultiplied alpha channels.
Regardless of category, layer styles and effects can interact with blending modes. After Effects preserves Photoshop layer styles when importing layered Photoshop files, and you can blend layer styles with underlying layers using the Blending Options group. Layer styles can be interior (affecting opaque pixels) or exterior (interacting with underlying layers but not directly blending with the layer’s own pixels). The opacity of layer contents and layer styles can be controlled independently in the Blending Options group. If you modify the Fill Opacity, layer styles’ opacity remains unaffected.
Practical Workflow and Tips
To change the frame-by-frame appearance of a layer, you can split the layer at the desired time and apply a new blending mode to the resulting piece. Frame blending modes are used during frame interpolation or time remapping; options include Pixel Motion, Pixel Motion (Frame Blending), and Optical Flow. To change a layer’s frame blending mode, select the layer, open the Time menu, and choose the desired option from the Frame Blending submenu. Keep in mind that the effectiveness of each blending mode can vary depending on the footage and the desired effect.
For quick compositing tasks, you can use blending modes to drop backgrounds. For a white background, Multiply removes white; for a black background, Screen preserves bright details while removing black. This is especially effective for assets like logos, motion graphics, or overlays. Blending modes unlock creative possibilities for title sequences, textures, and multi-layer composites, enabling dramatic visuals without heavy masking or keying.
When working with motion graphics or VFX, you may encounter GPU-accelerated 32-bpc blend modes on the GPU when a layer has motion blur applied. Knowledge of how to blend effectively can significantly speed up decisions during editing and compositing, letting you iterate quickly on look development and color dynamics.
Getting Started: Quick Step-by-Step
- To get started, open After Effects and import the footage you want to work with.
- Create a new composition with Composition > New Composition, setting dimensions and duration as needed.
- Drag and drop your footage into the composition; it appears as a layer in the timeline panel.
- Select the layer, then go to Layer > Blending Mode to reveal the list of modes and choose one.
- Explore different modes to observe immediate changes in the layer’s appearance; each mode has a unique effect.
- Adjust opacity and scale to refine the blending effect; multiple layers with different blending modes can yield complex textures.
- Apply additional effects or color grading to fine-tune the overall look.
- Preview with Spacebar or the Preview panel, and export via Composition > Add to Render Queue when satisfied.
Blending modes are a powerful tool in After Effects, enabling you to shape how layers interact with one another. By experimenting with different categories-from Normal to Matte modes, Additive to Subtractive, and HSL variants-you can achieve results ranging from subtle enhancements to bold, cinematic composites. Remember that the correct blending mode can dramatically alter color, brightness, and transparency, often with just a single click.
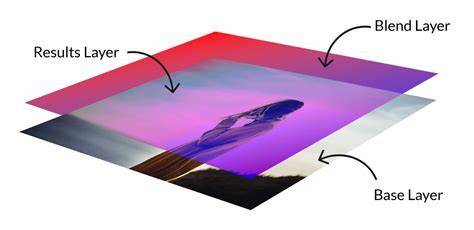
The Science of All 27 Blend Modes in Photoshop!
In practice, you can combine blending modes with track mattes, layer styles, and time-based edits to craft sophisticated visuals. As you gain experience, you’ll rely less on hard masks and more on nuanced blending to blend, erase, reveal, or emphasize details across layers.