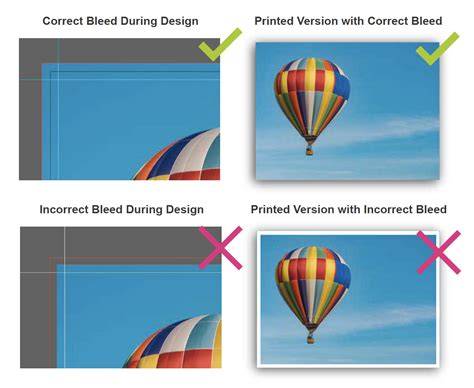
Bleed and margins are one of the most important settings to ensure that your final artwork files are printed in the highest quality possible. Photoshop is not an ideal software for setting up artwork files for printing, and one of the reasons for this is the setup of bleeds and margins. Now that your canvas size is correct, you still need to mark off the bleed area, and add safety margins.
Set up the bleed and center alignment
First, use the Rectangle Tool to create a rectangle that is the dimension of your final product. Once created, the rectangle needs to be center-aligned to your canvas. To do so, click the Align icon, then click Align to Canvas in the dropdown, and click Horizontal Centers, then Vertical Centers.
Define safety margins
You can repeat the above steps to create the safety margins for your file, by creating a rectangle with the final dimension of your printed product minus 0.3 cm on each side. In our example, the rectangle should be 8.4x4.4 cm, i.e. (9 - 0.6) cm width and (5 - 0.6) cm height.
Extend backgrounds to the bleed area
When you add a background (image, shape, or simply color), make sure to extend it to the end of the bleed area.
Guidance on practical use cases: Hello Everyone, I'm trying to use a pattern (a card for a game of my company) to fill an A3 file to print, but i need it to have margins, and i need the pattern to fill the space inside the margins, how can i do that?
Pattern filling and internal margins
Different take… I don't know your current experience with Ps, so this is a brief description. This option hides part of the pattern, and that is a nono. I need to create a pattern that fits into the margins, so when we print it there is no lost part of the pattern. The pattern is made with the cards of the game, its not for the back of a card, but for printing the game parts.
If this is STILL not what your looking for, PLEASE post a sample! I think the OP means to fill the internal space with the pattern, leaving a margin at the edge. But the margin cannot be a layer mask because the mask hides part of the pattern. Create a new layer above that and fill it with your pattern. It sounds like you are using Edit>Fill>Pattern for this. Now shrink your pattern layer using Edit>Transform>Scale. Shrink it down to reveal whatever size margin you wish. Fill your base layer with the color of the margin. Now go to Edit>Fill>Pattern.
Using guides for precise alignment
Guides help you precisely align and arrange objects in your projects. Open the downloaded file in Photoshop. In the Layers panel, select the "Step 1" layer. If you don't see the Layers panel, go to Window > Layers. Select View > New Guide Layout, which opens the New Guide Layout dialog box. Select the Clear Existing Guides option to remove the guides you made in Step 1. Within the New Layout Guide dialog box, select the Rows option and change Number to "6." For the Gutter value, enter the same value that is used for Columns, "0.278 in" (or 20px). In the New Guide Layout dialog box, select the Margin option. Enter "0.278 in" (or 20px) for the Top, Left, Bottom, and Right margins (the same value you specified for Column and Row Gutters).
Placing imagery and organizing layers
To bring an image into your document, go to File > Place Embedded and select “step-6.jpg” from the practice files you downloaded. Drag the image to arrange it as shown in the illustration (right). In the Layers panel, click the small box next to the “Step 7” folder, which causes all layers for Step 7 to display in your document. Click the arrow to the left of the folder icon to expand and show all of the layers and objects for this folder.