Sunflares can add dynamic interest to a photo, but sometimes they aren’t present in a scene. Maybe the sun has already gone down past the horizon or maybe you’re indoors and the sun simply isn’t shining through windows. This is where Lightroom’s powerful editing tools come into play. In this article, we’ll dive into the process of adding a sunflare in Lightroom to add interest and appeal to your images.
Light beams can transform a flat woodland scene into something magical. The shafts of sunlight filtering through trees create atmosphere, depth, and a sense of mystery that makes your image come alive. However, capturing those light beams naturally is rare. The weather, time of day, time of year, and location all must line up perfectly. You also need misty mornings, low sun, and clear patches in the canopy. So, getting all those things to line up might not be practically possible. Fortunately, Lightroom allows you to recreate those conditions digitally with just a few smart adjustments.
Foundations: preparing for a convincing sunflare
Post-processing isn’t about faking light; it’s about enhancing the light that was already there. In this tutorial, we’ll show you how to add realistic, natural-looking light beams to your photos using Lightroom’s Masking tools. This technique is quick, effective, and perfect for forest or woodland photography. For a full tutorial in Masking in Lightroom, click here.
First, you’ll need to access the Radial Filter tool in Lightroom. To do this, press Shift + M or select the circle icon in the toolbox. Once you have the Radial Filter tool open, you can adjust the size and feather of the filter using the sliders in the Masks panel. Naturally, strong sunlight reduces contrast. To position and blend the sunflare, first, look for the direction of the light by observing the shadows in the photo. The sun is usually located in the direction of the shadows, so use the click-and-drag technique to move the sunflare to the desired area of the photo. Next, adjust the size and shape of the sunflare using the sliders in the Radial Filter panel. This will help you create the desired sunflare effect, allowing you to control the brightness and intensity of the sunflare. Once you’ve positioned and blended the sunflare, it’s time to make some final touches to your image. Adjust the color and contrast of the sunflare to make it look even more amazing. When you’re satisfied with the sunflare effect in your image, save your work in the desired format.
Two main methods to create sunflare in Lightroom
One method is to use a Radial Gradient near the light source. Then, warm it with the Temp slider, raise Exposure, and lower Clarity to soften the glow. Position the mask so the light spills naturally into the frame. Sun flare effects are really popular right now, and thankfully, they’re pretty darn easy to do. Plus, there are two ways you can pull this off.
Step One: Here’s our original image. Step Two: Click on the Masking icon, in the toolbox beneath the histogram. From the panel of tools that appears, click on the Radial Gradient (or press Shift-M). Before you click-and-drag the sun flare out, drag the Temp slider way over to the yellow side. Here, I dragged it over to 65. Next, crank up the Exposure (it is the sun, ya know). In this case, I dragged it over to the right to 2.45, so basically adding about 2-1/2 extra stops of exposure. Now, click-and-drag the sun flare out in the top-right corner. Next, we’re going to add some negative Clarity to soften our sun flare, so drag the Clarity slider way over to the left (−60). Don’t forget- you can reposition your sun flare any time by clicking on the little black edit pin. Then drag it right where you want it.
To make the effect look more realistic, you’re going to need to somewhat match up the color of the rest of the image with the very warm color you just added with this sun flare. So, click the Done button at the bottom right of the Preview area. Then go to the Basic panel and drag the Temp slider over to the right until the color blends in with the color of the sun flare. Here, I dragged it to +41. To finish things off, back off the contrast a bunch (one of the rare times I add negative contrast, but in this case, with the sun bursting in, it helps sell the look). Lowering the contrast of the rest of the image helps with this effect. Here, I dragged the Contrast slider down to −63. I also ended up dragging the Dehaze slider a little to the left to −15.
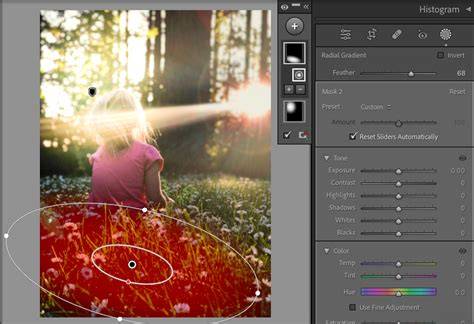
Tip: Optional Second Method If you’re not comfortable using the Radial Gradient yet, you can use the Brush tool (K) instead. A believable sun flare works because the mask, warmth, exposure, and contrast all support the existing light in the scene.
Refining and balancing the light
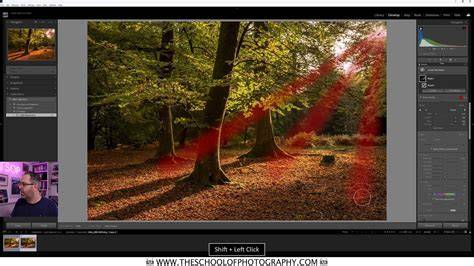
Lift Exposure and Highlights slightly to make the beams glow. Adjust the Amount slider to control strength. You can also gently paint in extra light around bright spots to balance the composition - for example, where sunlight might scatter through mist or branches.
Natural sunlight is warm, especially during golden hour. Making the Beams Interact with the Scene helps maintain believability: light shouldn’t fall where it logically wouldn’t - such as behind a tree trunk or under dense branches. Make sure you are still selected on your beam mask. Then click Subtract > Object and paint over the tree or branch that should block the beam.
Using presets and HDR for extreme contrasts
There are presets that can dramatically save time and increase color and contrast. Using sun rays and lens flare presets, you can choose from a variety of effects that can be easily applied to your images. Saving your own sun flare presets is really easy. Now click "Save Current Settings as New Preset", give your Sunflare Preset a name and click Save. By adjusting the settings in the Basic, Tone Curve, HSL/Color, and Effects panels, you can modify the preset to your liking. Don’t be afraid to get creative with your sunflare presets!
Extras - The Power of HDR Editing: By blending three bracketed exposures (one normal, one underexposed, and one overexposed) you can retain detail in both highlights and shadows. Lightroom’s HDR Photo Merge feature makes this simple. With the HDR base, your edited beams will sit naturally within a balanced tonal range.
Practical tips for authentic sunflare results
Replicating the depth and warmth of natural sunlight, complete with its rich orange tones and captivating flares, is no small task. However, with careful analysis of your scene and the appropriate techniques, achieving a believable effect is within reach. You’ll learn to craft sunflares using the Radial Filter, masking, warmth adjustments, and color tuning to blend the flare with the scene.
Remember to keep edits natural and avoid excessive processing. If the photo looks overly processed, take a step back and adjust to bring it back to a more natural look. Sunflare photography can be used to enhance various types of photography, such as wedding, portrait, and landscape photography. It adds warmth, depth, and atmosphere that can elevate the overall image.
Real-world applications
Sunflares can add a magical touch to wedding photos by adding warmth and depth, creating a sense of intimacy and romance. Portraits gain depth and atmosphere, while landscapes gain sense of depth and mood. There are many stunning examples of sunflare landscape photography available online, showcasing the dramatic impact that sunflares can have on a landscape image.
Связанные техники
Beyond sunflares, several other light effects can be applied to your photos, enhancing their allure. Bokeh, light halos, and warmth and color adjustments can all be used to enhance your images, creating a more dynamic and visually appealing result. Bokeh and light halos can enhance the natural backlight in your images and provide gorgeous framing around the subject. Adjusting the warmth and color of your images can significantly impact the overall look and feel of your photos.
Lightroom Tutorial | How To Create A Sun Flare
To adjust warmth in Lightroom, you can use the Temperature slider in the Develop module. You can also adjust the Tint, Vibrance, and Saturation in Lightroom to further enhance the colors in your images.
Finally, select one of the signature edits presets and click number. Capture sun flare by shooting during golden hour and removing the lens hood, then adjust your aperture for different effects. Sun flare can be added to any photo, regardless of the subject or the lighting conditions. Using presets can help you quickly apply the same look to multiple images, allowing you to create a consistent style for your portfolio.