Let’s face it, with two young children at home to take care of and a business to manage, sometimes coffee is the only thing that get me through the day. Seriously, I don’t know what I’d do without coffee literally all day. A lack of sleep makes coffee a necessity!
And my happy place is a nice glass of pinot noir when my husband and I finally get a minute to breathe after the kids are in bed after a long day. While I love coffee and wine dearly, my teeth sure don’t. It’s tough to keep the ol’ pearly whites looking their best. You might be wondering where I’m going with this. Well, clients ask me all the time to “Photoshop” their photos to make their teeth and eyes brighter.
For the record, I basically NEVER use Photoshop to alter someones physical appearance, but that’s a topic for another article. Before I answer this frequently asked question, I want to point out that my style is natural and minimalist, so I tend to not edit this way very much, if ever. However, there is indeed a way to make one’s teeth and eyes look naturally brighter using Lightroom if that is your desired goal.
Lightroom is constantly updating their amazing features, and the brushes and masking are one that got a major update lately. There’s a built in brush for everything! Click on the Masking function on the right hand editing panel (or press Shift W). You can also adjust the color, exposure, and whites/blacks of the specific area you’ve brushed on to. Be sure to not go overboard! Keep the look minimal and natural.
To whiten eyes in Lightroom, it’s pretty darn simple. From Effects, select Iris Enhance, or Dodge. Click on the eye you’d like to brighten, and start painting on the brush. As with teeth whitening, keep it natural and timeless. If you don’t need to meticulously edit eyes or teeth in an image, but want lower yellows in your images, bring down the yellow HSL slider to brighten teeth - OR try using presets!
Depending on the version of Lightroom you’re using, your editing steps may look a little different. Once the preset is applied, you can make adjustments to the preset’s intensity by using the preset slider. This is a new tool I excitedly wrote about recently.
In photography, the human eye is a fascinating subject. When done correctly, a photo of the eyes can reveal mesmerizing subtleties or beautiful flecks of color that can really capture a viewer’s attention. Sometimes, though, bad conditions (such as poor lighting) or an incorrect camera setting can get in the way of a good photo.
When we talk about brightening eyes in photos, what we’re really focusing on is the iris - so you’ll want to concentrate your editing efforts on the most colorful part of the eye. As with most special effects, you will need to work in layers. Create an adjustment layer. Duplicate your photo by selecting Layer > duplicate layer or CTRL/CMD J, then click on the Adjustment layer icon and select Curves. Adjust the line. Push the diagonal line upwards to add light to the photo. Invert the mask. Tap Command + I or Ctrl + I to hide the effect. Ready the brushes. Select Brush from the side toolbar, making sure its foreground color is white. Click down on the carat to the right of the brush thumbnail and navigate to the appropriate brush style. Brighten up. Zoom in on the eyes for accuracy and use your chosen brush tool to carefully paint the irises. Be careful to paint only the iris - brightening the white portion of the eye can make a photo look unnatural. To fine-tune, reopen the Curve Adjustment box and increase or decrease the diagonal line. Or, if the effect is too bright, simply decrease the opacity until you get it just right.
Eyes are the window to the soul - and this is especially true with our pet photography. Spending a little bit of time working on the eyes of the pet in your image will take them from dull, to bright and vibrant! But be careful! Everything in moderation! Most people when they first begin to edit pet photos, go a bit overboard with eyes. They make them too bright, too saturated, catchlights unnaturally light, or eyes too sharp.
The steps I usually take with eyes include: Using radial filters raising whites on the whole face (maybe twice). Adding a radial filter raising clarity over the whole eye. Also possibly raising whites a bit. Working on the catchlights - drawing a radial filter over the catchlights, increasing whites, increasing highlights, MAYBE increasing exposure or shadows. Aiming for naturally bright, not glowing or overdone. I also usually desaturate the catchlights. I try and aim for both eyes to be equally bright and the same colour. You can use radial filters OR the adjustment brush to help with the colour of the eyes.
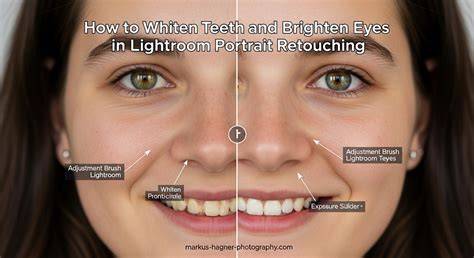
Lightroom Iris Enhance
Practical steps: a quick workflow
- Open Masking and choose Shift W to access the masking tools.
- Select Iris Enhance or Dodge from Effects to target the eyes.
- Paint carefully over the irises, avoiding the whites for a natural look.
- If needed, adjust color, exposure, and whites/blacks within the brushed area.
- Use Curves on a separate adjustment layer to add subtle light, then mask and refine.
- Lower the opacity of the effect until the result looks natural.
Tips to keep results natural
- Focus on the iris, the most colorful part of the eye.
- Work in moderation; subtle boosts beat heavy edits.
- Use layers and masks to control where the adjustments apply.
- Avoid whitening the sclera (the white of the eye) too much to prevent an artificial look.
- Match eye brightness and color between both eyes for consistency.
If you’re not editing every image, presets can offer a helpful starting point, and you can adjust the preset’s intensity to suit each photo. The key is to maintain a natural, timeless appearance that respects the subject’s real features and avoids over-editing.