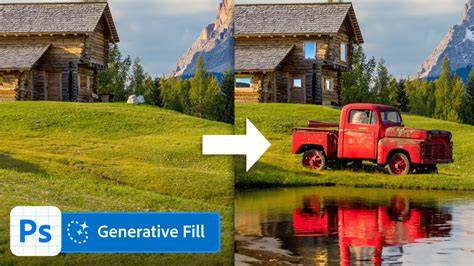
Adobe Photoshop has been the go-to software for image editing for over thirty years. In early 2023, Adobe released the next big thing in image editing - Photoshop AI generative fill. Using Photoshop’s latest version, you can add or delete elements, extend the width or height of an image, and remove backgrounds, to name a few things. Photoshop’s AI generative fill is a powerful feature that enables you to effortlessly fill, edit, and remove image elements with just a few clicks. Powered by machine learning AI, it generates parts of images or even entire composite photos in a fraction of the time it would take if a human were to do it. Photoshop analyzes each pixel of an image and matches the lighting, perspective, coloring, and shadows, resulting in a remarkably realistic piece of art. This non-destructive tool allows you to revert easily any changes you aren’t happy with, as it organizes every generated element into its own layer, complete with a layer mask. As a result, you can enhance and modify the designs you create using any of Photoshop’s other tools, such as blending modes or filter effects.
First and foremost, because it saves time. In the past, adding or removing elements in images was time-consuming. You’d often have to use the clone tool to match surrounding pixels and take steps to add the right lighting and drop shadows, among other things. With the introduction of generative fill, Adobe takes all the necessary steps to ensure the element you’re adding or removing results in a flawless photo every time. Another reason that generative fill is so exciting is that it can replace your expensive stock photography subscriptions. We were somewhat underwhelmed when Adobe rolled out its AI features in the first Photoshop beta. However, since its formal release to the world in September 2023, it’s obvious that they have made incredible improvements. Complex editing: Generative fill is great for refining, retouching, and reworking images. You must subscribe to Adobe’s Creative Cloud platform to use Photoshop AI generative fill unless you want to experiment with it on Adobe’s Firefly web app. The cost varies depending on your desired tools, but you can get Photoshop as a standalone product for around $21 a month.
Getting access and setup
Suppose you want to test out the features of Photoshop before purchasing. Once you sign up, click the download button to get Photoshop. Doing so will install the Creative Suite control panel on your computer. Open the Creative Cloud dashboard, then navigate to the Apps tab. From there, search for Photoshop in the Available in your plan section of the dashboard. Once you’ve installed Photoshop, you’re ready to start creating.
To access Generative Fill, use any selection tool available in Photoshop to choose the specific part of your image you want to work with. Then, click on the Generative Fill button located in the contextual taskbar that appears, or navigate to Window > Contextual Task Bar > Generative Fill. If the Generative Fill option is not visible, make sure you are using the latest version of Photoshop and that the Contextual Task Bar is enabled. There is no standalone free version of the AI Generative Fill; it is available as part of a subscription to Adobe Photoshop. A 7-day trial is available for testing, and ongoing use requires a Creative Cloud subscription (starting around $21/month).
What you can do with Generative Fill
There are several different ways to use Photoshop AI’s generative fill tools. You can use it to create images from scratch, remove objects and backgrounds, extend the size of your canvas, change elements of your photos, and generate backgrounds or realistic objects. One of the best ways to use generative fill is to extend the pixels of an image. With the crop tool selected, click and drag the left side of the image container and then the right to create even space on both sides. Here’s what our image looks like after Photoshop fills in the blank areas of our canvas. After using generative fill, you’ll have three variations, which can be found in the generative layer properties. As previously mentioned, Photoshop generates a new layer, complete with a mask, so your original image remains untouched. If you aren’t satisfied with the results, you can click the generate button, which provides you with three new variations. You can repeat that process as many times as you like to get the results you’re looking for.
In addition to extending the image area of your canvas, you can use generative fill to replace backgrounds in your images. For this step, we’ll eliminate the background of our car image and replace it with a depiction of the salt flats in Utah. First, you want to ensure nothing is selected. With your subject selected, click the invert selection tool. When the text prompt appears, type in the background you wish to see. We used mountain trail for this example. Now that we have the background let’s use generative fill to change the man’s jacket in the photo. Using the quick selection tool, we’ll draw a selection around his denim jacket. Be careful not to include any part of his shirt or surrounding areas, as Photoshop will overwrite any selected pixels with the information in the text prompt. The next step is to enter the following prompt: puffer jacket.
Another cool feature is the ability to remove or replace objects in your photos. Let’s say you have a perfect image minus a few blemishes. Using AI, Photoshop will remove aspects of your image and fill it with surrounding pixels in the picture. It’s similar to the content-aware tool but goes way beyond that. For example, we’d like to replace the lower half of a woman’s dress in this photo, so we’ll need to remove the one currently there. As you can see, when creating images with Jasper or another AI art generator, there will sometimes be imperfections. Using the lasso tool, form a selection around the lower part of her dress, click generative fill, then generate. This will tell Photoshop to replace what’s in the selection with surrounding pixels in the image.
In addition to altering existing images, Photoshop’s AI generative fill can create them too. However, Photoshop struggles with images larger than 1024 pixels, often resulting in lower-quality photos. Start with a blank canvas measuring 1920 pixels wide by 1024 pixels tall. Next, draw a selection around the middle third of your image, click generative fill, and enter the following prompt: majestic snow-capped mountain range. For the third selection, draw a rectangular selection around the upper third of your image. Now that we have our background let’s add a couple of accents. Start by creating a selection in the water with the lasso tool. Lastly, we’ll add a man with two dogs looking out at the scenery. Form a selection using the rectangular marquee tool over the lower right corner of the composite image.
Tips and best practices
One unique feature is that the shape and size of the selection matter. For example, if you want to add a hat to a person in your image, be sure to draw your selection as closely as possible regarding the type of hat you’d like. Additionally, note that small selections add a smaller design element, whereas a large selection would result in a larger object. One thing that Photoshop AI doesn’t do well is determining instructional prompts. Avoid using words like create, alter, or make when inputting your text prompts. Using descriptive adjectives and nouns will always give you better results. Unlike other AI design tools, less is more. Some users might not love the marching ants (selection) when working in Photoshop. A better way to make your selections stand out is by using Photoshop’s object selection tool.
Combining photos is another great way to use Photoshop AI’s generative fill feature. We’ll show you an example with two video game character images created in Midjourney. We’ll start by creating a blank canvas measuring 1800px by 1024px. To blend the two photos, we must ensure both images are on the same layer. With the new layer selected, we’ll add a selection between the two photos, ensuring that pixels from both images are included in the selection. Finally, click generative fill, then generate without adding a text prompt. We thought it might be fun to share a few of our creations as we researched this article, as it shows some of the things you can do with Photoshop’s AI generative fill tool.
To access Generative Fill, you must be on the latest Photoshop version and enable the Contextual Task Bar. If it does not appear, check Window > Contextual Task Bar > Generative Fill. If the Generative Fill option is not visible, ensure you are using the latest version and that the Contextual Task Bar is enabled. A subscription to Creative Cloud is necessary to access the full feature set, including Generative Fill. Adobe Firefly is a separate AI tool developed by Adobe for creative design tasks, and while it shares capabilities, Generative Fill is integrated within Photoshop for image editing tasks. Regular updates ensure access to the latest tools, including enhancements to Generative Fill and related features.
Extending and enhancing using Generative Fill
Generative Fill allows users to extend canvases by selecting edges and generating new content that matches the surrounding area. The tool can also replace skies, enhance subjects, and seamlessly remove objects. Start with high-resolution prompts for best results, and practice to understand how prompts influence outcomes. You can also create composites by section, using generative fill with prompts for diverse elements. By stacking layers, users achieve coherent composites, ensuring unified elements.
- Ensure you have the latest Photoshop installed and that the Contextual Task Bar is enabled.
- Select the work area with a selection tool and open Generative Fill.
- Enter a descriptive prompt or leave it blank to fill with surrounding pixels.
- Review the three variations and iterate as needed, refining with masks and adjustment layers.
Infographics or diagrams can help visualize the workflow, tool locations, and typical results of Generative Fill without relying on text explanations.
8 Insane Premiere Pro AI Tools (Edit Videos Faster With Adobe AI!)
A short video can illustrate selecting areas, applying prompts, and comparing variations to guide new users through the process.
One standout feature of Photoshop AI is its Generative Fill, excelling in seamless object removal. Unlike the content-aware tool, it expertly replaces portions with neighboring pixels indistinguishable from the original. Shape and size matter; precise selections yield more accurate outcomes. Mastering Adobe's AI Photoshop Generative Fill doesn't happen overnight. To enhance our skills, it's essential to use high-quality educational materials, official tutorials, and community resources. Regular practice, projects, and experimentation with prompts lead to better results over time.
Limitations and usage rights
There are limitations, such as a maximum image size of 1024 pixels (for certain workflows) and the need for better results for faces, hands, and animals. Adobe clarified that anything made with their AI programs is prohibited from commercial use in some contexts, but this has evolved. You can now commercially use many images created with Photoshop’s Generative Fill under the right licensing and terms. Adobe trained its generative AI model strictly on licensed Adobe Stock images, so there’s no need to worry about copyright infringement. It remains important to stay updated on licensing terms and usage rights as tools evolve.
Practical applications and learning resources
Generative Fill is a versatile tool for graphic designers, photographers, web designers, artists, and educators. It enables rapid mockups, background changes, and creative composites. For mastering the tool, consider tutorials, courses, and community forums. Courses such as Photoshop Generative AI Mastery offer structured guidance, while Adobe’s official tutorials provide step-by-step instructions and tips. Joining online communities and forums helps troubleshoot issues, gain insights, and share user-created workflows. Staying curious and practicing with diverse prompts will expand what you can accomplish with Generative Fill.