In Lightroom, understanding how to preview the original unedited RAWs after applying an AI preset is essential for evaluating edits, comparing versions, and managing your workflow efficiently.
Starting Point: Accessing Before/After Views in Develop
Firstly, head to the 'Develop' tab on the top right of Lightroom, next, click the 'Reset' button in the bottom right you will see the original raw file.
You can also do this using the following shortcut: Shift + ⌘ + R (mac) Shift + Ctrl + R (Windows).
Once you've hit 'Reset' and you'd like to go back to the edited version of your image you can now use the '\' key to see a before & after of your image.
Alternate Ways to Preview Original vs Edited
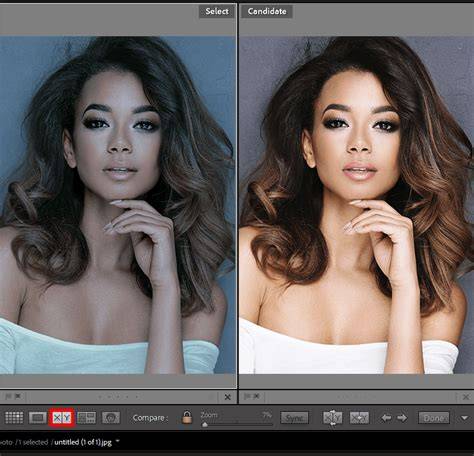
At the bottom left side of your center image display view, you’ll see two Ys side-by-side in the toolbar area. When you click on the down arrow next to the double Y icon, the dropdown menu will show you the different view options you can view of the different versions of your image for side-by-side comparison or top-down comparison.
The first time you click, it goes to the first Before/After Left/Right view. This is a straight forward view of the Before image that is unedited next to the After image that has been edited.
What is awesome about this particular method is that you can change the Before image to reflect a prior editing stage and not just the raw unedited stage. You do this by opening up the History panel on the same left-hand side, and drag any of the prior steps in the History panel to the “Before” image.
Managing History and Snapshots
In Lightroom, you can clear history above a certain step to continue editing where you left off at the most recent editing stage. This keeps the Before/After workflow flexible and non-destructive.
Similarly, you can still create snapshots after you’ve finished editing an image. To do so, you’ll right-click the step in the History panel that you want to save as a before image. And boom!
Using Virtual Copies to Compare Edits
Another basic but quick way to see before and after is to create a virtual copy of your edited image and reset it to its raw form.
If you want to toggle back-and-forth between an edited final image and unedited image but don’t want to use the \\ (backslash) key, you can create a virtual copy: right-click on your edited image and select create virtual copy. This will put an exact duplicate of your edited image next to your edited image.
Keyboard Shortcuts and View Modes
Here are some Lightroom keyboard shortcut keys that you will undoubtedly find valuable: Shift + ⌘ + R (mac) or Shift + Ctrl + R (Windows) to reset; the \ (backslash) key to toggle before/after; N (Survey view) to see Master and VC side by side; E to enter full-screen compare between two images; F to toggle fullscreen in various view modes.
These shortcuts can be accessed through the View tab dropdown while in Lightroom.
Understanding Masters, Virtual Copies, and Snapshots
The original image is referred to as the Master. Any additional records pointing to that image are Virtual Copies and you can have as many as you need. Creating a Virtual Copy adds another record that points to the same image on your hard drive. The Snapshot gives you one or more points in the development of one image to which you can return, such as finishing with the Basic panel in Develop and taking a Snapshot before experimenting with Color changes or Effects.
To see the two side by side, select the Master and the VC and press N (Survey view). If you want to toggle between the two images full screen, while both are selected press E and press the right arrow key as many times as you wish to toggle to the unseen image.
Practical Workflow: Preview Original During AI Preset Edits
When you ship images from Narrative to Lightroom using an AI Preset and want to view the original unedited RAW, revert to the original via Reset in Develop or use History to compare stages. If you need to repeatedly compare, maintain a few Virtual Copies representing different edit milestones so you can quickly toggle between them without losing your master file.
Additional Tips and Resources
Ah, here we are again with another Lightroom Classic tutorial blog post. If you’re looking for concise guidance, additional videos such as those by Signature Edits or Lightroom Killer Tips can provide quick demonstrations on viewing before and after in Lightroom.
USING BEFORE AND AFTER IN LIGHTROOM: LR Before & After Shortcut + Editing Trick!
- Reset the image in Develop to view the original RAW.
- Use the \ key to toggle between before and after views.
- Create virtual copies to compare edited versus original side-by-side.
- Utilize the History panel to adjust what constitutes the “Before” image.