Two months ago my daughter and I spent some time exploring perspective drawings. We like to work on small coding projects together, and she thought that a little app for drawing in three-point perspective would make a good project. She was right, although it does require a tiny bit of math beyond primary school level!
This article presents a concise, highly practical overview of a perspective drawing program that supports three-point perspective, with comparisons to two-point perspective and actionable tips for use. It compiles core ideas from a hands-on exploration of the app, focusing on how it works, how to use it, and how shifting vanishing points affects the drawing.
What is it?
Even if you have forgotten the name, there’s a good chance you learned to draw using two- or three-point perspective at some point. Both methods are good for drawing blocky scenes like cityscapes or Escheresque fantasy worlds because the drawings consist of edges that meet at right angles.
How it works
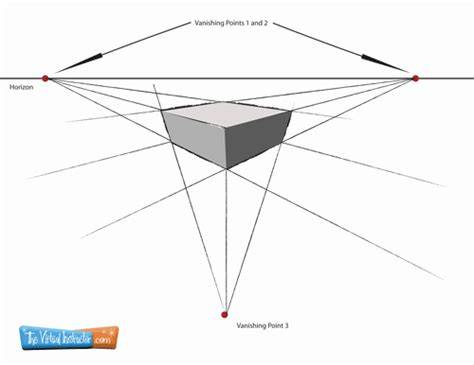
To draw in three-point perspective, start by placing three vanishing points (VPs) on a page in a triangle pattern. Two of the VPs form a horizon line near the top or bottom of the page, and another VP is placed in the middle of the opposite site (the bottom or top). Moving one of the VPs effectively rotates the image. Moving the points closer to or further from the centre of the page changes the strength of the perspective effect.
A cube shown in three point perspective, with the cube edges extended to their respective vanishing points.
To draw a shape, you draw a line for each edge. For each line you choose a starting point for the line and one of the three VPs. For vertical lines you use the VP in the middle, while for horizontal lines you use one of the two VPs on the horizon line. Then you use a ruler to connect the starting point and the VP, and draw along the ruler to create the desired edge. Repeat this process for each edge until you complete the shape. The illustration shows a cube (grey lines) with each of its edges extended (coloured lines) to show which VP it recedes towards.
The app provides vanishing points as percentages of the canvas and offers a “Move VPs” feature to adjust perspective interactively.
The app
How to use it: To draw an edge, pick a starting point and a VP to recede toward. Move the mouse pointer to the starting point and hold down the left mouse button. The direction you move next determines which VP you will use: move the mouse vertically for the middle VP, or move left and up toward the left VP, or move right and up toward the right VP. If you move left or right and down (away) from the side VPs, you will recede toward the opposite VP. As you keep moving, you will draw along the line formed by these two points as if your pen was pressed against a straight edge. The app uses light, rough lines for an effect similar to sketching freehand with pencils: you can darken an edge by moving the mouse back and forth, just as you might go over light pencil strokes multiple times.
You can also use your finger or stylus on a touchscreen, though it may be less accurate. (Your browser must support pointer events.)
Tips: You can move the mouse a few pixels (about 5) before the app starts drawing the line. Drawing is usually constrained to a perspective line, except when using the white eraser “colour”. (You can also erase with the right mouse button.) Choose Save to download a PNG image of your drawing.
Moving the VPs
You can move the VPs by changing the numbers listed in the Vanishing points field. The six numbers there represent three pairs of points. Each point describes the relative distance of a VP from the left and top edge of the drawing, as a percentage of the drawing size. For example, the first point is 1,25: this places the first vanishing point 1% of the way across the drawing from the left edge, and 25% of the way down the drawing from the top edge. The points are listed in left-to-right order, so the first and last points form the horizon line. Moving the VPs changes the apparent perspective of the observer. For example, if you flip the points so that the first and last are near the bottom of the drawing and the middle one is near the top, it gives the effect of looking up at the scene instead of looking down on it.
Two-point perspective
If you are wondering how three-point perspective differs from the two-point version, the two-point version uses only a horizon line. Vertical lines are always drawn straight up and down rather than receding toward a VP. In effect, you are doing three-point perspective with the middle VP placed infinitely far away.
Practical workflow and features
In perspective drawing tools, you can:
- activate perspective tools and choose One-, Two-, or Three-Point Perspective
- drag cross-hairs to set vanishing points and adjust them later via a settings gear
- assist with perspective by automatically generating a perspective grid
- use a guide tool to draw lines along guidelines
- switch between grid, guide, and assist modes for flexible sketching
- draw freely in 3D space with a virtual camera to expand imagination
- import an image as a layer to trace over for accurate alignment
- export completed drawings as high-quality PNGs
Two point perspective is often framed as a simplification: the horizon line suffices and verticals stay vertical, which is equivalent to three-point perspective with the middle VP effectively at infinity.
Tips for effective perspective drawing
- Use a light initial stroke and darken edges with deliberate overdraws to simulate pencil texture.
- Zoom in to work on detail and zoom out to ensure the overall composition remains coherent.
- Experiment with extreme perspective by adjusting vanishing points to emphasize depth or flattening.
Extensions and related tools
There are related tools and approaches that extend perspective practice, including systems that explore dynamic perspective techniques, such as Dolly Zoom-like effects and orthographic-to-perspective workflows. These approaches help artists push beyond conventional viewpoints and explore space in new ways.
Notes on usage and setup
The app emphasizes speed and fluidity, allowing quick experimentation with ideas. In perspective mode, lines align naturally to the targeted vanishing point, making it feel like an invisible ruler guides the hand. Keyboard input is not required; pen, stylus, or mouse work with smooth drag-and-draw actions. You can also erase with simple gestures or the eraser tool, and adjust the canvas size by dragging borders or corners. This workflow is designed to minimize reliance on external tools and to keep the drawing process focused on perspective construction.
Comparison and philosophy
Perspective tools aim to heighten awareness of how position and proximity affect how objects appear. The main goal is to explore dynamic, convincing space rather than to adhere to rigid geometry. The software encourages experimentation with rule-breaking approaches when building imaginative scenes, architecture, or interior layouts.
One of the most effective ways to draw with dynamic perspective is to play with its extremes-close and far contrasts can make your images exciting. The Dolly Zoom concept is explained as a technique where you zoom in while moving the camera back, keeping an object the same size, a method that has appeared in classic films and can inspire similar manipulations in digital drawing.
What to try next
Practice with various forms, from simple primitives to complex objects, while switching between orthographic views and extreme perspectives. The goal is to stretch space and stretch the mind, using perspective as a creative tool rather than a constraint.
Three Point Perspective Drawing Demonstration
Have a comment or correction? Let me know. Think of Perspective Sketch as a tool you use, like a pencil, pen, or ruler. All workflows, design-choices and functions have an emphasis on speed, to allow you to quickly experiment with ideas.
tags: #perspective #drawing #program