Every animator has experienced that moment of uncertainty when they lift their stylus and question whether their current drawing truly flows from their previous one. Onion skinning is the answer that keeps motion coherent, from traditional lightbox workflows to modern digital tools. This technique overlays faded, semi-transparent copies of neighboring frames on the frame you are currently working on, providing a real-time visual reference of motion through time.
Origins and concept
The method dates back almost a century. It was discovered by Disney animators in the 1920s when they stacked transparent paper on a lightbox and allowed the light to pass through earlier drawings to inform the subsequent ones. The digital equivalents mimic that physical method with added controls such as customizable frame range and color-coded ghost frames, yet the core idea remains the same: you can view where your character was and where they will be.
To provide you with a real-time visual reference for the motion route your character is following through time, onion skin animation renders faded copies of neighboring frames below the active frame in your viewport. You can view where your character was one, two, or three frames ago while drawing your current pose, and, depending on settings, where they will be a few frames ahead. This is critical because of the way we view motion-the phenomenon known as persistence of vision explains how our brains perceive movement from a sequence of still images.
Why onion skinning matters
Onion skinning becomes crucial when it comes to inbetweening, or drawing the frames that fall between two important positions. The main poses are defined by keyframes, and the transitions that give them life are produced by inbetweens. With onion skinning, you can see exactly where a new drawing should fall between two preexisting positions, making timing, spacing, and arcs more intuitive and accurate.
Three of the most crucial animation concepts-timing, spacing, and arcs-are instantly visualized through onion skinning. The two factors that most directly affect whether animation feels mechanical or alive are timing and spacing. The gap between ghost frames is spacing: close ghosts indicate gradual movement, while wide-apart ghosts imply quicker shifts. When used thoughtfully, onion skinning acts as a motion control system within the animator’s toolkit.
Practical use across tools
In traditional workflows, a lightbox, clear paper, and a steady hand formed the straightforward process: animators would trace the movement’s outline by placing a current sheet over an earlier drawing and making minor adjustments. The digital equivalents expand on this idea: modern software lets you manage the precise number of frames that show as ghosts, adjust opacity, color-code past and future frames, switch to outline-only mode when detail gets visually loud, and turn the system on or off. You can tailor the amount of context-from a six-frame stride to a narrow two-frame window for delicate expressions-to suit the sequence.
All major animation tools share the fundamental feature of viewing past and future frames within a single working view. The degree of control you have over which frames are displayed and how they look varies by software. For example, Adobe Animate uses color-coded past and future frames, an outline mode to reduce visual clutter, and customizable frame ranges, establishing it as an industry standard for 2D digital animation. Blender’s Grease Pencil offers an adjustable onion skinning feature within a 3D environment, including Onion Skin for Meshes for 3D mesh animation to see earlier model positions. Maya provides a Ghost Selected function for 3D character performance with a similar aim.
Specialized contexts and settings
Walk cycles benefit from a larger frame count-typically four to six frames-to trace motion arcs across the cycle. Lip sync often requires a smaller span, commonly one or two frames on either side, to capture precise mouth movements. Rotoscoping, which traces over live-action footage, uses the underlying reference to anchor each frame’s movement, a practice shared across traditional and digital workflows. Onion skinning, then, is a vital troubleshooting and planning tool during production, visible only while you work and not in the final render.
As a creativity tool, onion skinning displays distinct, transparent duplicates of nearby frames to assist decision-making. It does not affect the final render or playback performance; the effect is confined to the viewport during construction. The balance between frame range, opacity, and color-coding is essential: beginners should start with a small set of ghost frames and adjust as needed, while experienced animators tailor the setup per scene demands. When you step back from the ghost overlays, you can reassess your current frame in isolation to ensure clarity.
Procreate-specific guidance
In Procreate, onion skinning is accessed through Animation Assist. Tap the wrench icon in the top left corner, select Canvas, and turn on Animation Assist. Once you have multiple layers (frames), a timeline appears at the bottom. Tap the Settings icon to adjust opacity and other parameters. You can maintain consistency, especially in character animation, by frequently adjusting opacity and frame visibility. Each layer represents a frame, and onion skinning works to reveal multiple frames at once to guide your current pose. For users exploring skin glow and texturing, onion skinning serves as a bridge between traditional frame-by-frame workflow and digital ease, helping to keep animation fluid and cohesive.
- Choose an appropriate frame range for your sequence (e.g., 4-6 frames for walk cycles, 1-2 frames for lip sync, and around 2-3 for expressive poses).
- Adjust opacity to a level that preserves clarity without overwhelming the foreground drawing.
- Use color-coding to distinguish past and future frames, aiding quick visual differentiation.
- Use outline-only mode when needed to reduce visual noise.
- Turn onion skinning on or off to test how your current frame reads without context.
Ultimately, onion skinning in Procreate helps you maintain motion consistency across frames and supports smoother timing and spacing. It is a powerful technique when combined with careful posing, thoughtful timing, and deliberate spacing choices, and it complements other features like skin glow effects in texturing workflows.
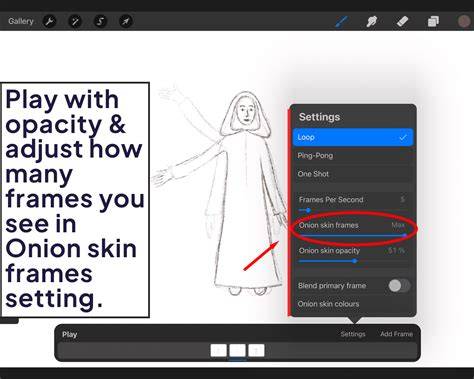
Images or diagrams can illustrate how past, current, and future frames align in a typical six-frame setup, showing how ghost frames guide inbetweening and pose transitions.
Video demonstrations can reinforce how to access Animation Assist, adjust opacity, and customize the timeline for various sequences, such as walk cycles and lip sync.
Common mistakes and fixes
The most frequent issue is displaying too many ghost frames at once; twelve overlapping frames render the reference useless. Start with two or three frames and increase only when necessary. Ignoring color coding can also hinder readability, so assign distinct colors to past and future frames, adjusting per scene requirements. Different sequences demand different playback and timing strategies, so adapt the onion skin settings accordingly. Finally, occasionally remove the onion skin to view the current frame in isolation to avoid overreliance on ghost overlays.
Key concepts recap
Onion skinning helps visualize timing, spacing, and arcs by displaying faded copies of neighboring frames alongside the active frame. It serves as a live motion-check system during production, enabling quick detection of motion inconsistencies. The technique remains a bridge between traditional frame-by-frame animation and digital workflows, adaptable across tools from Procreate to Blender and Maya.