Knowing how to add background to Photoshop is one of those skills that's required all the time when using the software. Perhaps you need to set a product photo against a clear white background, or maybe you want to frame a screenshot against a wider image to fit into specific sizing or image ratio requirements. Whatever the reason, if you're a regular Photoshop user, you'll probably need to do this a lot. As a daily Photoshopper myself, I'd say it's probably my most-used basic skill and it's super easy to do for yourself. The issue is, however, that although Adobe Photoshop is one of the best photo editing software applications out there, even simple tasks like this one are often buried within its overwhelming mass of buttons and options. But don't worry, we're here to cut through all that and show you how it's done.
Here's how to add a background in Adobe Photoshop.
Step-by-step: adding a background
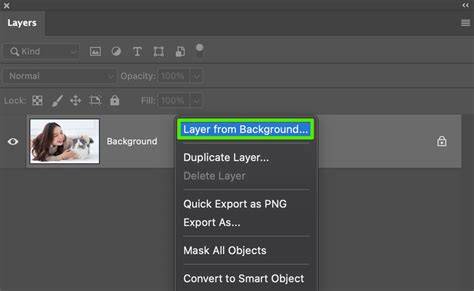
Open Photoshop and load an image. Convert the image to a layer (Layer > New Layer from Background). Resize the canvas to fit the background (Ctrl + Alt + C / Option + Cmd + C). Drag and drop an image as a background or create a new fill layer. Resize your background to fit your canvas. Move your image layer on top of your background layer.
Read on to see detailed instructions for each step.
- Open Adobe Photoshop, then click File, Open in the top toolbar and use your file explorer to select and load an image. (Image credit: Future)
- Check the layers box, which is bottom right by default. If your image loads as a layer, skip to step 3. If you see "Background" then we will need to convert the image to a layer. Click Layer in the top toolbar, select New, then click New layer from Background. (Image credit: Future)
- Rename your layer if you like, then hit OK.
- We now need to adjust the canvas size so there is room for a background. Press Ctrl + Alt + C (Windows) or Option + Cmd + C (Mac) to open the resize canvas window. Leave the Relative box unchecked if you know the size of canvas you want (i.e 4500 x 3000 pixels), and enter your canvas size in the width and height boxes. Alternatively, check Relative to expand the canvas from its current size from a set point. Then enter the desired amounts in the width and height boxes. For example: if you wanted to extend the canvas 100 pixels vertically and 50 pixels horizontally, enter 100 in Width and 50 in Height. (Image credit: Future)
- You'll now see that the canvas has expanded, with transparent space denoted by grey and white squares. (Image credit: Future)
- If you simply want a solid colour as your background, select Layer in the top tool bar, click New Fill Layer, then select Solid Color. If you want to, name your new fill layer and click OK. Then choose a color and click OK again. You can now skip to step 7. (Image credit: Future)
- If you're using an image as a background, it may not be the exact size to fit your canvas. Drag the anchor points to fit the image. So that the image's correct ratio is maintained (which stops the image being stretched), ensure the ratio lock symbol is depressed, middle left of the image toolbar. Alternatively, hold shift as you resize the image using anchor points to ensure it is resized in ratio. Once you're happy with the fitment, click the tick button on the right of the image toolbar. (Image credit: Future)
- Your background layer will be stacked above your original image. To move your image back to the top, click and hold its layer in the layer box, bottom right. Drag the image layer above the background layer. (Image credit: Future)
There you have it - you've now added a background to an image in Photoshop. From here, you can go on to add further elements to your image, or you can flatten and export it if you're done. Now that you're finding your feet with Photoshop, you might want to read our other image editing tutorials. We have other Photoshop tutorials, so take the next step by learning how to remove a background in Photoshop, how to create a GIF in Photoshop, how to add a drop shadow in Photoshop and how to add a border in Photoshop. Adobe's editing suite isn't the only way to edit images though, so broaden your horizons by checking out our guides on how to edit images on iPhone, how to blur a photo's background on iPhone and how to edit videos on iPhone.
Want to brush up on your photographic knowledge? Make a start by reading about optical zoom vs. Peter is a Senior Editor at Tom's Guide, heading up the site's Reviews team and Cameras section. As a writer, he covers topics including tech, photography, gaming, hardware, motoring and food & drink. Outside of work, he's an avid photographer, specialising in architectural and portrait photography. When he's not snapping away on his beloved Fujifilm camera, he can usually be found telling everyone about his greyhounds, riding his motorcycle, squeezing as many FPS as possible out of PC games, and perfecting his espresso shots.
Longtime Adobe Photoshop aficionados are likely familiar with selecting people or foreground objects and replacing what’s behind them, though not everyone knows all the tricks to doing it well. It’s similar to the green screening technique in video, only easier. Here, we show you the best ways to remove the background in the world’s leading photo editing software, giving you some options along the way.
The first part of the process involves selecting the part of the photo you want to keep. Adobe continues to make the tools for this selection easier, more accurate, and more powerful. For example, the Select Subject button uses AI to automatically create the selection for you, or at least to get you started. You can also now automatically select more than one subject, and the recent Remove Background Quick Action makes the whole process a piece of cake. As you'll see below, however, you'll likely want to improve the program's automatic work. To start, choose any of several selection tools, including the Quick Selection tool, and look for a button called Select Subject to appear above your image. Simply tap this button. Adobe added this one-click Subject Select option, which is powered by Adobe’s Sensei image AI technology, in 2018 (yes, Photoshop had AI back in 2018). Another way to start the process is from the new Contextual Task Bar that Adobe added in the June 2023 update, where you see buttons for Select Subject and Remove background, as shown above. If you hover the cursor over the subject, Photoshop selects the subject automatically with an outline. Note that you may need to refine the program’s initial work. If the instant selection is good enough for your purposes, you can move on to step 3.
Refining the selection and adding a background
2. Refine the Selection. The auto selection has gotten really good, but for accuracy, Photoshop has a whole Select and Mask interface where you refine the selection for a more convincing result. To make a correction, go into the Select and Mask mode. In Select and Mask, you get tools for editing the selection along the left, such as Quick Selection, Refine Edge, Object Selection, and Lasso. You also get a button for the Hand and Zoom tools, but you can use the keyboard for that. Holding down the spacebar switches the cursor to Hand mode, letting you pan around the image, and holding Alt down puts you in Zoom mode. You can also use keyboard shortcuts for the selection tools, for example, B for Brush. When you hover the cursor over any tool, these shortcuts appear in the tooltip.
This interface, too, includes a Select Subject button, and you can choose whether to use cloud or local processing. The former is more detailed, the latter is faster. You have a choice of views that show the selection, including Onion Skin, Marching Ants, and so on. Use the Brush tool to add to the selection and hold down the Alt key to switch it to Removal mode. I simply do this for all the incorrectly included areas. The Refine Hair button does a decent job, but complex hair patterns like the one in this sample photo still need further refinement. The Refine Hair button does a good job, too, but I still found non-hair items selected, as switching to On Layers view shows. Switching Refine Mode to Object Aware is another helpful trick for fixing that kind of selection error.
3. Create a Mask. If you took the easy route, using the one-click Remove Background button on the Contextual Task Bar, this step to create a Mask has already been done for you.
4. Replace the Background. If you only want the cutout of your subject, you’re done, aside from saving and exporting the image file. Go to File Explorer (or Finder on a Mac) and drag the new background image’s icon onto the masked photo in Photoshop. Then open the Layers panel and drag the new background layer below the layer with the mask. It should look like the image below. Make sure the blending mode for the masked layer is set to Normal, unless you want to play with some funky transparency and color-altering effects.
5. Export. You need to export your image to a different format. You can do this from the menu by choosing File > Export > Export As, or if you do it a lot, you’ll probably want to use the (unwieldy) key combination Alt-Shift-Ctrl-W. It somehow has made its way into muscle memory for me.
To learn all the ins and outs, as well as new features in the image editing software of record, read our full Adobe Photoshop review. The guide here shows how to craft backgrounds, combine patterns, and blend techniques to achieve professional-looking results.
Additional tips and variations
Turn any photo into an interesting background using a couple of basic selection tools in Photoshop. The single column and single row marquee tools can create a textured or abstract background when stretched with Free Transform. End results can be blended through opacity adjustments, blend modes, and masking for seamless integration with your subject. For a final polish, a subtle drop shadow or other layer styles can help the foreground pop against the new background.
tags: #add #background #to #photoshop