Adobe InDesign allows you to manipulate graphic design elements to produce documents, web pages, marketing materials and other products. You can create both long- and short-form products with InDesign. If you need to add an additional page to your InDesign project, you can easily do so. Click Layout at the top to open the menu. You'll see Pages on the Layout menu. Click Add Page to open the panel. Click File at the top to open the menu. You'll see Document Setup on the Layout menu. Click Layout at the top to open the menu. You'll see Pages on the Layout menu. Click Insert Pages to open the panel. Select a parent and enter the number of pages you want to insert. You can insert any number of pages into any location in your document.
When you create a new file and know the number of pages upfront, you can specify this during setup. If you have a multiple-page document like a catalog or brochure, use parent pages. With parent pages, you can automatically insert pages with specific layout elements. Understanding how pages function in Adobe InDesign is crucial for crafting visually stunning and organized documents, be it magazines, books, or brochures. Pages provide structure and flow to your designs.
To reorganize pages within a document, you can rearrange pages by dragging page thumbnails in the Pages panel. To rearrange pages within a spread, simply click and drag the page thumbnail to your desired position. For moving pages between spreads or reordering spreads themselves, drag the thumbnails to the desired location within the panel. You can also duplicate pages or spreads via the Pages panel menu. Click on the Pages panel menu/burger icon (located at the top-right corner of the panel). Choose "Duplicate Page" or "Duplicate Spread" from the dropdown menu, depending on your preference.
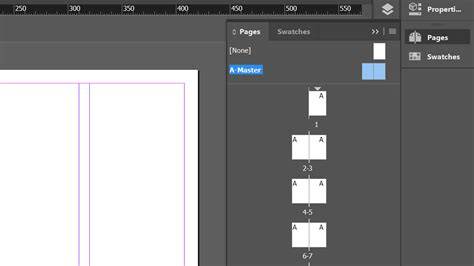
InDesign’s Master pages help keep repeated elements consistent across a document. You can edit the Master, and add elements to it that you want to appear across multiple pages, such as page numbers, running headers and borders. You can also create multiple Master pages, each with different design elements. A good example for when it would be appropriate to use multiple Master pages is when you’re designing a book that’s split into chapters. You might have one Master page for the opening page of a chapter, and another Master for the pages that sit within the chapter. The Master page above the A-Master in the Pages panel is, in fact, not really a Master. Masters are quick and simple to edit-simply double-click on one of the Master page icons in the Pages panel to bring it up on screen. You can now edit the Master as you would a normal page.
To create and apply a Master for a magazine or book, you can double-click on the A-Master icon in the Pages panel (Window > Pages). This is a two-page Master as the document has been set up with facing pages; clicking on either the left or right page of the Master will bring up the full spread on screen. Think about the elements that will remain consistent across a group of pages. For the A-Master for this magazine I’m going to add background color, page numbers and running headers. First, I take the Rectangle Tool (M) and drag onto the Master to create a rectangle that fills the entire left-hand page. By keeping the color in separate shapes on each page I can apply only the left- or right-hand page to a spread in my magazine.
I can also add page numbers to my A-Master. To do this, I zoom into the bottom left-hand corner of the left page, and use the Type Tool (T) to create a text frame. Placing my type cursor into the frame, I head up to Type > Insert Special Character > Markers > Current Page Number. Then I Copy > Paste the page number’s text frame and maneuver it over onto the right-hand page of the Master. Using the Type Tool (T) I create a long text frame at the top of the right page, adjusting this to read the issue’s date, and then format the text to adjust the size, font and color. I Copy > Paste this text frame, moving it over to the top of the left page, and adjusting the text to read the magazine’s title. By clicking on one of the page icons in the lower part of the Pages panel I am taken back to my document. I can see that the pages have all been updated with the edits I made to the A-Master.
However, you don’t have to apply a Master to all pages. You can create a new Master and apply it selectively to different pages. This opens up a New Master dialogue box. From here you can set the specs for your new Master. Master pages can be as simple or complex as you like. If you want your document to look extremely consistent, you can edit the Master to include elements that will help your whole document feel even more uniform. Master pages are a powerful way to ensure cohesive design across sections such as chapters, articles, or components like headers and footers. If you want more ready-to-use designs, you can explore book template categories and multipurpose book templates that suit authors, publishers, and designers alike. Want free InDesign templates? Of course you do!
- Insert Pages to add new pages at any location
- Duplicate Page or Duplicate Spread to copy layouts quickly
- Use Master pages to enforce consistent design elements
- Edit Master pages by double-clicking their icons in the Pages panel
How To - Parent Pages Tutorial in Adobe InDesign
Note: You can define different page sizes within a single document using the Page resize tool in the lower right corner of the Page Panel. You can edit the Master and add elements to it that you want to appear across multiple pages, such as page numbers, running headers and borders. You can also create multiple Master pages, each with different design elements. A good example for when you would use multiple Master pages is a book split into chapters, with unique Masters for chapter openings and interior pages. Masters are quick and simple to edit-double-click a Master page icon to bring it up on screen and modify as needed. This approach keeps your document visually cohesive while allowing targeted customization where necessary.