Blur is a versatile tool in Android photo editors, enabling you to soften backgrounds, emphasize subjects, or create artistic effects. This guide compiles practical insights and common workflows observed in various apps and user experiences, focusing on blurring portraits, backgrounds, and specific features across Android devices.
Understanding where blur can be applied
Blur can be used to obscure backgrounds behind a subject, to emphasize a face or a key element, or to achieve a photobooth-like effect. Some apps offer background blur before capturing a shot, while others require you to edit after taking the picture. The availability and layout of blur tools can vary by device (for example, differences between Samsung Galaxy layouts) and by the version of the editor you are using.
In portrait workflows, you may encounter a dedicated blur tool accessed via an edit pen, a smiley face icon, or a set of brushes and mosaic options. The exact iconography differs: some interfaces use a “pen” or “edit” icon, while others rely on a “smiley face” or a pattern selector to trigger blur or artistic effects. If you don’t see the icon immediately, explore the “Edit” or “Portrait” sections and try tapping around the toolbar areas, including the bottom or side panels.
Blurring portraits with face-aware tools
Many editors include face-aware blurring: you can blur the background while keeping the subject’s face in focus, or selectively blur around the subject. The key idea is to identify the subject (often a face) and apply a blur mask to the surrounding areas. This feature is frequently found under a portrait or editing mode, sometimes labeled with a face icon or a “smiley” tool. If the icon is ambiguous, switch to tools like Edit Image, Adjust, or Blur and look for face-aware options within the panel.
When using a face-aware blur, you can typically adjust strength, radius, and transition softness. Strong blur increases separation between subject and background, while a light blur can add a gentle separation without looking artificial. Some apps allow you to blur only the background, while others apply blur to the entire image with a masked foreground.
Blur workflows across common Android apps
There are multiple paths to blur on Android, including built-in photo editors, third-party apps, and web-based tools. Basic editors may offer a Blur slider under an Edit/Adjust menu. More advanced apps, such as those designed for graphic design or biometric photo preparation, provide comprehensive blur and mosaic tools, sometimes with multiple shapes and brush options for selective masking.
- Open the image in the editor and locate the blur function-look for terms like Blur, Gaussian Blur, or Mosaic; or icons such as a droplet, circle, or brush.
- Choose the area to blur: you can blur the entire image, the background, or specific parts using masking tools or selective brushes.
- Adjust the blur strength and edge softness to achieve the desired look. Use a preview to compare before and after states.
- Export or save the edited image in an appropriate format (JPEG, PNG, WEBP) and at a suitable resolution.
Tips for effective blur in portraits
To achieve a natural look, subtlety is key. Start with a light blur and increase gradually, checking how edges around the subject remain sharp while the background softens. For privacy or privacy-preserving edits, blur faces, license plates, or identifiers in non-portrait contexts. When working with mobile apps, consider the device’s processing limits and file size restrictions-some editors cap file sizes or provide optimized compression settings.
Third-party tools and alternatives
If the built-in options do not meet your needs, several third-party apps offer expanded blur features, including multiple blur shapes, mosaic pixelation, and advanced masking. Examples include PhotoRoom and similar editors that provide background blur, selective masking, and additional design tools. Some tools also offer AI-assisted blurring that intelligently identifies subjects and adjusts blur accordingly. You can also use web-based AI blur tools to quickly blur images without installing software, though this may require transferring your photo to a browser.
Blurring can be combined with other effects for creative outcomes: blur with high contrast, apply blur to create a soft background for overlay text, or combine blur with patterns for artistic backgrounds. It is also common to blur a portion of a photo to keep the main subject crisp while reducing distractions in the background.
Practical considerations and common pitfalls
Device variability matters: not all Samsung Galaxy models or Android skins show the same iconography or layout for blur tools. If you cannot locate the blur option, check for a dedicated Portrait/Photo editing section, or look for a pen/edit tool, a face icon, or a mosaic brush. Some features may be labeled differently or hidden behind nested menus. In cases where you cannot blur after capture, explore pre-shot options or camera modes that allow background defocus or portrait effects before taking the shot.
When sharing or exporting blurred images, ensure you preserve the desired level of detail and privacy. If you blur sensitive information, verify that the blur is applied to all intended areas, including edges that might reveal identifying features. If the image will be used for official biometric or passport-like purposes, confirm the alignment with the required standards and formats.
Summary of practical steps to blur on Android
Identify the blur tool in your editor, whether labeled Blur, Mosaic, or a face-aware option. Use masking or selective brush to control what is blurred. Adjust strength and feathering for natural results. Save or export the edited image in a suitable format. Consider trying a third-party tool if built-in options are insufficient, and explore both pre-shot and post-shot blur capabilities depending on your device and app.
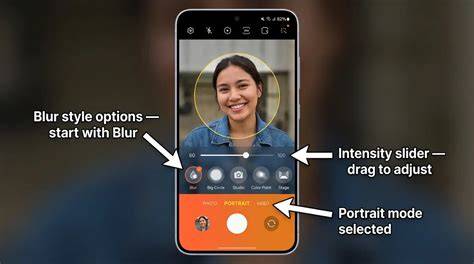
Tip: If the excerpt mentions specific icons like a smiley face, pen, or mosaic, use the corresponding tool by tapping through the editing panel to locate it.
How To Blur Video Background In CapCut - Full Guide
In practice, combining the above steps with a calm workflow yields reliable blur results across different devices and apps.