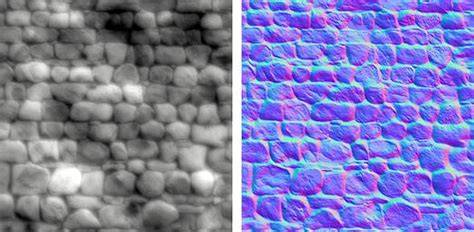
In the world of PBR texturing, many texture maps contribute to the illusion of detail without adding real geometry. This article assembles the key ideas from the provided material to explain bump maps, normal maps, specular maps, and ambient occlusion (AO) maps, how they differ, and when to use each in practice.
Foundation: What these maps do
Bump maps and normal maps are both shading tricks that affect how light interacts with a surface without changing the mesh silhouette. A bump map is a grayscale height map that simulates depth by perturbing the surface normals during shading. A normal map stores directional (RGB) information for the surface normals, offering more precise control over how light reflects off each texel. Specular maps, AO maps, and displacement maps extend these ideas, each serving a distinct purpose in material realism.
Bump map vs normal map
Bump maps and normal maps are similar in purpose, but the data they encode and the resulting lighting effects differ. Bump maps store height information directly as grayscale values, indicating relative distance from the base polygon. Normal maps store normals-the directions the surface is facing-via RGB channels. This means normal maps can encode more complex lighting changes because they specify direction, not just height.
Bump maps are easier to create and edit-often simply painting grayscale textures in 2D tools-while normal maps typically require a baking process from a high-poly model or specialized software. Normal maps, by encoding precise directional data, produce finer, more faithful surface detail under varying lighting and viewing angles, but they demand more careful creation and setup.
Specular maps
Specular maps do not simulate height or normals. Instead, they control reflectivity or shininess across a surface. A dull material (like coal) has low reflectivity, while a shiny material (like chrome) has high reflectivity. By adjusting a specular map, you can render surfaces with different lighting responses-glossiness, highlights, and reflections-without altering the geometry or the height data.
Ambient Occlusion (AO) maps
AO maps approximate how ambient light naturally penetrates and fills crevices in a model. They darken areas that are harder for ambient light to reach (crevices, cracks, folds), increasing perceived depth and realism. AO maps contribute to more convincing shading, especially in tough lighting scenarios, and they can be combined with normal or bump maps to enhance microdetail without changing geometry.
Displacement maps: an important companion
Displacement maps physically alter the mesh geometry by moving vertices according to grayscale values. Higher fidelity can be achieved because the silhouette changes with geometry, but this comes with a heavy computational cost. Displacement is usually used for major surface variation, while bump/normal maps handle finer details. In many pipelines, displacement is used in conjunction with normal or bump maps: large geometric changes with displacement, and fine microdetails with normal or bump maps.
How these maps relate and how to use them together
Bump maps, normal maps, specular maps, and AO maps each contribute to material realism in different ways. The practical approach often involves layering techniques to balance visual quality and performance:
- Use a normal map for accurate, high-frequency surface detail that reacts convincingly to lighting, especially on characters and deformable meshes.
- Layer a bump map for additional micro-details when a full normal map is not available or when you need easier authoring and faster iteration.
- Layer a specular map to control shine and reflectivity across materials, particularly for non-metallic vs metallic transitions or for materials with varied glossiness.
- Apply ambient occlusion to deepen crevices and add soft shadows in shaded regions, enhancing overall depth without geometry changes.
- Consider displacement maps when real geometry changes are essential for silhouette accuracy or for close-up detail, accepting higher render costs.
In practice, many workflows combine normal maps with a displacement map for large surface changes and fine surface detail, while bump maps offer a quick supplementary texture layer. The right combination depends on the asset, the target hardware, and the desired visual outcome.
Visual and technical overview
Normal maps come in two main variants: tangent space normal maps (commonly purple-blue) and object/world space normal maps (color variants). Tangent space maps are ideal for deforming meshes (e.g., characters), while object space maps are often faster but less flexible for tiling or deformation. Color space handling matters: normal maps must be treated as non-color data, or gamma corrections will distort the decoded normals and spoil shading. Bump maps, being grayscale, are also non-color data in many pipelines.
Displacement maps, unlike bump or normal maps, actually modify geometry and require more computation. They can be 8-, 16-, or 32-bit, with higher bit depths offering smoother results and fewer artifacts. However, real-time rendering with displacement maps demands substantial geometry generation or tessellation, which can impact performance.
Worked considerations and practical notes
When combining maps in a material, a typical approach is to use a normal map for primary surface detail and a bump map for additional micro-variation. If displacement is employed, it handles large-scale geometry changes and silhouettes, while normal or bump maps handle the finer texture details. Mobile and performance-constrained projects often favor bump maps or simplified normal maps, reserving full normal maps and displacement for higher-end hardware or hero assets.
Worked example: a brick wall material (conceptual)
For a brick wall, you might use:
- Diffuse/base color texture for the brick hue
- Tangent-space normal map to capture brick grain and edge details
- Grayscale height/bump map for mortar depth and subtle surface variation
- Specular map to control the shininess of wet-looking mortar vs. matte brick
- AO map to deepen crevices and between bricks, enhancing shadowing in crevices
The exact node connections depend on the rendering engine, but the principle remains: normal maps drive fine angular lighting, bump maps provide height-based shading, spec maps set reflectivity, and AO maps modulate ambient lighting falloff. Displacement can be layered where silhouette fidelity matters and performance permits.