In the traditional interior design industry, designers and clients often face a variety of challenges. The process is usually time-consuming and costly because manually drawing design plans and revising them requires a significant amount of time and effort. It is difficult for clients to accurately imagine the final result before the design is completed, leading to poor communication and reduced satisfaction. Therefore, this article focuses on interior design, teaching everyone to apply ComfyUI to their design work.
Prompts and LoRA: establishing flexible yet controllable styles
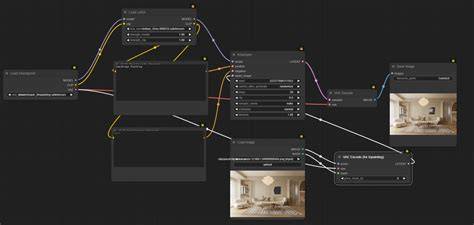
Midjourney may not be as flexible as ComfyUI in controlling interior design styles, making ComfyUI a better choice. The most direct method in ComfyUI is using prompts. Below I have set up a basic workflow. In the positive prompt, I described that I want an interior design image with a bright living room and rich details. The final rendered image met the mentioned requirements with a rational spatial layout. If you add more detailed descriptions, such as the dimensions of the room, the color of the curtains, ceiling design, lighting, etc., the generated images will be more in line with your expectations. If you want to switch styles, you can modify the content in the prompt box, for example, by adding 'Japanese style' or 'Modern Style' to change the style of the image. However, the style control of the images generated in this way is not very stable and accurate. A recommended practice is to incorporate specific style LoRA models. Here is the workflow for LoRA, which is simple to set up. Checkpoint: I first found several LoRA models related to interior design on Civitai (opens in a new tab). The page includes a brief introduction to LoRA written by its authors, usually with some usage recommendations. For instance, the author of this model mentions that the LoRA is based on SD1.5 training, and recommends base models: SD 1.5, Chilloutmix, and realistic series of large models. The style tends towards modern interiors, minimalism, grey textures, and modern series. Recommended weight: 0.6-1. Trigger word: Indoor Grey. Prompt: When using this LoRA for the first time, start with the author's example prompt to generate and see the effect. Batch_Size: In the empty latent image node, there is a batch parameter; I set it to 4, which means the model will generate 4 images in sequence.
Influenced by ancient Greek and Roman art and architecture, this style is evident across various domains such as architecture, furniture design, painting, and sculpture. Wabi-Sabi emphasizes minimalism, simplicity, and the beauty of nature. Modern design focuses on simplicity, with clean lines and geometric shapes. Unnecessary decorations are omitted to value functionality and the simplicity of form.
Inpainting and targeted edits: changing specific areas without disturbing the rest
ComfyUI supports generating different style concept images from a single base image. However, you might not be satisfied with certain parts of the image. So, how can you change just one area without affecting the rest? You can use inpainting to address this issue. Such a feature is convenient for designers to replace parts of the design in the concept image according to the client's preferences while maintaining unity. Checkpoint: First, download the inpainting model Dreamshaper 8-inpainting (opens in a new tab) and place it in the models/checkpoints folder inside ComfyUI. Prompt: Add a Load Image node to upload the picture you want to modify. Local Change: Right-click the Load Image node and select Open in MaskEditor from the menu. Once in MaskEditor, you can brush over the area you wish to change. Besides adjusting the model, you can also fine-tune the denoise setting in KSampler. From my testing, the smaller it is, the more it resembles the original image. If you want a larger scene, you can try AI outpainting by adding a Pad Image for Outpainting node.
Structure preservation with ControlNet: keeping layout while varying style
ControlNet can generate images with the same structure as the design base maps we provide. In interior home design, there are some constants, such as the position of windows, load-bearing walls, pipes, etc., that cannot be changed. The placement of sofas and tables can also be fixed, making ControlNet more convenient to use. The images generated, despite having different styles, maintain the same composition and content as the original. Double-click the panel to add the Apply ControlNet node and connect it to the Load ControlNet Model node, and select the Canny model. Then use the Load Image Model to upload the line drawing image, and finally run the workflow. The generated images preserve the design very well, with only changes in the style of the hard furnishings and furniture.
M-LSD straight line detection allows you to identify all the straight lines in the room if you want to redesign it. If I use the following image as a base, I can regenerate it with the M-LSD model. It should be noted that compared to Canny, M-LSD is very accurate in identifying straight lines in the image. You will find that all of the straight lines in the bedroom are recognized. However, curved items like spherical lamps will not be displayed in the recognized line drafts, making them the only variables in the rendered image.
Apart from the two scenarios mentioned, you might also encounter some urgent situations where you need to create draft designs for clients through quick hand-drawn sketches. But creating good hand-drawn drafts can take a long time. The method is very simple; you still need to use the ControlNet model, but now you will import your hand-drawn draft. You can choose your preferred drawing software, like Procreate on an iPad, and then import the doodled image into ComfyUI. In the positive prompt, I described a cozy interior design image with a bed, windows, and decorative paintings. During the process, I added the Load ControlNet Model node and selected the Scribbles model. I also chose a modern LoRA model. In addition to these three models, our tutorial also introduces models like Depth and Pose.
Workshop perspective: learning by applying three production-ready workflows
As we delved deeper into the application and potential of ComfyUI in the field of interior design, you may have developed a strong interest in this innovative AI tool for generating images. To learn more about ComfyUI and to experience how it revolutionizes the design process, please visit Comflowy (opens in a new tab). 🥰 Thanks for reading! Subscribe for free to receive new posts and support my work.
Texture-focused course overview Create AI-powered PBR materials in ComfyUI, designing seamless textures, height maps, roughness, normals for 3D rendering. What will you learn in this online course? 9 lessons & 7 downloads. Preparing ComfyUI - 18 minutes, 34 seconds. First Steps in ComfyUI - 6 minutes, 12 seconds. Working With Seams and Generating the Height - 13 minutes, 19 seconds. Generating Other Information Passes - 9 minutes, 57 seconds. Generating the Basecolor and Saving the Textures - 6 minutes, 25 seconds. Visualizing PBR Materials - 4 minutes, 13 seconds. View all lessons. What’s included in this course? You’ll learn to build synthetic textures that behave like full PBR materials, fix seams, and generate passes like height, roughness, normal, ambient occlusion, and basecolor. You’ll practice organizing outputs for batch export of 8-bit and 16-bit files.
Course context and tools Recommended software & tools for this course: ComfyUI. This course targets beginners and hands-on learners who want repeatable, node-based workflows that integrate into modern render engines. The content covers Foundations of ComfyUI and Workflow Design, Text to Image Generation and Prompt Engineering, and Image to Video and Reference Driven Workflows.
Practical tips for consistent interior texture generation
- Define a clear base model and VAE to stabilize initial outputs, then layer Style LoRA models to target the desired interior vibe (modern, minimalist, grey textures, etc.).
- Use explicit prompts with room dimensions, materials, lighting, and window placement to guide composition and realism.
- Leverage inpainting for targeted refinements without altering the overall layout.
- Apply ControlNet on line drawings to preserve layout while experimenting with furnishings and textures.
- Experiment with M-LSD for precise straight-line features, but be aware of curved elements that may not be captured.
- Prepare and organize assets (models, checkpoints, and prompts) in a consistent workflow directory to streamline iterations.
Visual aids and multimedia recommendations
To enhance comprehension, infographics showing a typical ComfyUI workflow, LoRA integration, and inpainting steps can be valuable. Also consider a short video demonstration of building a three-node texture generation pipeline and applying a style LoRA to a bright living room design.
Intro to AI-Powered 3D Model & Texture in ComfyUI | Model & Texture Basics (Part 1)
Intro to AI-Powered 3D Model & Texture in ComfyUI | Model & Texture Basics (Part 1)
In practice, the combination of prompts, LoRA style models, and inpainting controls provides a robust toolkit for interior designers to produce credible, client-appropriate textures and materials. The workflows described enable rapid iteration, reduce miscommunication, and help visualize complex design concepts with greater fidelity before production.
| Workflow | Key Nodes / Models | Use Case |
|---|---|---|
| Base style with LoRA | Base Model, VAE, LoRA (Indoor Grey) | Establish a modern interior aesthetic with reliable control |
| Targeted edits | Load Image, MaskEditor, Inpainting | Refine specific areas without reworking entire scene |
| Layout-preserving style transfer | ControlNet (Canny or M-LSD), Load Image | Maintain composition while exploring new textures and furnishings |
In summary, ComfyUI enables interior designers to generate high-quality texture imagery efficiently by combining structured prompts, precise style control via LoRA, and targeted edits with inpainting and ControlNet. This approach supports clearer client communication, faster revisions, and more accurate visualization of final results.
tags: #comfyui #texture #generation