I've been obsessed with photography for the past decade and in particular, I love all things fantasy, surreal, horror, or conceptual. Five years ago I was working as a model but decided I much preferred it on the other side of the camera; nobody else knew how to Photoshop my spots out, so I learned how to do it myself. It took off from there and now, I work mostly with local amateur models. I prefer working with local amateurs because I think everyone deserves to feel beautiful, whether you do it for a living or not. Here are my official 'Before & After' shots - I always find it's more fun to look at when you can see what you started with. Hope you guys like them. I'm a 30-something female creative from Wales, UK obsessed with all things creative. I used to make a living as a model and photographer, but these days, I just do it for fun because I enjoy the creative process. Doing it for a living took all of the fun right out of it for me, so I thought it was more important to take a step back from professional work. I focus on fantasy, horror, conceptual, and surreal photography because, to me, digital artistry is an opportunity to live in ways we'd never truly be able to; to experience and think about things we otherwise might not have. Half the appeal for me is that it doesn't look like reality. Life is often predictable or boring, and creating images like these allows me to explore ideas and themes that don't quite fit inside the box (until they create a device that allows me to go live inside my dreams anyway).
I'd always been interested in photography but had only ever taken pictures of animals or landscapes until I quit modeling myself. I transitioned from model to photographer because although I worked with some amazing creatives, I always found myself thinking 'That's not how I would've done it' and wondering just how they'd missed a chance to try X, Y, Z. Where I live, photographers are already a rarity but fantasy and horror photographers (the type I was desperate to work with) were few and far between, so I started to think that if I wanted certain images, maybe it'd just be easier to do them myself. It sounds stupid but I first began learning how to use Photoshop because some of my regular photographer clients didn't always know how to remove any spots (yup, I had spots but I still got booked somehow!), and I was concerned that if the images were posted of me with a zitty face, it might not look too good for my modeling work. So combine some know-how with an absolutely desperate desire to do something a bit more 'out there', and before I knew it, I was behind the camera instead of in front of it - and I wouldn't change a thing!
I don't think I could do what I do without editing. With the right enhancements, a composite image can go from a hodge-podge of craziness to a fully-fledged fantasy fable that keeps you coming back to look a second time. I usually approach my photo editing with a very specific goal in mind: does it look like it came out of a fairytale storybook? I think the editing portion of my work is where its soul lives; I love giving my images an almost otherwordly, old feel, as I want them to feel like they each have a story to tell. To me, editing is the most enjoyable (and surprisingly relaxing) aspect of the creative process; some of my edits can take anywhere up to 8 hours at a time to finish. I work primarily with amateur models and non-models - I've even asked strangers on the street to pose for me before. You don't need to be experienced to work with me, as I think everyone has a look that works for something. You're unequivocally, unapologetically you, and you're wonderful, exactly as you are, so don't let anyone tell you that you have to be a size 0 and look like Kim Kardashian to feel beautiful in front of the camera!
When I look for a model to work with, I want to find someone who is easygoing and concerned with one thing - enjoying themselves. I have a motto I live by: 'If you're not having fun, why bother?' and this is the first thing I tell people when they work with me. The best images are taken when someone isn't hyper-focused on what they look like but when they're laughing, joking, and having fun. Seeing someone's confidence skyrocket because they're enjoying themselves more than they thought they would is a wonderful feeling and even more so when they see the images afterward. If you want to look amazing on a photo shoot, the best advice I can give you is to just be yourself and be silly with it. You only live once, right? Both Purpleport.co.uk and Modelfolio.io are great places to start. It's a great, fun hobby that I highly recommend to anyone. Just remember, don't take it too seriously, and have fun with it!
Photoshop has continued to broaden the horizons for photo manipulations. It’s not just a program for touch up and tweaks. You can use it to create surreal images, manipulated and twisted into something completely new. If you’re looking for inspiration for your next photo manipulation masterpiece, you’re in the right place. The term photo manipulation can mean many things. It can be adding filters or minor effects to photographs. You can also manipulate a photo by removing unwanted elements. Or you can manipulate images until you have a unique piece of digital art. You can use Photoshop to distort, dissect, and dissolve. You have the power to change your subject from a mere human to a creature from another planet. Landscapes can be altered and new worlds created.
Photo manipulation artists can combine images and media to make composite photographs or digital collages. And you can combine photos with other media. Or the software can change your photos into other media. The only limitations are in your imagination. When you use your original photography for image manipulation, you can do as you please. But if you’re using stock photos, there can be some ethical problems. You need to make sure the work you create has changed the images enough, so your work is original. It’s bad form to pass off the work of others as your own.
Now we’ll take a look at some surreal photo manipulation ideas you can try. Double exposure is a great way to get started with Photoshop manipulations. You don’t need to be an Adobe Photoshop pro. You just need two photographs you’d like to blend. In the days before digital image manipulation software, you had to create a double exposure ‘in-camera’. You’d have to expose the same piece of film twice. This analog technique would give you multiple exposures on one segment of celluloid. Thanks to Photoshop, this process has become far easier. All you need to do is upload your images into Photoshop as separate layers. Then you place one over the other and increase the transparency. You want to see details from all the images. But the amount of transparency is up to you. Your final images should be a dream-like blend of the two images. It’ll be full of texture and ghostly shapes. Photographer Luke Gram provides the perfect example with this fabulous double exposure portrait. For more details, have a look at our double exposure Photoshop tutorial.
Making your subject disappear can seem like an odd strategy. Your subject is the focal point in your artwork. And it’s what the viewer connects with the most. But they don’t need to disappear completely. Anna Maghradze uses this photo manipulation technique in her work. Her subjects fade into their surroundings, but their shape is still visible. But they’re transparent, like a ghost in the physical world. Her photo manipulation work explores themes of loneliness and isolation. Her characters feel anonymous to the point that they’ve lost their physical appearance. They’re a spirit, floating alone midst the hustle and bustle of the modern world. Anna has a simple approach to composite image-making. She never uses more than two or three images, allowing the message to speak for itself. Anna uses two or three layer masks in Photoshop and adjusts them using the layer filters.
If you apply this simple approach to your photo manipulation, you’ll be rewarded with some excellent results. Start with two or three stock images, and make your subjects disappear. Rather than making your subject disappear, you can take the opposite route and multiply your subject. Reproducing the same character in one image gives it a surreal twist and adds energy to the photo. There are several ways you can apply this manipulation technique. There’s the collage approach, where you cut and copy different photos and bring them together in one image. Or you can take multiple shots of the same scene. In each shot, the subject can be holding a different pose. If you go for the multiple shots option, you can use a continuous shooting mode to capture the subject’s movement around the scene. It’s best to use a tripod for this technique. And you should select a setting with minimal movement in the background.
Once you have all the shots, you need to bring them together in Photoshop. Using many images from the same scene will make it easier to overlay each layer. Use the blend tools to create a seamless composite. Natalia Seth has the perfect example. Her subject holds many striking poses across the photograph, adding energy and movement. We have an entire dance chorus with only one dancer. Here is our photo manipulation tutorial on multiplicity for more info. You may not be familiar with the name Droste, but you’ve probably seen the effect before. It’s where the picture repeats within the image, often multiple times. It’s like a sound echoing down a corridor. You can use two Droste effect methods for photo manipulation, one in Photoshop and the other in Photo Spiralysis. For both techniques, you need a photo with a frame in it. It can be a picture frame, television, or computer screen. The Photoshop method is where you have a photo within a photo within a photo etc. The image can repeat an infinite amount of times. Or until it’s so small, it’s impossible to edit. The Photo Spiralysis option gives you a different kind of Droste effect. The image spirals into itself with this effect, repeating and twisting into infinity. One famous example is Pink Floyd’s Ummagumma album cover. The example here comes from Expert Photography’s Josh Dunlop. You can check out his Droste effect photo manipulation tutorial, where he shows you both methods.
Landscape photography is stunning and inspiring. But by using photo manipulation techniques, you can change a landscape into a surreal scene. Using Photoshop, you don’t need to stick to the standard rules of physics. A landscape to a photo manipulation artist is the same as an animator’s ball of clay. They can change any element and introduce foreign objects. You can change a blue sky into a space scene. Or you can add arctic animals to a desert scene. You have the power to change the landscape itself. Whole sections can be removed, and new boundaries can be drawn. Mountains are putty in your hands. Jati Putra Pratama is an expert landscape manipulator. He creates surreal landscapes by folding Earth’s surface, creating right angles and sheer cliff edges. He breaks the world apart and restructures the planet. You can create the same effect in Photoshop. Open your landscape in Photoshop and create a Duplicate Smart Object. Then use Perspective Warp tools to make the angles you want. You can see a photo manipulation tutorial here.
A large part of surrealist art is about deconstructing the world around us. We take apart our reality-sometimes piece by piece. Digital editing techniques allow artists to visualise this deconstruction in new ways. One technique for creating a surreal image is incorporating practical effects and props. You can take pictures of different surfaces or objects. You can break ice or heat water to create steam. These can be photographed and incorporated into another image using Photoshop. Erik Johansson makes perfect use of this technique in the image below. To get the broken lake effect, he used real broken mirrors. He photographed shards of glass from different angles. He even bought a real fish to include in the final image. Erik uses Photoshop to incorporate these practical effects into his digital image. It gives his final picture a tangible quality, making the surreal image believable. He has a great video on his Instagram that gives you a glimpse of his creative process. See his photo manipulation tutorial here.
Portrait photography is about understanding your subject. A portrait photographer takes an intimate look and allows the subject’s character to shine through. Distorting this standard practice with photo manipulation ideas can create surreal portrait pictures. Removing the face is a powerful technique when manipulating portrait photos. We connect to the subject through their face and eyes. If these are removed or replaced, we feel an immediate disconnect. You can use blur effects to obscure the eyes. Or you can replace them with different objects, creating a unique digital collage. You can take a playful and surreal approach, replacing facial features with random things. Or you can pack your image with meaning. Tommy Ingberg‘s ‘Wall’ is the perfect example of this image editing style. The face is torn from the head, revealing a brick wall. The figure with no face is a powerful image. And we can read meaning into the use of a wall.
Composite photography is a great way to incorporate photo manipulation with digital photography. You can bring two worlds together, creating a scene of surreal magic and wonder. You need two images to bring together as a composite image. They can be two photos you’ve taken yourself, or stock photos if you prefer. You want two that create a sense of juxtaposition. You could use a day scene with a starry sky. This is a good way of incorporating astrophotography. You can also have your subject interact with their environment. This brings the dream world to life, as they play an active part in that world. It’s an excellent storytelling device for composite photography. Platon Yurich has mastered this image manipulation technique. He has a scene from above the clouds stretching across the ground. But his subject has lifted the curtain to reveal the sky is a mirage. The skill of this overlay technique comes from how Platon has left so much detail of the curtain. The sky nearly looks real, but the ripples in the cloth give it away.
Adobe Photoshop is a great tool for making digital collages. You can create seamless composite photos. But a retro cut-out collage effect is another excellent photo manipulation idea worth trying. In Photoshop, cut out part of your scene. You can cut along the horizon or around significant objects. Then overlay this on a colored background to make it look like it’s been cut out and stuck down. Frankie Lee Matthews creates digital collages with this retro aesthetic. She makes her digital work look and feel hand-made. There’s a sense of craft, and her images pop with fun and color. In the piece below, she’s only used a few elements. Despite the simplicity, it’s a well-constructed piece of digital collage. The line of shadow behind the wave and woman is a lovely detail. It lifts the subject off the pink background, giving the picture a sense of depth.
Adobe Photoshop isn’t just the leading photo editing tool. It also has excellent digital drawing facilities. You can upload your photography and use Photoshop to add illustrated elements. The style of illustration you apply is up to you. It can be modern digital-style brushwork. Or you can go for a pop art or cartoon style of illustration. They can be seamless blends or real and drawn. Or you can try a Roger Rabbit environment, where real and cartoon co-exist. Alberto Seveso is one of the all-time greats of this photo manipulation technique. He uses illustration to deconstruct his photographs, taking them apart with color and texture. He removes layer after layer, only to add different elements of color and shape. A cinemagraph is a photograph that has one element that moves. Everything else in the image is completely still. They’re a great way to create something different with Photoshop. To make a cinemagraph, you need a camera to record short videos. You don’t need to record any sound. Once you have your video, start the editing process in Photoshop. You need to select the start and endpoints of the cinemagraph. Then in a separate layer, paint over the still parts of the image to freeze them.
Creating magic portals in your images is an excellent storytelling technique. And with a few photo manipulation techniques, you can make surreal artwork that takes the viewer on a journey. A portal can be something simple like a doorway or a window. Or they can be something more mysterious, like a magic wardrobe in The Lion, The Witch and The Wardrobe. When a character interacts with a portal, it creates a sense of narrative. A portal shows us there are different locations. They’re in one location one moment and a completely different place a moment later. Joel Robison is an excellent visual storyteller. And the example below demonstrates how portals inject movement and narrative. The magic suitcase is the portal, allowing Joel to travel between locations. The leaves escaping from the suitcase give clues about his previous location. It’s a self-portrait that combines several basic images and blending techniques. He doesn’t over-complicate his photography. He uses this one device to create energy and movement.
Cities in the clouds or under the sea have been the subject of fantasy and science fiction for years. You can make these dream worlds a reality with simple photo manipulation techniques. All you need to do is bring several stock images together in Photoshop. Find a background image. It can be a scene from above the clouds or under the ocean. Then you’ll need another image of some houses or a cityscape. It’s then a case of blending techniques to create a natural yet surreal picture. Charlie Davoli has nailed this technique in the picture below. Perspective illusions in surreal art are visual elements that physically connect in ways that don’t make sense to the human eye. At first glance, all seems well. But when you take a closer look, things don’t add up. A staircase that connects around on itself is a famous example. But Erik Johanssen has given us another unique example of a surreal perspective illusion. The ladder comes from below and goes through the ceiling above. But in this image, the floor and the ceiling are on the same level. It’s a tricky photo manipulation technique to get your head around. But with a few photos and a bit of Photoshop know-how, you can make amazing perspective illusion photos. You can create fabulous colorful portraits by adding paint effects to your pictures in Photoshop. It’s a simple photo manipulation technique that gives excellent results. You can use a silhouette of your subject then fill the shape with colorful paint. It can be a solid color, Jackson Pollock-style dashes, or watercolor blotches. The latter has been used in our example by Andreas Lie. Uploading your own paintwork is an excellent option. You can either scan or photograph your art and upload it into Photoshop. Or you can create the paint effect digitally. Photoshop has great paint tools. And there are other excellent digital paint options you can try.
Image manipulation is a fantastic way to create digital art. Photoshop gives you the power to make unique, surreal, and magical images. There are no limitations when it comes to photo manipulation ideas. I hope these ideas and examples have inspired you to start your photo...
Note: The article uses a mix of personal experience, techniques, and practical tips to explore the world of creative Photoshop manipulation.
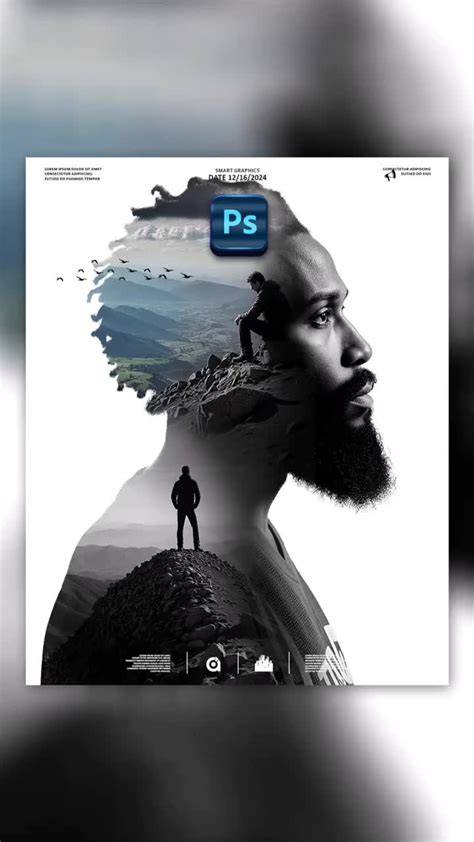
Images and tutorials cited emphasize the transformative potential of layered imagery and controlled transparency to fuse two or more photographs into a single dreamlike scene.
Make This Surrealism Poster Design With Me | Photoshop Tutorial
Video examples highlight how artists blend realism with fantasy through compositing, masking, and delicate color grading to maintain believability in the surreal.
When the name of a software becomes a verb, you know it’s redefined the way we work. Over the decades, Photoshop has become more than just a tool - it’s a rite of passage for designers, photographers, and retouchers around the world. It’s where technical skill meets creative intent. In this post, we’ve compiled a series of before-and-after images that reflect how Photoshop is used in everyday professional workflows. The edits range from subtle to more involved, but each one demonstrates a clear, purposeful improvement guided by a trained eye. Which edit stood out to you? This week’s highlights reel of images from our CLG community comes courtesy of our Discovering Photoshop Creative Workshop which recently wrapped up. Over the course of the four week tutorial, our students experimented with different types of photo edits, which resulted in some absolutely STUNNING Photoshop fixes both for portraits and landscape photography! We began the workshop by looking at workflow basics and how to use Photoshop edits to enhance and strengthen our straight out of camera images. Right from the very beginning of the workshop, our grads were OBSESSED with overlays, and it’s easy to see why! Blown the sky while exposing for your subject? No problem! Just switch out the sky! As well as being a powerful program for creative editing or portrait retouching, Photoshop is also a useful tool for tidying up clutter in an image, either by cropping it out, or by using the clone and heal tools to spirit it away. In addition to the photoshop edits for portraits discussed, one of the other techniques we covered in the workshop was how to use light overlays. This photo retouching experience was meant to enhance the gorgeous light we’ve captured in our straight-out-of-camera images, paying attention to the placement, direction and temperature of the light to ensure it looks natural. Among the most effective photoshop edits you should know about if you want to become a skilled photographer, learning how to adjust white balance can help you add a polished look to all your portraits.While generally the camera reproduces colours the same way they look in real life, white balance influences how warm or how cool the colors look in your photographs. Auto white balance can give bad color effects to your photos leading to dull skin tones or hair colour, either because it sees different colors from your subjects, or because it can’t see the color from your flash. We hope you enjoyed this collection of portraits and composites from our Discovering Photoshop edits workshop for students!
tags: #creative #photoshopped #photos