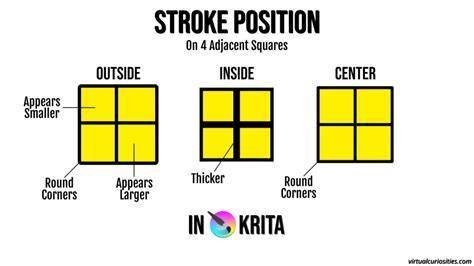
Strokes are a collection of properties you can apply to layers in design files. You can think of strokes as the visual representation of a vector network's path. Note: When you select an object, Figma applies stroke properties to the entire layer. The stroke fill is the main property you’ll use to define the stroke. You can apply more than one fill to a stroke. Use the Position menu to apply the stroke on the inside, outside, or center of the layer’s path. Most shapes are set to inside by default, except for lines which are set to center. The SVG format only supports center strokes. If you export a layer with inside or outside stroke to SVG, the stroke will be simplified. This makes an inside or outside stroke look like a center stroke. This won't affect the appearance of the exported object, but it will impact the complexity of the SVG code.
Note: For advanced stroke customization, the Variable width tool lets you adjust a stroke’s thickness at any point along the path. By default, stroke properties are applied to all sides of a layer. When you select Custom, you’ll see four individual fields in the Stroke section. Use the fields to adjust the weight for each side independently. You can add styling to the end points of any open vector paths. None: No cap or tip is added to the end of the path. Line arrow: Two 45-degree lines to either side of the end point(s). The line arrow uses the same stroke weight as the path itself. Triangle arrow: Triangle arrowhead to both end points. You can use the advanced stroke settings to further customize how a stroke looks.
Note: Figma starts and ends every dashed line with a half-length dash. You can use Outline stroke from the right-click menu to convert the stroke to a vector object. For example: We want to represent the letter f in morse code ..-. as a custom dash pattern. Brush strokes give your selection an organic, hand-painted look. Use the Brush tab in the Advanced stroke settings to browse through available brush styles, including custom brushes you’ve created. Hover your cursor over a style to preview how it will look on your selection. Dynamic strokes give your selection’s stroke a hand-drawn, bumpy look.
Define how lines join within a path or vector network. Adjust the joins in an entire path, or enter vector edit mode to select a single anchor point in the path. Use the Miter angle setting to control the angle at which two joined lines bevel. Some properties are only supported on specific layer types. If you have view permission to a file, stroke properties show up in the right sidebar as Borders. You can choose to represent the properties as CSS, or color values like Hex, RGB, HSL, or HSB. Note: Figma doesn’t include the stroke weight in a layer’s dimensions. In an auto layout frame, you can choose to include stroke in the layer’s total dimensions. When included, the layer’s dimensions in the right sidebar will include the weights of any strokes. You can only create and apply color styles to strokes. When you apply a color style to a stroke, you can still adjust the other properties. Resize the object if you want to retain a stroke's weight, while adjusting the object's dimensions. Use the scale tool to scale the stroke properties along with the object's dimensions.
Practical patterns for dashed lines
Figma starts and ends every dashed line with a half-length dash, which is important for creating consistent dash patterns. Outline stroke lets you convert a stroke to a vector object, enabling precise edits. A useful example is representing Morse code patterns as custom dashes, such as ..-. for the letter f, by combining dash and gap lengths to achieve the desired rhythm.
Tips for working with strokes
- Choose inside, outside, or center for stroke placement using the Position menu.
- Leverage the Variable width tool to vary thickness along a single path.
- Use four separate fields in Custom stroke to tailor weight on each side of a shape.
- Add end-cap styles (None, Line arrow, Triangle arrow) to open paths for distinct silhouettes.
- Switch to Brush strokes for an organic, hand-painted aesthetic.
- Preview brush styles by hovering to see how they affect your selection.
- Enable Dynamic strokes to introduce a hand-drawn, uneven feel.
- Adjust joins and Miter angles to control how corners meet within a path.
- Export SVGs with center strokes by default to avoid unintended complexity.
- Include stroke weights in auto layout dimensions if needed for responsive layouts.
Table: stroke properties overview
| Property | Effect | Notes |
|---|---|---|
| Position (Inside/Outside/Center) | Stroke alignment relative to path | Most shapes default to Inside; lines use Center |
| Stroke weight | Thickness of the stroke | Changed with scale; included in dimensions if enabled in auto layout |
| Dash pattern | Custom dash array | Starts/ends with half-length dash |
| End caps | None, Line arrow, Triangle arrow | Applies to open vector paths |
| Brush styles | Organic or custom brushes | Accessible in Brush tab |
How to make dotted line pattern in Figma | 1 Minute Figma Tutorial
In practice, you can represent various design intents by combining stroke placement, dash patterns, and end caps. If you want to maintain exact stroke weight while resizing, use the scale tool to propagate stroke properties with object dimensions. When working within an auto layout frame, weigh whether to include the stroke in the total dimensions to ensure predictable layout behavior.