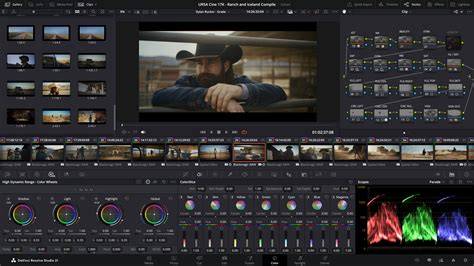
In this tutorial, we will share techniques for utilizing nodes in DaVinci Resolve. Nodes are powerful tools in DaVinci Resolve. They are not only found in DaVinci Resolve but also in top software used in the film and gaming industries. The popularity of nodes stems from their non-destructive nature. This is especially valuable in complex projects, as traditional layer-based logic, like that in Photoshop, can be challenging to meet practical requirements. It's important to note that more nodes do not necessarily equate to better results. It's crucial to approach node usage with a rational mindset and aim to achieve the best outcome with as few nodes as possible.
To begin color grading your footage in DaVinci Resolve, import your media into the timeline and switch to the Color page. Click on the Nodes button located in the top right corner, and you will see the node structure as shown in the image below. Nodes flow from left to right. The green node on the left represents the input media, which then passes through correction nodes.
Getting started with nodes
Nodes are incredibly intuitive. Whenever you use any color grading tool on the Color page, a small icon will appear on the node, indicating the adjustments you have made. However, since the previous node's adjustments feed into the new node, the initial footage of the new node is already influenced by the previous node. You can try color grading operations on two different nodes separately and then experiment by swapping the order of the two nodes.
It seems like we missed an important step: how to create a new node. Right-click on any node and select "Add Node" > "Add Serial" from the menu list. This will create a new node in the sequence, automatically connecting it to the previous and subsequent nodes. Serial nodes are fundamental and commonly used in node-based workflows.
Parallel and Layer nodes
This is where Parallel nodes come in. Parallel nodes are designed for Secondary Color Grading. No matter how you adjust the color within one node, it won't affect the other nodes within the Parallel node. In practical color grading work, you can use DaVinci Resolve's Window and Magic Mask feature to isolate specific areas for color adjustments. Creating a Parallel node is also straightforward. So, what is the difference between Layer nodes and Parallel nodes?
Layer nodes, like layers in Photoshop, have a hierarchical relationship. But what can you do with this? It's important to note that the layer logic in DaVinci Resolve is opposite to Photoshop. When you create a mask, you have the option to create an Outside Node in DaVinci Resolve. As shown in the image below, if we isolate the face of a person using a mask, the automatically generated inverted mask in the Outside Node will select everything except the face. In addition, Outside Nodes can also be used in conjunction with "Alpha Output" to remove green screen backgrounds. By creating an Outside Node to preserve the subject, you can right-click on the Nodes panel and select "Add Alpha Output". To remove the green screen background from a clip, simply connect the blue output point of the Outside Node to the blue input point of the Alpha Output.
In reality, the nodes in DaVinci Resolve are not overly complicated. However, this is not something that can be easily achieved through theory alone. It requires practice and critical thinking. This innovative tool enhances your editing experience by providing intuitive control over various parameters, making your workflow even more efficient and enjoyable.
Practical workflow tips
If you enjoy editing videos and creating content on your iPad, check out our new TourBox Elite Plus. You can use it on both PC and iPad to speed up your workflow and make your creative process smoother. And that concludes our tutorial on DaVinci Resolve nodes.
Intro to node editor concepts
The node editor within DaVinci Resolve is an incredibly powerful tool once you understand how to use it correctly. Having worked with Adobe software for years, when I started to use Resolve for colour work, nodes were slightly alien to me at first. I was used to a layer-based workflow and so it took a little bit of time to get my head around just how useful working with nodes can be. Unlike layers, nodes are read from left to right. Nodes start at the green RGB input single that can be modified with a variety of different corrector nodes along the way until the signal reaches the output node. The green triangle and square are the RGB input and output. Corrector nodes can only take one RGB input but they can have multiple outputs. The Blue Triangle and square are the key input and outputs. These can be used to transfer data from power windows or mattes to other nodes. The keyboard shortcut E can be used to extract a node from the pipeline. You can also use the command or Ctrl key to swap the order of the nodes while maintaining the link. The nodes will take the RGB signal from the input and send the modified signal to the next one along the node pipeline. Each node is affected by what comes before it. These changes are not completely destructive, however, as you can still access the RGB signal data in preceding Nodes.
Types of Node
Serial node: A serial node is the most basic form of node and you can apply a variety of corrections to them. They have only one input and output and work as your basic building blocks for correcting footage and creating looks. The shortcut for these is Alt S or Option S.
Mixer Nodes: There are a couple of different mixer nodes. Mixer nodes allow you to combine the RGB signal into one output. Parallel nodes combine the signal at the same time. These are good to use if you are working with skin tones. The shortcut is Alt P or Option P. When you first add a parallel node, it will add a new node below the current one. It will also add the parallel mixer node itself. You also have the option to transform a parallel mixer into a layer mixer node and vice-versa if needed. The shortcut is Alt L or Option L to create a Layer mixer Node.
A Layer mixer node works similarly to a parallel mixer, however, a layer mixer works more like the layer system within Photoshop for example. The main difference here though is that the bottom node is the top layer and the top node is the lowest layer, does that make sense? The main thing to get your head around is that the physical location of the nodes can be changed and doesn't make a difference, it's only when you adjust the order of the RGB signal does it have an effect. Layer Nodes are particularly useful when working with keys. Layer mixer nodes also allow you to adjust the blending mode.
Outside Node: An Outside node is useful when you want to invert a selection to another separate node. As an example, if you were working with a mask, you could use an outsider node to just affect outside of the mask.
Key Mixer Node: A key mixer works in a similar way to a parallel mixer, however, it only works with key channels and is used to combine multiple keys into one single key.
Splitter Combiner Nodes: A splitter node will separate a signal into three separate channels and a combiner node will then as the name suggests combine those signals back together. This is useful when you want to work on an individual channel such as red or work in a different colour space on a particular channel. Nodes can be bypassed so you can see what effect they are having by using Ctrl D to bypass just your selection or Alt D to hide them all.
Node order and advanced features
Node Order: When it comes to what order to work with Nodes, that comes down to personal preference and what your actually working on. Some scenes may need a lot of work while others may be simple.
Compound Nodes: If you are working on a complex look, you may find it useful to use compound nodes. Compound nodes work similarly to Nests in Premiere, where you can group a selection of nodes together into one. This can be done by selecting the nodes you want and right-clicking and selecting compound node. If you need to, you can decompose a compound node, however, if you just want to see the nodes within, you can right-click and select see inside.
Summary
The best way to learn how to use the different Nodes and DaVinci Resolve, in general, is just to experiment and play around.