We use GIMP’s crop tool to trim certain parts of the image. You don’t need to be an expert to use this tool. Need a more professional edit? Struggling with the crop tool? To crop the background of your image, you can use the Fuzzy Selection tool or the Paths one.
The Fuzzy Selection tool allows you to select areas of your image with similar colors. Then, click on the Fuzzy Select menu. Next, use the magic wand to select the parts you want to remove from the background. We mainly use the paths tool to create complex selections. It might require a little bit of patience, though.
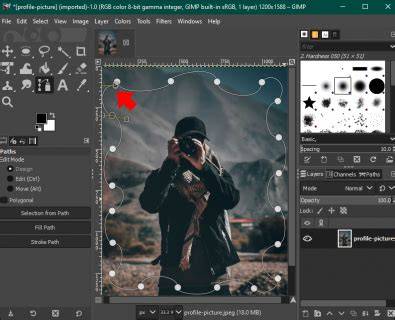
Start creating paths by left-clicking around your main object. After that, you need to close the path by hovering over the first node. Does this process sound like a hassle for you? This smart tool searches through your active layer for the largest border area with the same color. You can find this tool in the “Image” menu. Then, you can click and drag to outline your main object. You must close the shape by returning to the start point to complete your selection. After many trials, we’ve found that the “Paths” tool works best for shapes with lots of straight lines. Cropping sounds easy now, right?
Choosing the Right Tool for Crop to Selection
For quick isolations, the Fuzzy Selection tool can rapidly grab contiguous color regions. It’s ideal when your subject contrasts well with the background, or when you want a rough cut before refinement. Use the Fuzzy Select menu to refine the selection with tolerance adjustments, then apply crop to the selected area.
For precision and complex shapes, the Paths tool shines. Start by tracing around the object with anchor points, then close the path to convert the outline into a selection. This method is especially effective for subjects with straight edges or well-defined contours, and it pairs well with feathering and additional mask refinements.
Step-by-Step: Crop with Fuzzy Selection
- Open your image in GIMP and choose the Fuzzy Selection tool from the toolbox.
- Click on the area you want to keep or remove; adjust the threshold to broaden or shrink the selection.
- Use the Fuzzy Select menu to refine the selection edges if needed.
- Once satisfied, crop to the selection by choosing Image > Crop to Selection.

Step-by-Step: Crop with Paths
- Select the Paths tool and click to create nodes around your main object, then click the first node to close the path.
- Convert the path to a selection by right-clicking the path in the Paths dialog and choosing Market/From Path (depending on your version).
- Refine the selection as needed, then crop to selection from the Image menu.
Common Pitfalls and Tips
- Paths often require patience; take breaks and zoom in for precision around curves.
- After creating a path, consider feathering to soften edges for a natural blend when compositing.
- Save frequent steps as presets or duplicate layers to compare crop results quickly.
- If the selection accidentally removes part of the subject, use a soft erase brush on the mask or reselect to adjust.
Advanced Techniques for Professional Edits
For difficult backgrounds, combine tools: start with Fuzzy Selection to grab large areas, then switch to Paths for fine-tuned boundaries. The Paths tool can be particularly effective on subjects with straight lines or distinct edges, making complex selections more reliable than color-based tools alone.
After cropping to a selection, you can add a layer mask for non-destructive editing, enabling further refinements without altering the original image. Consider adjusting contrast and color balance on the cropped region to ensure cohesion with the background or composited layers.
Crop Images in GIMP Like a Pro - Step-by-Step Tutorial
Practical Workflow Summary
Start with the tool that matches your subject’s edges: Fuzzy Selection for color-based regions, Paths for precise contours. Create a selection, crop to it, and then refine with masks, feathering, and color corrections as needed. With practice, cropping becomes a smooth, repeatable part of your editing workflow.