InDesign is a unique program that focuses on laying out files for printing-making it perfectly suited for book design. This ultimate guide covers the basic ins and outs of using Adobe InDesign to create a PDF interior for your book, including how to insert pictures, manage guides, master pages, and prepare documents for print and digital publication.
The Learning Curve and Workspace
If you’re familiar with Word as your primary writing and layout tool, InDesign brings with it a few differences you must acclimate to. In particular, you’ll notice differences in the way the toolbar is set up and organized. Once you get past importing your manuscript and getting a working file in place, using InDesign to finesse the layout of your book is an absolute pleasure. If you’ve struggled with section breaks, text justification, page sizing, text styling, or page numbering using Word, you’ll find InDesign to be easy, intuitive, and all-around much better to work in.
On the very first screen, we’ve got two main ways to start a document: Recent and Saved. These are self-explanatory and much like Word’s Page Setup options. I advise you to save common sizes to keep your interior files consistent and make it easier when you prepare your next book. There are a few options that we need to look at in that right sidebar: Page Size, Pages, Facing Pages, Columns, Bleed & Slug. For a book, the bleed is the key thing to include here at 0.125” on all sides. It is advisable to build your book for bleeds, even if you aren’t using them to fill a page with image content - it just ensures your file will accurately represent what your final printed book will look like.
Inserting Images and Linking Files
Inserting a picture is done with the file -> place command. It references the file path of that object and will update when changes are made to that particular object in other Adobe programs. When preparing your document, use the Place command to import graphics and images into the layout, which also offers a variety of import options. Text frames can be linked together, allowing text to flow smoothly from one frame to another, which is particularly useful for designs with multiple columns or documents with several pages.
Guides: Alignment and Reference
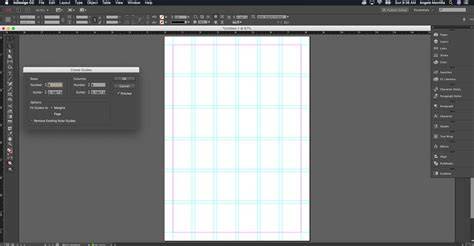
Enabling guides is straightforward: right-click on the page to bring up a menu and select Guides to pull up a selection of guides to use. Most appear in light blue (by default) on your document and do not print out but are used for reference only. They can be helpful for aligning objects and looking at the spaces around objects. This is your essential toolkit for aligning typography and imagery with consistent gutters and margins.
Master Pages and Page Layout
Master Pages define elements that stay consistent across multiple pages, such as headers, footers, and text boxes. Each page in your document can have a Master Page that sets the layout for all actual pages. You can create multiple Master Pages to suit different sections (front matter, chapters, back matter) and apply them accordingly. You can override Master Page items to edit text on individual pages while preserving the overall template structure.
Understanding the Page: The Page Layout panel displays pages in spreads. Master Page usage is indicated on pages, and you can bind text boxes across left and right pages to flow together. The placement of page numbers and header text can be controlled to stay away from the spine, ensuring a consistent look throughout your book.
Page Numbers and Paragraph Styles
To add sequential page numbering, insert a Current Page Number marker into a text box. This automatically updates as pages are added or removed. Paragraph Styles are crucial for consistent and efficient formatting. You can edit or create new styles, and apply them to text to maintain uniform look throughout the document. Right-click a style in the panel to redefine or update it, propagating changes across the document.
Front Matter, Back Matter, and Content Flow
Front Matter and Back Matter Master Pages enable you to organize the opening and closing sections of your book. You can insert pages before the main content or after it, and apply dedicated Master Pages to these sections. For example, you might include a Front Matter Master Page - header and footer spaces but no page numbering - and a Back Matter Master Page to hold concluding notes. When you paste content from Word, InDesign will add pages and flow text through linked text frames until all content fits the layout.
When adding images and layouts, keep consistent margins and bleeds. The angled line between pages indicates that a text box on the left is bound to the corresponding box on the right, enabling synchronized flow across spreads. You can paste entire chapters or stories into the Adventure Masters and adjust as needed, with InDesign automatically expanding pages as text flows.
Tables, Lists, and Text Formatting
Beyond basic text, you can create and style tables with InDesign’s table tools, manage text wraps around images, and apply Drop Caps and Nested Styles for advanced typography. Paragraph Styles are the core tool to achieve consistent paragraphs, and Table Styles extend these concepts to tabular content. Master Pages and Page Numbers work in concert with these features to maintain a cohesive, print-ready layout across hundreds of pages.
Exporting and Publishing Formats
When preparing a document for print, export it to PDF format with appropriate crop marks and bleed settings to maintain the integrity of the design during printing. Customised PDF presets help tailor the PDF output to specific needs. For a digital reading experience, InDesign supports exporting documents to the EPUB3 format, featuring improved HTML5, CSS3 compatibility, and global language support. InDesign also allows the creation of interactive PDFs for a more engaging experience.
Creative Cloud Libraries and Adobe Stock provide centralized access to assets across applications. You can place Adobe Stock graphics into your layout and manage assets through CC Libraries, enabling collaboration and consistent design across projects. Fonts from Adobe Fonts are accessible in InDesign via Creative Cloud integration, simplifying typographic consistency across your book.
Practical Tips and Quick Facts
Keyboard shortcuts can significantly speed up your workflow. For precise movement, hold Shift while dragging with the Selection tool to move objects in 45° increments. If you’re new to InDesign, you can learn the basics in a relatively short time, but mastery may take weeks to months depending on your goals and depth of use. InDesign is a premium software requiring a valid license, and there are options for a 7-day trial to explore features before committing.
To start a layout in InDesign, choose the page size and orientation, set the number of pages and whether you want facing spreads, and then design by adding text and image placeholders. For a grid-based layout, you can create a layout grid in the New Document dialog box and adjust settings as needed. Master Pages, Paragraph Styles, and Page Numbers all play pivotal roles in creating professional, print-ready books.
InDesign’s strengths lie in its detailed control over typography, image placement, and multi-page document management. While there are alternatives, InDesign remains the leading tool for desk-top publishing, especially for complex, multi-page books that require precise layout and print-ready output.