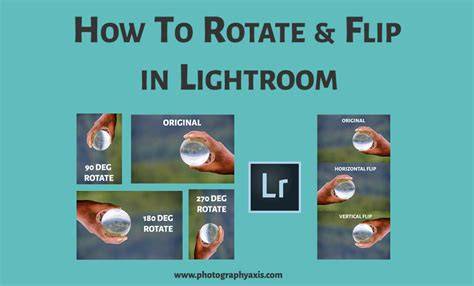
Lightroom is an extremely powerful program that is an amazing resource for organizing, editing, and straightening your files. The most beautiful thing about it is that it’s a non-destructive editor, meaning that the program does not change the data in the original files the way that photoshop can. Click on the image that needs a rotation, and simply press Ctrl + [ (Cmd + [ on Mac) to rotate left, or Ctrl + } to rotate to the right. Alternatively, you could right click on the image, scroll to transform, click rotate clockwise or counterclockwise. If you’re in Library mode, you can also select multiple images and rotate them in a batch.
There are plenty of reasons to flip an image. Probably the most common reason that I flip a photograph is when I’m using the golden ratio (a.k.a Phi Ratio) for composition. But nature doesn’t always play nicely with the golden ratio, so sometimes you have to improvise. Flipping an image is a painless process in lightroom Classic. Instead, you’ll have to right-click the image you want to flip, scroll down to transform. That’s it. If you want to see what it looks like before the flip, you can always create a virtual copy to see the before and after. And if you want to take a look at the golden ratio, Lightroom has a handy guide built into the crop tool.
Press R, or click on the Crop Overlay tool just below the histogram in the Edit Panel. Then by pressing ‘O’ you can choose from a wide variety of different guides, starting with the rule of thirds. What methods are the best for straightening photos like this? Cityscape and architecture photography can be extremely challenging, since you have to correct for the horizon angle, and building perspective. Straightening is where the fun begins. Lightroom has some extremely powerful tools. Over the years they’ve gotten so good that users rarely need to bring photos to photoshop for straightening. One of the biggest issues I have when I handhold my camera during a shot is that they all come back with a maddening curve to the left. This type of straightening is luckily very easy to fix, but it does mean that I often lose a little bit of the frame to a crop.
In the editing panel in Lightroom, scroll down to the Transform section. At the top of the transform, there are 5 different straightening modes. These are a one-button-fits-all kind of straightening. Both do a good job most of the time, but it doesn’t always get things perfect in complex photographs, like architecture. Auto Level takes a balanced approach, and Full level doesn’t. This means Full Level will attempt to correct more perspective and distortion issues than Auto straightening. Both can struggle with wide-angle zoom lenses or cheaper third-party primes like Tokina or Rokinon. These lenses can be great, but they will exhibit more distortion than the pro versions by Canon, Nikon, Sony, and even Sigma or Tamron. The distortion can cause Auto to choose the wrong lines, or attempt to over-correct in strange ways. That said, Full Level can completely fix some images that Auto straightening can’t. This auto-straightening method is the simplest. It only rotates the image, and will not attempt to correct distortion. This is perfect for the vast majority of landscape photographs. To do that, simply select the entire set by pressing Ctrl+A (Command+A on Mac), turn on Auto Sync, and then press the Auto Level button under Transform.
By default, Auto-Sync is turned off, because it will sync all of your corrections (even local adjustments) to any number of photos you have selected. This can cause issues down the road if you have to undo everything on an entire image just because you left auto-sync on. I’ve run into this issue multiple times myself, and it can sometimes mean losing an hour or more of work. Alternatively, you can make Auto-Level a preset. To do this, press Auto Level on one of your images. Then, while having that image selected, mouse over to the little plus sign on the left side of the screen where it says ‘Presets.’ Click the plus, and uncheck all of the options by clicking Check None at the bottom. Having a straight horizon on a landscape image is an absolute must. I always have a slight angle when hand-holding a camera, and even sometimes when it’s on a tripod. So using Lightroom features like Auto-Level have become a part of my editing process.
Vertical Level contains all of the same changes as the Auto Level tool, but it will also attempt to fix vertical perspective. This mode is intended for architecture photographers who have many vertical lines. If the camera is near the ground looking up, the vertical lines will converge into the centre of the frame. This is the most powerful of the leveling options, and it’s the only one that isn’t automatic. To start, you can either press the Guided Transformation button, the set of lines on the left corner that look like a tic tac toe board, or press Shift+T. Then, you can draw 2 to 4 (2 vertical, 2 horizontal) lines across the image. These will be the guides that Lightroom straightens the image based on. When using guided transformation, always select the most dominant lines in an image. And whenever possible, it’s best to use long lines towards the outside of the frame.
By default, Lightroom will show the Loupe, which magnifies the section of the image where your mouse is. This can be extremely helpful, but can also slow down Lightroom considerably on computers with smaller amounts of Ram, or when doing other heavy workloads.
These articles are designed to give everyone a leg up on their photographic journey. If you want to learn how to take your own stunning photos with the camera you already own (in just four easy steps) without all the boring techno-babble. Lightroom Classic is a powerful software for managing and editing photos. In this tutorial, we will share several ways to rotate a photo in Lightroom Classic, so you can quickly learn the techniques for rotating photos. For example, we may want a vertical photo but end up with a horizontal one, or vice versa.
1. Press "Ctrl (Command) + [" to rotate the photo counterclockwise or "Ctrl (Command) + ]" to rotate it clockwise. 2. Click on the "Photo" menu, then select the "Rotate Left" or "Rotate Right" command. 3. In the Library module, if the toolbar is visible (you can activate it by pressing the T key if it's not), you'll see two rotation icons above the thumbnail at the bottom. 4. These icons represent rotating the photo left or right, respectively. 5. 6. Have you heard of TourBox? TourBox is a creative tool designed for creators, content creators, and photographers. With just a gentle turn of the Dial, you can easily rotate your photos.
Sometimes, the photos we capture may appear a bit skewed, with the horizon or vertical lines not aligned properly, affecting the overall beauty and balance of the photo. In the Crop Overlay panel, you'll see an Angle slider. You can drag it to rotate the photo or enter the desired rotation angle in the adjacent input box. If you want Lightroom Classic to automatically rotate the photo, you can click on the "Auto" button in the Crop Overlay panel. While rotating the photo, you can press the "O" key to toggle between different crop overlay grids, such as the rule of thirds, golden ratio, diagonals, etc. Certainly, you can accomplish all of the mentioned operations by controlling TourBox with just one hand.
Sometimes, we may want to flip (mirror) a photo to change its visual orientation or create some interesting effects. Using the top menu bar: Click on the "Photo" menu, then select the "Flip Horizontal" or "Flip Vertical" command. Similarly, all of these methods can be used to flip multiple photos simultaneously by selecting the photos you want to flip before applying the flip. And that concludes our tutorial on how to rotate a photo in Lightroom Classic. While rotating a photo, pay attention to the composition and visual impact to ensure a balanced and visually pleasing result.
You can use the Crop Overlay grids in Lightroom Classic. When rotating a photo, consider the orientation and orientation that best aligns with your intended purpose and output format. To flip images taken upside down do this: In Lightroom: In grid view, select the group of photos using shift+right-click, then press and hold Control/command and Photo / flip vertical. Wallla.... perfect. I took images of sisters laying on a bed with their new baby sister, but I didn't have enough room to stand or use a ladder, so I just took them upside down. I am glad I found the answer before my reply. Thanks. Dah, ... I just noticed that Its all gooid in grid view. No need to even hold Control/command. he-he! Ha-ha! lol! Hopefully I didnt confuse anyone. Thanks for understanding my mistake with the latest version of Lightroom. So I am an old fogey. Blessings to you. Nevermind I found the solution. Ever opened a photo in Lightroom only to find it sideways or upside down? It can be frustrating when your shot looks perfect except for the wrong orientation. This guide shows how to flip and rotate any photo in Lightroom quickly and easily. Step by step, you will learn the right tools, shortcuts, and techniques to adjust your images without damaging quality. Flipping and rotating a photo in Lightroom takes just a few clicks. You can adjust the orientation to match your vision. This can help fix tilted shots or create a new look.
Start by selecting your photo in the Library or Develop module. Then find the rotate and flip tools in the toolbar. Click to turn the photo left, right, or upside down. For horizontal or vertical flips, the options are right there too. Sometimes a photo does not match the way you want it to appear. A horizon line may lean, or the subject may face the wrong direction. Flipping or rotating can correct this. Lightroom provides several tools to adjust your photo’s angle and direction. You can rotate, flip, or use transform options. Each tool serves a slightly different purpose. The rotate tool lets you turn a photo by 90 degrees to the left or right, or by 180 degrees. This is useful if your camera was tilted or if you want a new perspective. Rotating does not change the photo’s size or crop. Flipping a photo flips it along a vertical or horizontal axis. Horizontal flips reverse the left and right sides. Vertical flips reverse the top and bottom. Transform vs. Rotate vs. Lightroom also has transform tools. These let you adjust perspective and straighten lines. Rotate changes the angle, crop trims edges, and transform reshapes the image without cutting parts off. Rotating a photo can help fix the angle or improve its composition. Lightroom offers several ways to rotate images quickly and easily. Lightroom’s toolbar has buttons that let you rotate your photo left or right. Click the left button to turn the image counterclockwise. Click the right button to turn it clockwise. Each click rotates the photo 90 degrees. Another option is to use the Photo menu at the top of Lightroom. Open the menu and select “Rotate Left” or “Rotate Right.” The result is the same as the toolbar buttons. The Crop Overlay tool also allows rotation. Open the tool and hover near the edges of the crop box. A curved rotation handle appears. Click and drag to rotate the photo freely. Flipping a photo in Lightroom can change its perspective. You can flip it sideways or upside down to get the look you want. Flipping horizontally turns the image left to right. To do this, open the photo and go to the Photo menu. Choose Flip Horizontal. Your image will mirror across its vertical axis. Flipping vertically turns the image upside down. Open the Photo menu and select Flip Vertical. The top becomes the bottom, and the bottom becomes the top. Flipping an image can also flip text or watermarks, making them hard to read. Check the flipped areas carefully. You might need to reapply text or move watermarks so they appear correctly.
Lightroom has keyboard shortcuts that save time. You can rotate photos left, right, or 180 degrees with a single key. Flipping a photo horizontally or vertically also works with shortcuts. Using these keys is faster than clicking through menus. Lightroom lets you edit several photos at the same time. In the Library view, select all the photos you want to rotate. Use the rotate left or rotate right option. Every selected photo will rotate together. You can copy the orientation from one photo and apply it to others. Select the photo with the correct rotation. Then choose the sync settings option. Pick an orientation and apply it to the rest.
Lightroom has auto-straighten features. These tools detect the horizon or main lines in a photo. They rotate the image to make it level. Image Distortion After Rotation: Sometimes, rotating an image can make it look stretched or squished. This usually happens if the aspect ratio changes during the edit. To fix this, check the crop settings and make sure the width and height stay proportional. Cropping Issues After Flipping: Flipping a photo can hide or cut off parts of your subject. This is common when the flip moves the main object to a different area of the frame. You can fix this by adjusting the crop or repositioning the subject inside Lightroom’s Transform panel. Lightroom won’t rotate RAW Files: Some RAW files may not rotate as expected. This can happen because of how the camera saves the file or a software glitch. Try closing and reopening Lightroom or resetting the image’s orientation in the Develop module. Keep Horizons Level: A crooked horizon can make a photo feel off. Always check the line where the sky meets the ground. Use Lightroom’s grid or leveling tools to make adjustments. Avoid Overusing Flip Effects: Flipping an image can change perspective, but too much flipping can look unnatural. Only flip when it improves the composition. Combine Rotation with Cropping: Rotation can create better angles, but it may leave empty spaces at the edges. Cropping after rotating cleans up the frame.
Batch editing and syncing orientation can save time when working with multiple photos. With these techniques, your photos will always appear correctly, balanced, and ready to share. Can I rotate multiple photos at once in Lightroom? Yes. In Library view, select all photos and use the rotate left or right option. What is the difference between flip and rotate? Rotate turns the photo by 90 or 180 degrees. Flip mirrors the image horizontally or vertically. Will flipping a photo affect text or watermarks? Yes. Flipping can reverse text or watermarks. Why does my RAW photo not rotate properly? Some RAW files may not rotate due to how the camera saves them or software glitches. Can I rotate a photo freely instead of just 90 degrees? Yes. How do I keep my horizon level after rotating? Use Lightroom’s grid or leveling tools. Are there keyboard shortcuts to rotate or flip photos? Yes. Lightroom offers shortcuts for left, right, 180-degree rotation, and horizontal or vertical flips. Part of the reason is the way image pixels are stored in the file. You can't rotate images in LR other than ±90˚. That is 45˚ is not possible in LR. The new Guided Transformation tool in Lightroom CC2015.8 can probably do it. It can make much stronger corrections than the other methods. It can be used for perspective correction when necessary. Think about it: if you are shooting with a super wide angle, you may have to tilt the camera upwards as much as 45 degrees to keep the top of buildings in your image. The range of adjustment LR offers isn’t enough to correct fully for such a setup. Take a minute to think about your current editing workflow. Chances are, you have needed to know how to rotate photo in Lightroom more than a few times. The following tips will not only help you produce better-quality images but can also help reduce the time you spend in your post-wedding workflow. Just like the reasons to crop a photo in Lightroom differs, various circumstances can create the need or desire to rotate a photo. These can range from camera settings and effects that may distort the image to the physical factors of the surroundings that prevent you from getting the straight-on photo that you wanted. Elements in the photo appear slightly tilted. Whether your subjects are standing on a sloping hill or the camera is unintentionally tilted at the wrong moment, photos can end up slightly off center. This can often happen when shooting at the beach, and your horizon line is very evident. You want the final photo to be a mirror image of the original. In some cases, you may want to flip an image entirely, so that the left and right sides are switched. The approach you choose when deciding how to rotate image in Lightroom will depend on how dramatically you want to turn your original image.
1. One of the first ways you can adjust your image is to rotate it by 90 degrees. Click the Develop tab (next to the Library tab). Move your mouse to the top menu bar and click on Photo. The first is to Rotate Left (CCW) and the second is to Rotate Right (CW). A. Lightroom offers several options for rotating photos. Here are a few alternative options for rotating photos in Lightroom. C. You can also rotate a photo by 90 degrees in the Library module, though you will have less control over the degree increments than you would in the Develop module. 2. If you decide to rotate a photo (or photos) by less than 90 degrees, there is an option to do so in the Develop Module. To achieve this goal, you can use the Crop and Straighten tool in Lightroom. A. The next option is to flip the photo to its mirror image. Click the Develop tab (next to the Library tab). Move your mouse to the top menu bar and click on Photo. Select Flip Horizontal from the dropdown menu. This also applies when you want to flip the image vertically. 3. For most of your needs, the above rotations will be far too coarse. Within the Develop module of Lightroom, you will use crop and rotation in conjunction to compose a perfectly straight image. A. A relatively new feature of Lightroom is the auto straighten function, which is located under the Crop tool option. With the auto straighten function, Lightroom will identify the horizontal line and adjust accordingly. B. Similar to the auto straighten function, Lightroom has a precise straighten option under the Crop and Straighten section. This option works well for the scenario described above (the goal to straighten a horizon). Click on the Crop and Straighten section. There will be a line for you to align with horizon. For any additional adjustments, use the slider located in the right side panel. For this part, you will need to adjust according to your end vision for the image. C. You can rotate photo in Lightroom using the Angle slider or the Rotate icon from the corners of the crop box. To reset the slider back to zero, you can move the slider back to the middle. 4. Another option you have to rotate the photo is to manually input the degree to which you would like the photo rotate. In Lightroom, use positive numbers to rotate the photo clockwise. To rotate the photo counterclockwise, use negative numbers. As you work on perfecting the rotation of your photo in Lightroom, you can always reverse the edits by clicking on the Reset option in the Crop Overlay tool window. You can find the Crop Overlay tool window in the Develop module (a keyboard shortcut is to press D on your keyboard to get to the Develop module. Once you are satisfied with the positioning and straightening of your image, click on the Crop Overlay tool to apply your changes. Whether you are correcting an issue with the original photo or using an angle to add visual interest to a special image, you will need to know how to rotate photo in Lightroom the correct way. And like all processes, this will take time for you to master. The above guide is just the start of becoming an expert with straightening and rotation tools this powerful program offers.
With these techniques, your photos will always appear correctly, balanced, and ready to share.