When you’re working in Photoshop, adding in a photo as a layer allows you to manipulate the photo and gives you control over the layer as part of the greater composition. Learning how to add pictures as layers is a great starting point in photo editing - and a fundamental Photoshop skill. The Layers panel is one of the main sites of control for your workspace, whether you’re making more layers, modifying your background layer, adding new elements, or adjusting layers you already have.
Understanding Core Concepts: Smart Objects, Rasterization, and Layer Masks
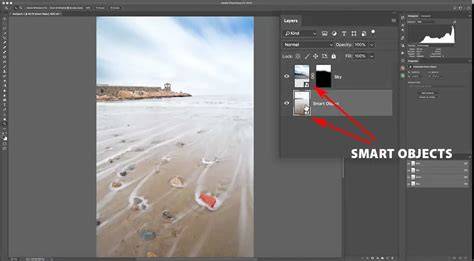
Smart Objects allow you to make transformations and changes without losing resolution or causing permanent changes. Photoshop will automatically convert to Smart Objects when you place embedded objects. Apply filters nondestructively. You’re not able to change or alter pixel data of Smart Objects. This means to use features like blend modes you have to rasterize it, which means converting it from vector graphics to pixel graphics. To do so, select Rasterize Layer. Layer masks help you return to any point in the process and fix mistakes or undo work. They work by hiding pixels in your image rather than deleting them altogether. With a layer mask, you’re working in white, black, and gray. When using the Brush tool to paint white on a mask, you reveal that layer - black hides it.
Whether you’re on a Mac or Windows device, you can learn many more foundational Photoshop skills. Photoshop actions are a powerful tool for photographers and graphic designers, streamlining the process of photo editing and allowing for rapid, consistent results. They are especially useful for repetitive tasks, saving valuable time and energy. This guide will delve into how to install and use Adobe Photoshop actions effectively. Get ready to transform your workflow with this simple yet transformative feature!
Photoshop Actions: Automating Repetitive Tasks
Understanding Photoshop Actions: Photoshop actions are essentially a sequence of tasks that you record and can apply to a design, photo, or a series of photos. They can automate almost any process in Adobe Photoshop, making them incredibly useful for repetitive tasks such as resizing images, applying filters, or adjusting colors. The beauty of Photoshop actions lies in their ability to maintain consistency across your work, ensuring each image receives the same level of treatment and quality. (I’ve been using Photoshop actions to add consistent texture and coloring to my promo images lately and LOVE it)
Finding and Downloading Photoshop Actions: You can find Photoshop actions in various places, both free and paid. Press the “Play” button at the bottom of the panel. If the imported action is a folder containing multiple actions, make sure you open the folder by clicking the arrow to the left of the folder icon and name, then select the action you’d like to use within the folder. You can experiment with various actions to see different effects. Some actions are subtle, enhancing colors or contrast, while others can completely transform your image into a work of art.
Troubleshooting Common Issues: Common issues with Photoshop actions include compatibility problems or actions not producing the expected results. Ensure your Photoshop version is compatible with the actions you’re using. If an action doesn’t work as expected, try resetting Photoshop’s preferences or reach out to the action creator for support. Photoshop actions are a game-changer in the world of digital art and photography. They save time, ensure consistency, and open up a world of creative possibilities. This guide should have provided you with the knowledge to confidently install and use .atn files.
Three Practical Methods to Add Images as Layers
Welcome to this beginner's guide on how to add images in Photoshop. Launch Photoshop and you'll arrive at the home page. On the left side of this page, you'll see two options: "Create new" and "Open". Here, you have two ways to add images into Photoshop. The first way is to simply click on the "Open" option. This will prompt a file explorer window to pop up. You can then navigate to your image file, select it, and click "Open".
The second method involves creating a new document. In the document setting window that appears, you can set the dimensions, color mode, and background contents of your new document according to your needs. Once you've created a new document, you'll be taken to the main Photoshop workspace. Next, navigate to the "File" option in the top left of the menu bar. In the "File" drop-down menu, click on the "Open" option. This will prompt a file explorer window to open. In the file explorer, navigate to your image file. After clicking "Open", your image will appear in your new Photoshop document.
When you use the "Open" function, Photoshop treats the entire image as a background. If you want to manipulate the image as a regular layer, you'll need to unlock it first. The second approach we're sharing is one of the quickest and easiest ways to add an image to your workspace in Photoshop. It's called the drag-and-drop feature. First, open your existing Photoshop document or choose to create a new one. Next, navigate to the folder that contains the image you want to import into Photoshop. To perform a drag-and-drop operation, you'll need to have both Photoshop and your file folder visible on your screen simultaneously. Now, click and hold the image file in your file explorer. While still holding the mouse button, drag the image over to the Photoshop window. Once the image has been dropped into Photoshop, it will open as a new layer in your document. You can adjust the size of the image by dragging the edges of this border. When you drag and drop an image into Photoshop, it automatically converts to a Smart Object. If you wish to edit the image without the constraints of a Smart Object, you can easily convert it back to a regular layer.
The third method for inserting images into Adobe Photoshop is by using the "Place Embedded" function. Start by opening the existing Photoshop document where you want to add the image or create a new one. Once you're in the Photoshop workspace, head over to the top menu bar. After clicking "Place Embedded...", a file explorer window will pop up. Navigate through this window to locate the image file you want to insert into your Photoshop document. Once the image has been placed, it will show up in your Photoshop document with a bounding box around it. To adjust the image size, click and drag any of the eight handles located around the bounding box. Our tutorial on how to add an image in Photoshop has come to an end. In this guide, we've shared three methods for inserting an image into Photoshop.
Tips for Image Quality and Workflow Tools
Image Quality: Always try to use images with the highest possible resolution. Smart Objects: To preserve the quality of layers, it's wise to convert them into Smart Objects. Resizing Images: When resizing images in Photoshop, remember to maintain the aspect ratio to avoid distorting the image. Regardless of the method used, we may encounter some inconveniences during the operation. In such situations, we'd like to recommend a very practical tool-TourBox. TourBox has a user-friendly design with a dial, a scroll wheel, and multiple custom buttons. The dial can be used for precise adjustments of the image size and position, and the scroll wheel for quick scrolling or zooming. This setup allows you to focus on creating, rather than being distracted by tedious operations. With the above methods and tips on how to add image in Photoshop, you should now be ready to experiment and create your own designs.
Working with Actions and Final Adjustments
Open Photoshop and go to the “Actions” panel. Click “Open” and your actions will load into the actions panel. All images are different and in most cases the default settings for an action will need to be tweaked to achieve the perfect look for your photo. The most common method for adjusting the effect of a Photoshop action is to adjust the opacity of the entire layer group. You can select a layer group by clicking the “folder” icon next to an already run action within the layer palette. The more detailed method for adjusting the effect of an action is to adjust the individual layers within the layer group. This requires a deeper understanding of the different components within the layer group, but the method for adjusting the opacity remains the same. Note: Actions will always work better on RAW images, simply because there is more information and data to manipulate. When actions are applied to a JPEG image, the effect can sometimes be overpowering.
Итоги по методам и возможностям
Three practical methods to add images as layers have been explained: opening an image as a new document, dragging and dropping into an existing document, and placing embedded images with a bounding box. Smart Objects help preserve quality during transformations, while layer masks provide nondestructive editing capabilities. Photoshop Actions streamline repetitive tasks and help maintain consistency across projects. These foundational techniques form the basis for more advanced compositing and editing workflows.