Color grading is one of the essential stages of any video and film production. The color grading process starts in preproduction and involves different departments, such as wardrobe or makeup. LUTs are an excellent tool for grading, but it's good to know how to grade without them. Whether you’re working on a social media video or a Hollywood blockbuster, color grading is one of the most crucial stages of any film production. Back in the day, directors of photography had to do everything on camera, choosing the film stock and lab to give the image the desired look. Color grading is a must today, and most popular cameras are shooting in LOG and RAW formats. And thanks to Premiere Pro’s intuitive interface, achieving a professional-level color grade is easier than ever.
What is color grading?
Color grading is a crucial aspect of the post-production process in video editing, where the visual appearance of footage is enhanced, corrected, and stylized to achieve a desired aesthetic. This involves manipulating colors, tones, and hues to evoke emotions, convey a particular atmosphere, or maintain visual consistency throughout a project.
Color grading vs color correction
Color correction focuses on fixing technical issues such as white balance, exposure, and saturation to ensure that footage appears natural and authentic. On the other hand, color grading involves artistic decisions to stylize and enhance the visual narrative by applying creative color effects and adjustments.
A foundational understanding of color theory is essential for effective color grading. This includes concepts such as hue, saturation, brightness, complementary colors, and color harmony. By leveraging these principles, you can manipulate the mood and atmosphere of a scene, guide the viewer's attention, and create visual cohesion across different shots. Just as a painter selects pigments to evoke specific emotions or convey particular themes, you can employ color-grading techniques to imbue footage with narrative depth and visual impact.
Start color grading in Premiere Pro
Premiere Pro offers a dedicated Color workspace with comprehensive professional-grade color grading and correction tools. This specialized environment streamlines the color grading process and seamlessly integrates with your editing workflow. The Lumetri Color panel is the heart of Premiere Pro’s color grading arsenal. It allows you to make adjustments essential for refining your footage's visual aesthetics, from exposure and contrast to highlights, shadows, whites, and blacks. You can fine-tune these parameters with simple slider adjustments to achieve your project's desired look and feel.
How to color grade in Premiere Pro
- Set up a color workspace: Navigate to Window > Workspace > Color or select Color from the workspace switcher. This opens the Lumetri Color panel alongside the Lumetri Scopes panel, providing real-time visual feedback.
- Apply basic correction: With the Lumetri Color panel active, position the playhead on the desired clip within your sequence. Premiere Pro automatically selects the clip for color adjustments. Utilize the Basic Correction section to address technical issues such as exposure and white balance. You can experiment with the Auto Color feature powered for intelligent color correction or manually adjust the Intensity, Color, and Light sliders.
- Refine with creative tools: In the Creative section, you can apply pre-set Looks or make your own with the adjustment sliders.
- Fine-tune with curves and color wheels: Refine RGB and Hue Saturation curves in the Curves section to precisely manipulate shadows, mid-tones, and highlights for more nuanced adjustments.
- Achieve consistency with color match: Use the Color Match section to match color tones and ensure a seamless scene transition.
Color grading with LUTs
One option for quick and efficient color grading is working with LUTs or lookup tables. There are two types of LUTs: technical and creative. Technical LUTs quickly convert native color spaces from your camera (such as LOG and RAW) to a color space that allows you to see how the footage might look after being graded. Creative LUTs offer a specific aesthetic, emulating popular film looks, vintage techniques, or specific color palettes. Creative LUTs speed up grading but should be used carefully, as they may not fit all shooting conditions.
How to use a LUT in Premiere Pro: Select a clip in the Timeline panel. In the Lumetri panel, open the Basic Correction tab. In the Basic Correction tab, select the Input LUT dropdown menu. To add a new LUT, click Browse. Select the LUT of your choice. Edit the white balance and tone of the clip.
Color grading from scratch
Color grading from scratch is recommended when you have experience. For LOG or RAW grading, know your camera format characteristics to color grade without technical LUTs. Start with a basic correction, fixing brightness, contrast, shadows, and highlights. A good tip is to start by adjusting the brightest and darkest points, trying to stay within the waveform limits. The blacks should always be near zero. Then, you can fine-tune with curves or color wheels for a creative grade. Saturation and noise considerations come next, with options to denoise if needed and to correct white balance if skin tones appear off. Remember, color grading is a back-and-forth process, often requiring revisiting brightness and saturation to achieve the desired result.
Try the color wheels, curves, and HSL sliders for creative grades. With time, these tools will become intuitive. If you’re seeking inspiration or a jumpstart, explore Artlist’s pre-color grade clips and LUTs to spark creativity and enhance your projects.
How to color grade skin tones
Natural-looking and consistent skin tones are crucial when editing footage with people. Start with proper exposure and white balance, then adjust white balance and tint to achieve neutral tones while preserving natural hues. Maintain consistency across footage using adjustment layers or presets to apply uniform corrections. Pay attention to hue, saturation, and luminance (HSL) controls via HSL Secondary to fine-tune skin tones without affecting other elements. Avoid over-saturation, and test your footage on different displays to ensure skin tones remain accurate across devices.
Color grading workflow and tips
Begin with a simple color correction to fix imbalances and then move to color grading for style. It’s best to perform color changes on an adjustment layer so the original footage remains intact. Use scopes to ensure accuracy, as monitors and eyes can be misleading. Premiere Pro’s Lumetri Color Panel, along with a Color workspace and Lumetri Scopes, provides a comprehensive toolset for professional grading. The workflow typically follows: color correction first, then creative grading, and finally, verification via scopes and test viewing.
Premiere Pro integrates well with other Creative Cloud apps, offering a familiar environment for colorists. In addition to core tools, plugins and presets can extend capabilities. For accessibility and localization, captions and subtitles can accompany your color-graded edits, with tools available to assist in adding them within Premiere Pro.
Practical notes and quick references
The Lumetri Color Panel contains multiple sections you’ll use repeatedly: Basic Correction (input LUT, white balance, saturation, exposure, contrast, highlights, shadows, whites, blacks), Creative (Looks, LUTs, vibrance, saturation, shadow/highlight tint), Curves (RGB, Hue vs Hue, Hue vs Sat, Hue vs Luma, Luma vs Sat, Sat vs Sat), Color Wheels & Match, HSL Secondary, and Vignette. The Lumetri Scopes panel (Waveform, Parade, Vectorscope, Histogram) provides essential feedback to ensure consistency and prevent clipping. Using an adjustment layer keeps the original footage intact and simplifies revision.
If you’re looking for additional resources, note that the Lumetri Color Panel is strategically located in the Color workspace, which can be accessed via Window > Workspaces > Color. The Color workflow is designed to be intuitive, allowing you to match looks across shots and craft a cohesive visual narrative.
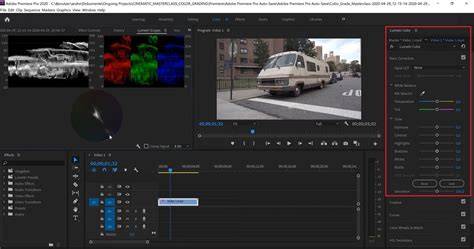
To visualize color decisions, include a simple infographic showing the Lumetri panels, with labeled sections for Basic Correction, Creative, Curves, Color Wheels, HSL Secondary, and Vignette, and a small waveform/vectorscope illustration.
Embed a concise video tutorial that demonstrates applying Basic Correction, then adding a LUT, and finishing with a skin-tone refinement pass using HSL Secondary.
Table: Quick reference workflow
| Stage | Key tools | What to adjust |
|---|---|---|
| Basic correction | Lumetri > Basic Correction | Exposure, White Balance, Contrast, Highlights, Shadows, Whites, Blacks |
| Creative grade | Lumetri > Creative | Look/LUT, Vibrance, Saturation, Tint |
| Fine-tuning | Lumetri > Curves | RGB Curves, Hue vs Hue, Hue vs Luma, Luma vs Sat |
| Color balance | Lumetri > Color Wheels & Match | Shadows, Midtones, Highlights color balance |
| Isolation | Lumetri > HSL Secondary | Isolate skin tones or specific colors for targeted adjustments |
| Finishing | Lumetri > Vignette | Subtle vignetting to focus on subject |
In summary, color grading in Premiere Pro combines technical correction with creative decisions to shape mood, atmosphere, and visual continuity. Use the Lumetri Color Panel, scopes, and an adjustment layer to maintain control and flexibility throughout the process. Experiment with LUTs and creative tools, but always verify skin tones and consistency across shots and displays.