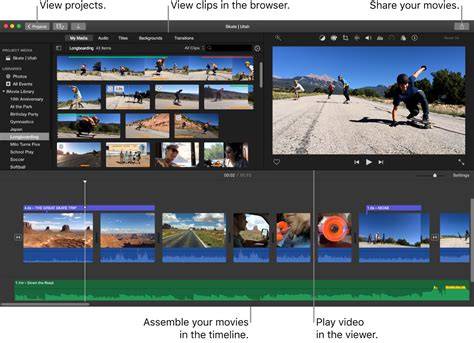
Importing media into iMovie can be accomplished through multiple pathways, ensuring your clips appear in the media browser and are ready for editing. The following sections consolidate the various methods and practical steps to bring video and still images from iCloud Photos, AirDrop, Finder, iOS devices, cameras, and other sources into iMovie.
Import media using iCloud Photos
You can use iCloud Photos to make your photos and video clips available on all your devices. For example, if you take a picture on your iPhone, the photo automatically appears on all your other devices that have iCloud Photos turned on. For more information, see Set up iCloud Photos on all your devices in the iCloud User Guide. Important: iCloud Photos requires that you have iCloud set up and are using iOS 8.3 or later or iPadOS 13 or later. When iCloud Photos is turned on, you can’t transfer photos or video clips from your Mac using the Finder.
On each device, go to Settings > [your name] > iCloud. The device you want to import media from must be signed in to the same Apple Account as your iPad. Tap Photos, then turn on Sync this [device]. Open iMovie on your iPhone or iPad, then open a project for editing. Some media may be stored in iCloud but not on your device. If a Download button appears when you tap a photo or video clip in the media browser, you can tap the button to download the media to the photo library on your device. For more information, see Add video clips and photos in iMovie on iPad.
Import media from another device using AirDrop
In iMovie or the Photos app on the device you want to transfer from, tap the video clip, photo, or movie you want to transfer. Tap the Share button, then tap the device you want to transfer to. If the other device doesn’t appear automatically, make sure AirDrop is turned on on both devices in Control Center. On the device you want to transfer to, tap Accept when an AirDrop alert appears. Imported media is added to the photo library. Follow the instructions in Add video clips and photos in iMovie on iPad to add that media to your movie or trailer project in iMovie.
Import media from your Mac using the Finder
Connect your device to your Mac, then open a Finder window. After a moment, your device appears in the sidebar of the Finder window. Click the device’s name in the sidebar, then click Files in the bar below the device name. Drag the file or files you want to add to the iMovie icon in the device’s Finder window. When the transfer is complete, the video clips and photos are available from the media browser within iMovie. Open iMovie on your device. Open a project, then tap the Add Media button. Tap Browse, navigate to the location of the item you want to add, then tap it. Important: If you use iCloud Photos, you can’t transfer your photos or video clips using the Finder.
Transfer media from your iPhone or iPod touch to your iPad
If you record video or take photos using your iPhone or iPod touch and save them to the photo library, you can transfer them to your iPad using the iPad Camera Connection Kit. The iPad Camera Connection Kit includes a Camera Connector and an SD Card Reader. You build a movie by adding clips to it from your events. Drag a clip to the timeline in iMovie on your Mac or iPad as part of your editing workflow.
Editing workflow: building a movie by assembling clips
In the iMovie app on your Mac, select an event in the Libraries list containing footage you want to add to your movie. Event clips appear in the browser to the right of the Libraries list. Drag a clip from the browser to the timeline. To split a clip in your movie and insert the video between the two segments, drag the clip on top of an existing clip in the timeline, and choose Insert from the menu that appears. Drag part of a clip to the timeline by selecting a range with the R key held while dragging, then drop the selection onto the timeline. To add a clip to the end of your movie, select the desired clip and choose Add to Movie or use the Add button (+) in the browser. The selection is added to the movie at the end of the timeline.
Insertions can also be made by replacing a clip in the timeline, inserting a clip, or adding media from multiple events. If the playhead is positioned on top of a clip, inserting a new clip will split the timeline accordingly. Video in a project is marked with an orange stripe in the browser to indicate usage across projects. Note: If you add 4:3 standard-definition video to a 16:9 high-definition project, iMovie crops the video to fit the 16:9 frame.
Import options and sources beyond devices
Videos that you want to reuse from your Mac’s hard drive or other disks can be imported by Finder drag-and-drop or by the Import command. iMovie can import media from iPhoto Library or Aperture as well, provided the media is in compatible formats. If you’re importing from iPhoto, locate the iPhoto Library in the list and choose the Event you want. You can also import movies already on your Mac by choosing File > Import > Movies and selecting the files you want to bring into iMovie. You can also access clips stored in iPhoto Videos via the iPhoto Videos entry in the Event Library.
When importing from external storage devices, connect the device and use the Import window to select files, choose an event, and decide between Import All or Import Selected. You can sort clips by data such as duration or creation date, add folders to Favorites for quick access, and preview clips in the Import window before importing.
Live camera capture
iMovie supports capturing live video from a compatible camera connected to your Mac. Click the Camera icon in the toolbar to open the Import window, select your camera from the Camera menu, then click Capture to begin recording. The captured material can be analyzed for stabilization and facial detection during capture. The audio source is determined by the Mac’s Sound system preferences.
- Launch iMovie and start a new project.
- Connect your camcorder or device and use the Import window to select clips.
- Choose an event to import into and start editing in the timeline.
- Optionally, capture live video and import into your project.
How To Merge Video Clips In iMovie
In addition to the above methods, you can import existing movies by File > Import > Movies, or import from iPhoto/Apple’s Aperture libraries if you own those programs. iMovie automatically provides a library for iPhoto and Aperture, allowing easy access to previously stored videos. The Import window also offers options to create or choose an event, and to decide between full-size or large-size imports, and to organize imported media into events for project management.