Plugins are often distributed in zip files as dll files. The files you extract should be moved to the effects folder of the Paint.NET installation directory. After having moved the .dll files to the required folders you might need to restart Paint.NET. After completing the above steps, the plugin should have been installed. Sometimes Paint.NET may have installed in a non-default location. To find the installation folder you can right-click the shortcut of Paint.NET, click on properties, and then read the location from the target line.
Short tutorial showing how to rotate text, selections and layers in Paint.NET. How to add support for Gimp's .XCF, .XCFGZ, and .XCFBZ2 files in Paint.NET. How to create curved text using a plugin. How to enhance the colors in photographs in Paint.NET using curves and levels. If you use Paint.NET, you have probably heard of plug-ins. These extensions can significantly enhance the program's functionality and allow you to achieve more creative effects and adjustments. In this guide, I will show you step by step how to download and install plug-ins for Paint.NET.
Key Takeaways
- Plug-ins expand the functionalities of Paint.NET.
- You can download plug-ins directly through the Help section.
- Downloading and installing plug-ins requires moving DLL files to the correct folder.
Step-by-Step Guide
- Opening the Help Section in Paint.NET
To begin, open Paint.NET and click on "Help" in the top menu bar. Here you will find the option for plug-ins, which will lead you to the download pages.
- Navigating to the Plug-in Pages
In the Help section, you can click on the "Plugins" button to see more options. You can select either "Plugin Packs" or specific plug-in types. I recommend browsing through the "Plugin Packs" first, as they often contain multiple useful tools.
- Downloading a Plug-in Pack
Choose one of the offered plug-in packs to get more information. Click on the respective link to begin the download. Ensure you select the correct file - it is usually ZIP files with DLLs.
- Downloading the ZIP File
Downloading a ZIP file is the next step. You may be directed to a Dropbox page immediately or find a direct download link. Click "Download" to save the file to your computer.
- Extracting the ZIP File
Once the download is complete, extract the ZIP file. Right-click on the file and choose "Extract All." You will get a folder with the DLL files you need.
- Copying the DLL Files
Now, look for the installation folder of Paint.NET on your computer. You will often find it under "C:\Programs\Paint.NET." Inside this directory, you should find a folder named "Effects." If this folder does not exist, simply create it.
- Inserting the Files into the Effects Folder
Open the "Effects" folder and drag the extracted DLL files into it. Make sure you copy all the necessary files into this folder.
- Restarting Paint.NET
After inserting the files, you must close and restart Paint.NET. The next time you open it, the new plug-ins should be visible in the menu.
- Using the Plug-ins
You can now use the downloaded plug-ins. You will typically find them under "Effects" or "View" in the menu. Experiment with the new options and discover which ones provide the best results.
- Exploring the Plug-in Functions
Many plug-ins offer additional functions that can help optimize your work in Paint.NET. Think about which tools could be useful for your projects. For example, some plug-ins are excellent for text creation or applying special effects.
Additional Notes on Plugins and Compatibility
In this guide, you have learned how to download and install plugins for Paint.NET. The process may seem complex at first, but it becomes easier the more you go through it. Try out different plugins and discover how they can expand your tools to enrich your creative possibilities.
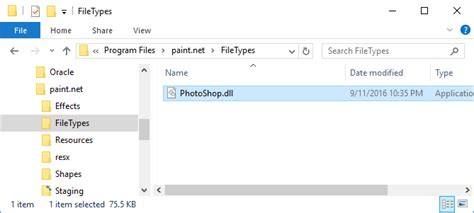
First, ensure the plugin is placed in the correct folder (Effects for effects, or FileTypes for format handlers). Next, verify that your Paint.NET version matches the plugin’s requirements (e.g., .NET Framework). Portable Paint.NET stores its plugins in the same directory as the executable (e.g., Paint.NET Portable\Effects). Simply copy the .dll file into this folder, and the plugin should load automatically. The loading process typically begins when Paint.NET scans its Effects folder for valid .dll files. If a plugin meets the API requirements, it appears in the Effects menu under a subfolder named after the plugin’s author. File type plugins integrate into the File > Open As or Save As menus.
Plugins are the unsung heroes of Paint.NET, turning a basic image editor into a versatile toolkit for artists, designers, and hobbyists. They eliminate the need for multiple software licenses by consolidating features-such as batch processing, advanced filters, or custom brush engines-into a single, lightweight application. The impact extends beyond convenience, democratizing access to professional-grade tools and enabling techniques like non-destructive editing or AI-assisted retouching.
Understanding paint net how to install plugins is more than a technical skill-it’s a gateway to unlocking creativity within budget constraints. While the process demands attention to detail, the rewards are immediate: a toolkit that evolves with your needs, without the bloat or licensing restrictions of commercial alternatives. Official recommendations include the Paint.NET Forums, where developers and users share tested plugins. Avoid downloading from untrusted sites, as malicious .dll files can harm your system.
Note on common issues: if a plugin fails to load, verify the plugin placement, confirm the plugin’s compatibility with your Paint.NET version and .NET Framework, and consider restarting the program. In some cases, older plugins may not load on newer builds, while newer tools might require updates to the .NET Framework or administrative privileges. The plugin system in Paint.NET has evolved since its early days as a student project by Rick Brewster, expanding to two main categories: Effects and File Types. Plugins are compiled .NET assemblies that Paint.NET loads dynamically at runtime to extend functionality.
For those ready to dive in, the first step is simple: locate a trusted plugin source, verify compatibility, and follow the installation steps meticulously. The community continues to grow, with plugins ranging from basic adjustments to complex AI-driven effects, and developers sharing tools via the Paint.NET Plugin API. The installation process itself is deceptively simple: drag and drop a .dll file into the appropriate folder within Paint.NET’s installation directory.
Common Questions and Tips
How do I find the best plugins for Paint.NET? Simply browse through different plugin packs and read the reviews. Are the plugins free? Yes, all plugins downloaded by you are free. How do I install the plugins? Simply drag the DLL files into the "Effects" folder of Paint.NET and restart the program. Can I uninstall plugins? Yes, you can simply delete the respective DLL files from the "Effects" folder.
Paint.NET isn’t just a lightweight alternative to Photoshop-it’s a canvas for experimentation, especially when plugins transform its core functionality. The platform’s open architecture allows third-party developers to extend its features, but the process isn’t always intuitive. The frustration stems from a lack of clear documentation. The future of Paint.NET plugins hinges on AI integration and cross-platform compatibility, with plugin interoperability emerging as a trend to create more dynamic editing workflows.
Beginner's Guide to Paint.NET | The Basics
In short, understanding paint net how to install plugins opens up a vast toolbox for creativity within a compact application. The journey starts with locating trusted sources and ends with experimenting to find the most effective tools for your projects.