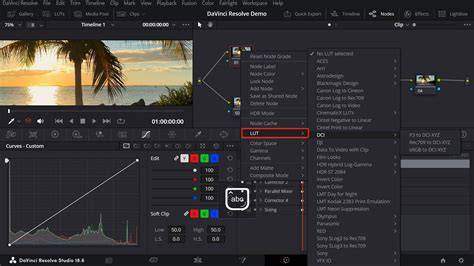
LUTs, or Lookup Tables, are a powerful way to quickly apply a specific color style to your footage, whether you’re aiming for a cinematic look, a consistent visual style, or a faster starting point for color grading. LUTs transform the color in video footage to create a mood or set the tone of your film, acting as color presets for color correction and grading.
What are LUTs and why use them?
LUTs are mathematical algorithms that map the input color value of video footage to different output values. They can streamline the color grading process, saving time and effort in editing, and help achieve color consistency across projects or clips. In more technical terms, LUTs are predefined mappings that alter how colors are displayed, which can range from simple 1D adjustments to complex 3D transformations.
There are two main LUT categories depending on the coloring process you're working on: Technical LUTs and Creative LUTs. Technical LUTs allow you to change color space, convert LOG footage, edit raw formats, and calibrate displays for accuracy. Creative LUTs are used to give footage a distinctive look and color grade. Within these categories, there are 1D LUTs and 3D LUTs, and DaVinci Resolve supports both formats along with DCTL for advanced color processing.
Types and formats of LUTs
- 1D LUTs adjust a single input value to an output value, typically used for basic corrections such as brightness, contrast, or individual color channels.
- 3D LUTs work with red, green, and blue values to transform a broad range of colors, allowing control over hue, saturation, and brightness for more advanced color grading.
- DaVinci CTL (DCTL) allows scripting-based color processing for precise adjustments beyond built-in tools.
- Formats typically include .cube and .3DL, with .cube being the most compatible across editors. Other programs may use different formats, but cube is the standard for DaVinci Resolve and many other apps.
Preparing and importing LUTs into DaVinci Resolve
- Download or export LUTs in cube files to your computer from various online sources (free or paid).
- Open DaVinci Resolve and access Project Settings. You can do this from the bottom-right settings icon or via File > Project Settings (Shift + 9).
- In the Color Management tab, locate the Lookup Table options and click “Open LUT Folder.”
- Place your .cube files into the opened LUT folder, then return to Resolve. If you manually installed LUTs outside Resolve, you may need to refresh the LUT list in the Color Management tab.
Bonus: If you install LUTs manually, you can copy them to the system LUT folders for Mac, Windows, or Linux (paths vary by OS). After copying, re-open Resolve to see the new LUTs in the lists.
Applying LUTs in DaVinci Resolve
- Switch to the Color page (bottom tab) to apply LUTs to your clips. You can change the workspace via the Workspace menu if needed.
- Select the clip in the timeline. You can apply a LUT directly to the clip or add a Corrector node to the node grid and connect it to the first node.
- Click the LUT button in the top-left area to reveal available LUTs. Hover to preview, then click and drag the chosen LUT to the node to apply it. Another method is to right-click a node and choose LUT from the dropdown to view all LUTs; select one to apply. Note that previewing LUTs in this method may not be available in all setups.
Fine-tuning after applying a LUT is often necessary. You can adjust Gain, Gamma, and Offset in the Color Wheels, or use the Curve and Key tabs for further refinement. Adjusting exposure, contrast, and color balance helps tailor the look to your footage.
Viewing versus stylizing LUTs
Viewing LUTs (or correction LUTs) provide a solid starting point for color grading, while Stylized LUTs deliver dramatic artistic looks. Some footage benefits from using both types-one to correct and one to stylize-but not all footage requires both. If a stylized LUT looks too strong, reduce its intensity or combine it with additional color adjustments to achieve the desired balance.
Tips for working with Log footage
Log Footage preserves a wide dynamic range and detail in highlights and shadows, often accompanied by a broad color gamut. Shooting Log gives you more data to recover in post-production, though it requires careful grading to bring the image to a pleasing, viewable state. Different camera manufacturers offer various Log formats, and LUTs found online may combine viewing and stylized LUTs to streamline the workflow.
When LUTs produce unexpected results or noise, consider tweaking the node setup, adjusting the LUT intensity, or combining the LUT with other grading tools to minimize artifacts and preserve detail.
Advanced workflow and additional tools
TourBox is an example of an editing controller designed to work naturally with DaVinci Resolve, offering Resolve-optimized settings and features like HoverAdjust for a grading-console-like feel. While not required, such tools can enhance efficiency, especially for professionals working on long-form projects.
Exporting LUTs is straightforward: in the Color page, right-click the clip’s thumbnail, select Generate LUT, choose a format, and save to the Resolve LUT folder for reuse in future projects or other software.
Practical considerations and common issues
- Applying a LUT is not the final step-many clips require further adjustments to exposure, contrast, and color balance to achieve the exact look you want.
- If a LUT seems too strong, consider lowering its intensity or stacking with additional color corrections to maintain a natural appearance.
- Not all footage benefits from both a viewing LUT and a stylized LUT; evaluate based on the project’s style and requirements.
LUTs remain a fast, professional way to set looks, achieve consistency across shoots, and accelerate the color grading workflow in DaVinci Resolve, making them a staple tool for editors and colorists alike.