Have you ever struggled with CAD drawings or stock artwork that’s full of unnecessary groups, clip groups or compound paths? There’s a quick way in Adobe Illustrator to release all of your clipping masks in one go: Select the Objects, Release the Clipping Masks, and streamline your workflow. This article compiles practical steps and expert tips drawn from a broad set of user experiences and guidance on clipping masks, clean-up, and workflow efficiency.
Direct method: release all clipping masks at once
Select the Objects: Select the objects you want to release or alternatively select everything by using the quick key commands: Command + A (mac) / Ctrl + A (Windows).
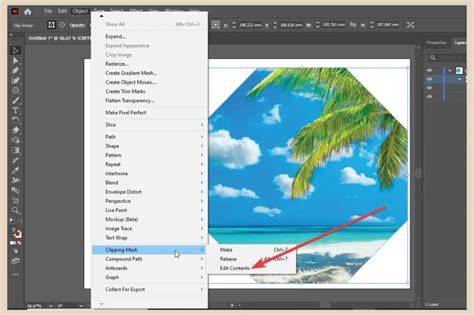
Release the Clipping Masks: With your objects selected, go to the top menu and choose Object > Clipping Mask > Release. This is the most straightforward approach to unwrap clipping masks in a single action.
Notes on scope: This method will release clipping masks recursively, one level at a time, and can significantly reduce time when working with files that include multiple nested clipping masks.
Clean-up after release: handling nested groups and masked objects
Still have unnecessary nested groups? The VectorFirstAid plugin from Astute Graphics has 20+ menu items that can clean-up your Illustrator documents. Want to try it for yourself? Already a subscriber? Ensure you have the VectorFirstAid plugin installed through your Astute Manager, then you can find the VectorFirstAid panel in the Window > Astute Graphics > VectorFirstAid.
The root issue of clipping mask pollution in artwork is users creating the PDFs without maintaining Illustrator editing capability. Illustrator provides that option, but not everyone bothers clicking the little check box. Astute Graphics has an Illustrator plug-in that can fix a lot of problems when importing PDFs into Illustrator, but it's not 100% perfect.
Practical workarounds and common scenarios
Importing files from clients or vendors often comes with clipping masks scattered throughout. If you get native files, you may open them more easily, but PDFs or other formats can introduce clipping-mask pollution. In many cases, the best approach is to use the Layers panel to manage visibility and selection, or to release clipping masks in groups to simplify the artwork.
For videos and visual references, the Layers panel view helps you see clipping masks clearly and determine which parts are masked. If you move or scale masked content, you’ll want to understand how the clipping mask interacts with the underlying objects, especially when masks are part of a larger group or nested structure.
Recommended workflow for handling clipping masks
Best practice is to start with a native Illustrator file when possible. If you must work with PDFs or other formats, use Illustrator’s options to preserve editing capabilities and consider plugins that assist with cleanup and repair of clipping paths and masks.
When you encounter a clipping mask that sits atop a group, the top object is the mask. If you need to adjust, editing often benefits from the Layers panel and Isolation Mode, which lets you work inside the clipping group without disturbing other artwork.
Common questions and tips
- Can you use a Group in a Clipping Mask? You can mask grouped objects but you cannot use grouped shapes as a mask. A workaround is to combine the group into a single object using the Shape Builder tool or Pathfinder panel, then apply a clipping mask.
- Why is my Clipping Mask not Working? Ensure both the mask and the content are selected, and convert multiple mask objects into a compound path if needed. The top object must be a vector shape, not a raster image, and it should not be part of a group.
- How to release all clipping masks? From the menu, choose Select > Object > Clipping Masks to select all clipping masks in the image, then press Delete to remove them.
Editing and refining masking in practice
Editing a clipping mask often involves adjusting the mask or the content within the mask. Use the Layers panel to select the mask or content, or enter Isolation Mode to work inside the clipping group. The Properties panel also provides Edit Mask and Edit Content options for targeted adjustments.
Examples and use cases
Clipping masks are widely used in real estate flyers to organize photos, in social media posts to reveal artwork inside text, and in complex layouts to frame images. They enable designers to create dynamic shapes and textures without losing control of individual elements.
Table: quick reference for clipping mask workflows
| Situation | Recommended action | Notes |
|---|---|---|
| Release all masks at once | Object > Clipping Mask > Release after selecting all objects | Releases masks level by level |
| Masking multiple objects | Make Compound Path or use Shape Builder / Pathfinder | Ensure top object is vector |
| Mask not working | Verify selection, top object, and vector nature; avoid groups as mask | Convert to compound path if needed |
| Editing mask | Layers panel or Isolation Mode | Allows precise adjustments |
In summary, releasing clipping masks in Illustrator can be done quickly with a single command, but thoughtful clean-up and workflow choices-such as using the Layers panel, considering compound paths, and leveraging plugins for cleanup-help maintain clean, editable artwork and reduce manual, repetitive tasks.
tags: #illustrator #release #all #clipping #masks