Creating transparent images in Photoshop is a valuable skill for graphic designers and photographers alike. In Photoshop, you can make an image transparent by using tools like the Magic Wand, Quick Selection, or Pen Tool to isolate the subject. We'll guide you through the process step-by-step, covering different techniques to achieve transparency in your images. Adobe Photoshop offers a powerful set of tools for image editing and creation.
To start a new project in Adobe Photoshop, we click "File" then "New" in the top menu. We can choose from preset sizes or enter custom dimensions. The Photoshop interface consists of several key panels and tools. The Properties panel adapts to our selected tool or layer, providing relevant options and adjustments. On the left, we find the Tools panel with various editing instruments. The Move tool helps position elements, while selection tools like the Magic Wand allow us to isolate parts of an image. Layers are the foundation for creating transparent images in Photoshop. Layers in Photoshop act like transparent sheets stacked on top of each other. Each layer can contain different elements of an image, such as text, shapes, or photos. We can adjust the opacity of entire layers or use blending modes to create unique effects. To view a layer's contents, we click the eye icon next to it in the Layers panel. To start working with layers, we often need to convert the background to a regular layer. We can duplicate layers by right-clicking on a layer and selecting "Duplicate Layer" or using the keyboard shortcut Ctrl+J (Cmd+J on Mac). To rearrange layers, we simply click and drag them up or down in the Layers panel.
Layer masks are powerful tools for creating transparent areas in an image. The mask appears as a white thumbnail next to the layer thumbnail. White areas of the mask reveal the layer content, while black areas hide it. We can paint on the mask with black or white brushes to hide or reveal parts of the layer. Selecting specific areas of an image is crucial for creating transparent elements in Photoshop. The Magic Wand tool is excellent for selecting areas with similar colors. We can adjust the tolerance to control how closely colors must match. To use the Magic Wand, we click on the area we want to select. The Contiguous option limits selection to adjacent areas. The Lasso tool offers manual control for irregular selections. For precise selections, we can zoom in and use a graphics tablet for better control. We can combine Lasso tools with other selection methods. The Pen tool offers unparalleled precision for complex selections. We create paths by placing anchor points and adjusting curve handles. The Quick Selection tool allows us to paint our selection quickly. It works by analyzing color and texture to guess the area we want to select. The Object Selection tool uses AI to identify and select entire objects.
Photoshop offers powerful tools to remove backgrounds from images efficiently. Photoshop's Quick Actions provide a fast way to remove backgrounds. To use it, we select the layer containing our image and click "Remove Background" in the Quick Actions section. For images with clear contrast between the subject and background, this method works exceptionally well. However, complex images may require additional refinement. When Quick Actions don't provide perfect results, we turn to the Refine Edge tool for more precise control. The Refine Edge tool analyzes the contrast and texture in these areas to create a more accurate selection. We can adjust settings like Smooth, Feather, and Contrast to further improve the selection quality.
Transparent images are essential for various design projects. Next, we select the layer containing the logo or graphic. Press Delete to remove the selected area. Select PNG or GIF format, as these support transparency. Start by creating a new layer for your text or shape. For partial transparency, add a layer mask. To create see-through effects within text, right-click the text layer and choose "Blending Options." Then, adjust the "Fill Opacity" slider. For shapes, we can use the Eraser tool with varied opacity to create soft, partially transparent edges. Once you've created a transparent image in Photoshop, it's crucial to save and export it correctly to preserve the transparency. To export a transparent image as a PNG in Photoshop, we first need to ensure our image is set up correctly. While PNG is the most common format for transparent images, other options exist. For web use, we recommend sticking with PNG. When working with transparency in Photoshop, we can create composite images by combining multiple layers with varying levels of opacity. Transparent images have become essential in modern digital media. We often use transparent backgrounds in marketing to create eye-catching designs. Transparent elements add depth to social media graphics, making them more engaging. In web design, transparent PNG images allow for creative layering. Making product images transparent is crucial for e-commerce. We use transparency to create 360-degree product views, allowing customers to see items from all angles. Transparent images also enable easy creation of product mockups.
Mastering transparency in Photoshop involves honing your workflow and exploring advanced techniques. Efficiency is key when working with transparent images. Use the eraser tool with E key for quick transparency adjustments. For precise opacity control, use number keys. Press 5 for 50% opacity, 7 for 70%, etc. To create complex transparent elements, we employ advanced methods. Refine Edge (Select and Mask) is crucial for hair and fur. Access it via Select > Select and Mask. For marketing materials, we often use Blend If. This powerful feature creates partial transparency based on luminosity. Lastly, when saving, choose PNG format for web graphics with transparency.
Creating transparent images in Photoshop involves several techniques and considerations. Next, we select the area we want to keep using tools like the Magic Wand or Quick Selection. Removing a white background in Photoshop is straightforward. We then delete the selected region. Using a large, soft brush with black as the foreground color, we paint on the mask where we want transparency. We then use selection tools like the Magic Wand or Quick Selection to select the background. In the latest Photoshop version, we achieve image transparency using various tools. The Object Selection tool quickly selects subjects. Meanwhile, the Refine Edge brush helps with complex edges like hair.
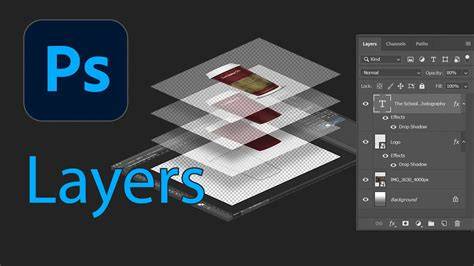
Infographics and visual references can help illustrate how layers, masks, and selections interact to create transparency. For instance, a step-by-step schema showing a subject isolated with selection tools, then masked, and finally saved as PNG, can be highly informative.
Adobe Photoshop 2025 tips and tricks Remove Background
In summary, mastering transparency in Photoshop involves knowing when to use Quick Actions, Refine Edge, and Select and Mask; how to work with layer masks and opacity; and how to export as PNG for web-friendly transparency. The combination of selection precision, masking technique, and careful saving ensures professional results across marketing, product photography, and graphic design projects.
| Technique | Best Use | Key Tool(s) |
|---|---|---|
| Quick Actions Remove Background | Fast background removal on high-contrast images | Layer > Remove Background |
| Refine Edge / Select and Mask | Complex edges (hair, fur) | Select > Select and Mask; Refine Edge |
| Layer Masks with Brushes | Partial transparency and composite elements | Layer Mask; Brush tool |
| Pen Tool for Precise Selections | Highly accurate edges and shapes | Pen Tool |
tags: #make #picture #transparent #photoshop