Masks in Photoshop are essential for unlocking advanced image editing without destructive changes, enabling you to hide or reveal details with precision. Like the secret identities of heroes, masks conceal or expose parts of a layer, controlling transparency through grayscale values from white to black.
Pro Tip #1: The best editing is non-destructive editing. You can radically alter an image, colorize it, remove or add parts, and still keep the original source intact within one Photoshop file. Masks are key for this approach.
What are Masks and How Do They Work?
There is no huge secret behind masks. Black hides, white reveals, and gray areas present partial transparency, which becomes clearer as you apply them in your projects. Two main types of masks exist in Photoshop: Layer Masks and Clipping Masks, each influencing transparency in distinct ways.
Layer Masks
Layer Masks are added on top of a layer to control its transparency. They must be painted in grayscale, from white to black or various shades of gray. A full white mask reveals the entire layer, a full black mask hides it, and a gray mask creates partial transparency.
In a practical example with two layers-a lemon over a soda can-a non-destructive composition can be achieved by masking instead of duplicating or deleting parts of the original images. If the mask is disabled, the original image remains intact.
The Layer Mask is linked to its layer; you can adjust the mask’s position and effects while keeping the original content safe. You can adjust Density (strength of the hidden parts), Feather (edge softness), and use options like Invert to swap visible and hidden areas.
Clipping Masks
Clipping Masks also control transparency but in a different way: they rely on the transparency of the layer beneath. Placing text over a clipped image is a classic example: the text layer acts as a mask for the layer directly below it, shaping the visible portions of the underlying image.
Clipping Masks affect only the layer they are clipped to, leaving other layers untouched. This makes text effects and complex composites easier to adjust while preserving editable text in the masked layer.
Step-by-Step: Layer Masks in Practice
- Plan your composition. Select your images and decide how they should blend. For example, clouds and a photograph of a cup of coffee can form a dreamy composition.
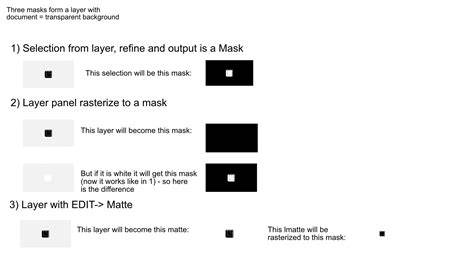
- Mask your selection to preserve the original. Use the Elliptical Marquee Tool (M) to create a selection, then apply a layer mask to hide everything outside the selection while keeping the original intact.
- Move the masked content into the target canvas. Use the Move tool (V) to place the masked clouds into the coffee cup scene, then scale to fit inside the cup.
- Adjust inside the Layer Mask. If the mask is linked to the image, click the mask thumbnail to refine its position and shape. The link icon shows the relationship between the mask and its image.
- Explore mask controls. In the Properties panel, adjust Density, Feather, and use options like Select and Mask or Color Range for fine-tuning. Invert can switch visible and hidden areas as needed.
Step-by-Step: Clipping Masks in Practice
- Amp up text and design with a clipping mask. Place a background layer beneath a text layer, then apply a clipping mask to have the text reveal or reveal a texture from the background.
- Apply the mask and fine-tune. The clipping mask confines the visible area of the background to the text shape. You can move or adjust either the text or background to perfect alignment.
- Preserve editability. Clipping Masks affect only the linked layer, so your text remains fully editable while the masked layer below changes with ease.
Practical Insights and Tips
Clipping Masks are versatile for text effects, color grading, and applying textures to shapes while keeping edits non-destructive. Layer Masks enable precise compositing and non-destructive manipulation of complex scenes, such as integrating clouds into a coffee cup or blending multiple elements with seamless transitions.
To maximize efficiency, consider mapping clipping and layer mask workflows to your preferred hardware (like shortcut optimizations) and leverage adjustment layers in combination with masks to control color and tone non-destructively.
What’s Next?
As you deepen your practice, explore more advanced masking and selection techniques within Essentials and Advanced Photoshop courses, reinforcing non-destructive workflows and expanding your creative toolbox. By mastering Layer Masks and Clipping Masks, you’ll achieve cleaner edits, greater control, and more dynamic composites.
Mask Text Reveal Animation in After Effects - After Effects Tutorial | Text Animation
See you in class! See how masks empower your designs to evolve without sacrificing original imagery or flexibility.