Matched Photo in SketchUp is a powerful technique that allows you to integrate 3D models seamlessly into photographs by matching camera perspectives, positions, and viewing angles. This process is particularly useful for visualizations, architectural renderings, and historical reconstructions. Understanding the nuances of camera positioning, focal length, and perspective is crucial for achieving realistic results.
Understanding the Purpose of Matched Photo
The primary goal of Matched Photo is to build a model based on a photo, effectively overlaying 3D objects onto a background image. It is essential to recognize that Matched Photo aims to replicate the camera viewpoint captured in the original photograph. This involves setting the virtual camera in SketchUp to a position and angle that match the real-world camera used when the photo was taken.
The Importance of Camera Position and Viewpoint
To accurately insert models into existing photographs, you need to determine the camera viewpoint in your photo. This involves identifying where the original photographer was positioned relative to the scene. Once established, you must set your SketchUp camera to the same location and orientation. The camera position in SketchUp should correspond precisely to where the photo was captured, ensuring the perspective lines and scale align properly.
It is important to understand that you are often limited to the original camera position when working with existing photos. If the photo is modern, you can set up your rendered view for the best composition and angle, then determine where you need to stand to replicate that view. Afterward, you can take a new photo from that exact position to match your model. For historical or old photos, modeling an entire environment to match the scene can help, but this approach can be complex and impractical.
Focal Length and Lens Considerations
Many users ask whether focal length affects the process of matching photos. It is crucial to understand that photo matching has absolutely nothing to do with focal length. The position of your virtual camera in SketchUp must match the physical position of the real camera at the time of exposure. Focal length and lens type influence the field of view but do not directly determine the camera's position in space.
Some confusion arises from attempting to convert digital camera focal lengths into standard lens numbers. For example, a 6mm focal length, when multiplied by 6, might suggest a 36mm lens. However, this number is not relevant for camera matching in SketchUp because what truly matters is the camera's placement, not its lens specifications. Perspective is primarily determined by the distance between the camera and the subject, not the focal length.
Perspective and Camera Height
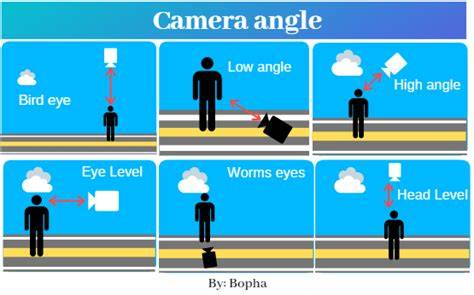
Perspective is influenced by the camera's position and angle, not solely by lens choice. The height at which the camera is placed also significantly impacts the scene's appearance. Setting the camera too high or too low can distort the perspective, making the model appear unrealistic within the photo. For example, if you set the camera too high, you might need to be on ladders, cranes, or even hanging from helicopters to match the viewpoint.
Matching Camera Viewpoints for Accurate Integration
To accurately embed a modeled object into a photograph, you should model from the photo and determine the virtual camera's position and tilt-that is, the direction it looks and its angle of view. The process involves modeling a scene or structure to match the photograph, then aligning your SketchUp camera to the same position and tilt. This ensures that the perspective lines match, and the model appears correctly integrated.
Perspective is determined by the lens to subject distance, not by the focal length alone. To illustrate, taking a picture of a building with a telephoto lens and then with a wide-angle lens from the same spot will produce drastically different perspectives. Enlarging the wide-angle image until it matches the size of the telephoto image demonstrates that perspective depends on the distance rather than the lens type or focal length.
For example, photograph a building with a telephoto lens. Then photograph it again with a wide-angle lens from the identical spot. Of course, the building will be tiny in the wide-angle photo. Now enlarge the wide-angle image of the building until it is the same size as the telephoto shot. Using transparent layers in Photoshop, put the enlarged wide-angle photo over the telephoto picture. The two images will align perfectly with the only problem being that the enlarged shot will be grainy (if you used film) or pixelated (if digital).
Practical Tips for Effective Matched Photo Workflow
- Identify reference objects within the scene, such as fences or buildings, to determine scale and position.
- Model key elements that give you spatial references for matching perspective and scale.
- Use the matching process to position your model and camera so that the perspective lines and scale are consistent with the photograph.
- Be mindful that the camera's tilt (up and down) must also match the real camera's tilt to maintain perspective accuracy.
- Take a new photo from the same position and angle once you have set up your model to verify accuracy.
Limitations and Challenges
Since Scene MatchPhoto's main purpose is to replicate the camera view of a particular photo, it will often "change" your view to match that photo. Achieving perfect perspective alignment can be challenging, especially if the original camera position is difficult to replicate. There is no guarantee of perfection, and some trial and error is often involved. Modeling the entire environment seen in the photo to get an exact match can be impractical but might be necessary for highly accurate results.
Updating Multiple Camera Views AT ONCE in SketchUp!
Summary
Mastering the art of matched photo in SketchUp involves understanding that the key is replicating the camera's position and tilt rather than focal length. Accurate placement of the virtual camera in 3D space ensures that inserted models blend seamlessly into background images, providing realistic visualizations. Remember, perspective depends on camera position and the distance to objects, not solely on lens choice or focal length. By carefully modeling reference points, adjusting camera height and tilt, and taking precise photos from the same vantage point, you can achieve highly convincing integrations of 3D models into photographic backgrounds.