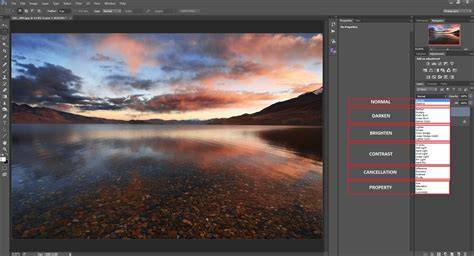
Blending modes are a fundamental tool in Photoshop that control how a layer interacts with layers beneath it. The blend mode can be changed to alter color, brightness, contrast, and overall tonality, often with dramatic results. This article explores where to find the blend mode control and how users can leverage it to enhance adjustments, textures, and composites.
Where to change the blend mode
The blend mode for a layer is located at the top of the Layers panel, next to the Opacity control. This is the primary interface element where you select how the current layer blends with the underlying content. In addition to ordinary layers, text layers and certain tools also expose blending options, expanding the ways you can blend and stylize elements within a composition.
Categories of blend modes and their behavior
Blend modes are organized into sections that group similar results. The sections include:
- Darker - darken the base colors; examples include Multiply and Color Burn. These are useful for enhancing shadows and deepening tones.
- Lighter - brighten the image by emphasizing lighter colors; examples include Screen and Color Dodge. These modes are handy for brightening highlights or creating luminous effects.
- Contrast - increase or decrease contrast through interactions between base and blend layers; examples include Overlay, Soft Light, and Hard Light. These modes can add depth and dynamism without masking.
- Comparative - invert or invert-like interactions, useful for subtle layered effects or color inversions; examples include Difference.
- Color - affect hue, saturation, and luminosity to harmonize or stylize colors across layers. These modes are powerful for color manipulation without heavy masking.
- Stencil and Silhouette - use alpha or luma values to affect transparency or reveal parts of layers beneath, enabling complex compositing tricks.
Within these categories, individual modes such as Linear Light, Vivid Light, Hard Mix, Linear Burn, and Color Burn can have markedly different outcomes depending on whether you adjust Opacity or Fill. This distinction between Opacity and Fill is especially notable for certain “Special 8” blend modes, where Fill can yield results that differ dramatically from Opacity.
Practical use cases: adjusting with Curves and blend modes
One common workflow is to combine a Curves adjustment layer with a blend mode to increase contrast or alter tonality. By switching the blend mode of an adjustment layer, you can double the utility of the adjustment and potentially bypass more complex masking. For example, using Linear Light or Vivid Light can amplify midrange contrast, while Darker modes like Multiply or Color Burn can deepen shadows with fewer steps.
In portraits, blending modes can affect skin tones and hue with minimal masking. A typical approach might involve a Curves layer set to a particular blend mode, coupled with an adjustment such as Hue/Saturation to fine-tune color balance. The goal is to achieve the intended tonality without introducing unwanted color shifts or clipping.
For night skies or high-contrast scenes, applying a blend mode with Fill adjusted to a lower percentage can preserve essential details while enhancing overall contrast. The interaction between Fill and the underlying layer’s tonal range can yield smoother transitions than Opacity adjustments alone.
Tips for effective use
- Experiment with Fill values on modes like Linear Light, Vivid Light, and Hard Mix to explore divergent outcomes from standard Opacity adjustments.
- When working with color and luminance, consider Color Burn, Linear Burn, Color Dodge, and Linear Dodge (Add) in the appropriate lighting or darkening contexts to achieve the desired dramatic effect.
- Use additional adjustment layers (for example, a Black & White layer set to Luminosity or a Hue/Saturation layer) on top of Curves to constrain or refine color and tonal changes without masking.
- For precise control, leverage Blend If sliders and layer styles in conjunction with blend modes to create smooth transitions between tonal regions, such as foreground and background elements.
Additional notes on workflow and limitations
Blending modes are not universally applicable to every scenario; their effectiveness depends on the content and the desired outcome. Some modes primarily modify color channels rather than alpha, which means they affect the resulting image differently than simple opacity changes. Their behavior may differ when applied to fills, borders, shadows, or inner shadows, so testing across layers is advisable.
In a comprehensive retouching or compositing workflow, blending modes become more informative when used in combination with layer styles and other adjustments. While some effects are straightforward, others require a sequence of layers and careful parameter tuning to achieve seamless transitions or targeted color control.
Terminology and additional background
Blending modes are part of a broader family of tools in Photoshop that include layer styles and effects. While layer styles interact with the base layer, their opacity interacts with the layer’s own opacity, and Fill opacity can affect layer styles differently. Understanding these interactions helps you plan a non-destructive workflow with fewer masks and more dynamic control.
In summary, the window to change a layer’s blend mode is the Layers panel, near the Opacity control. By selecting the desired mode and adjusting Fill or Opacity, you can expand the capabilities of any adjustment layer or composite, achieving a wide range of creative and corrective outcomes.