Removing a background in Photoshop is one of those tasks that comes up again and again. You might be preparing product photos for an ecommerce store, creating marketing graphics, or placing a subject into a completely new design. Photoshop offers several ways to do it. Some rely on automation and can produce a usable cut-out in seconds. Others take a bit longer but give you far more control over the edges. The important thing to understand is that there isn’t one method that works for every image. A simple product shot with clear edges can often be separated quickly. Images with hair, fur, reflections, or transparent materials usually need a more careful approach.
Photoshop provides a spectrum of techniques to suit different image complexities. We’ll explore the fastest automatic option, more precise manual methods, and advanced edge refinement workflows. By the end, you’ll know when to reach for the Remove Background button, the Object Selection tools, Select and Mask, or the Pen Tool for perfect results.
Method 1: Using the Remove Background Button
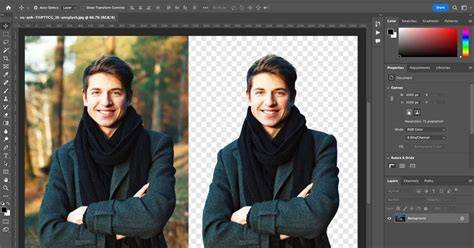
The fastest option is the Remove Background button. Adobe introduced this AI-powered feature to simplify basic selections. When the subject stands clearly apart from the background, it can often produce a usable result in just a few seconds. You’ll find it inside the Properties panel, under Quick Actions. Open your image in Photoshop. If the image loads as a locked background layer, unlock it first so Photoshop can apply changes. Next: Go to Properties → Quick Actions. Click Remove Background. Photoshop will analyse the image and attempt to detect the main subject automatically. When the process finishes, it creates a layer mask that hides the background while keeping the subject visible. At first glance the result often looks finished. However, it’s worth zooming in to inspect the edges closely. Small imperfections can appear around hair, shadows, or reflective surfaces. This tool works best when the subject stands clearly apart from the background, the edges are fairly simple, and the lighting is reasonably even. If the selection misses parts of the background, tools like the Magic Wand or Quick Selection Tool can sometimes help refine the result.
Portraits photographed against plain walls or product images on neutral or white backgrounds are good examples where this tool often performs well. If your image contains more than one subject, the Object Selection Tool can offer a little more control. Instead of letting Photoshop decide everything automatically, this tool allows you to highlight the object you want to isolate.
How to use it: Select the Object Selection Tool from the toolbar. Move your cursor over the subject. Photoshop will attempt to detect the object and highlight it automatically. Click the highlighted area to create a selection, then apply a layer mask to hide the background. If the automatic selection misses part of the subject, switch to Lasso mode and draw around the area manually. This tool tends to work well when several products appear in the same image, subjects overlap slightly, or the background contains some visual noise. Adobe continues improving these selection tools with every Photoshop update, but fine details such as hair or transparent materials still require additional refinement.

Method 2: Object Selection Tool and Layer Masks
The Object Selection Tool builds on AI-assisted detection to offer focused control over which object to isolate. Use it when you need more precision than a broad auto-detection but don’t want to draw every edge by hand. Start with the Object Selection Tool, hover over the subject, and let Photoshop highlight it automatically. Then apply a layer mask to hide the background. If needed, switch to Lasso mode to refine manually. After masking, you can place a new background below the subject and adjust color to blend seamlessly. If the automatic selection misses parts of the subject, you can refine with a brush on the mask to reveal hidden areas. For challenging subjects, Layer Masks are preferred over destructive erasing because they are non-destructive and reversible.
In practice, many editors combine this method with Quick Selection or Select and Mask to tighten edges, especially around hair or semi-transparent materials. This combination often yields robust results while keeping the process efficient for large batches.
Method 3: Select and Mask (Best for Hair, Fur, and Soft Edges)
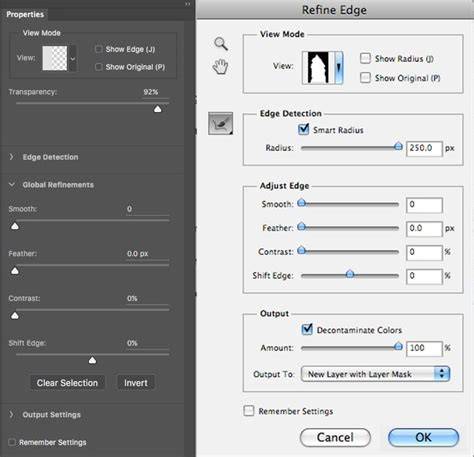
When edges become more complicated, the Select and Mask workspace becomes extremely useful. This workspace includes several tools designed specifically for refining edges and recovering small details. It’s particularly helpful for subjects such as hair, fur, feathers, and semi-transparent fabrics. Instead of drawing a hard outline around the subject, Select and Mask allows you to refine the edge gradually. Typical workflow: 1) Start by making an initial selection using Select Subject or the Object Selection Tool. 2) Then click Select and Mask in the top menu. Inside the workspace, zoom in and examine the edges carefully. The Refine Edge Brush Tool is especially helpful around hair or textured areas. As you paint along the edge, Photoshop analyses nearby pixels and attempts to restore fine detail that might otherwise disappear in the cut-out. Even with AI assistance, it’s normal to spend a few minutes refining the edge here. Those small adjustments often make a noticeable difference in the final image. 5) Add a solid fill layer underneath your cut-out to check for any edge issues. Use something bright and unforgiving like we have done in this example. 6) Once the edges look natural, output the result as a Layer Mask.
While automated tools have improved dramatically, many professional editors still rely on the Pen Tool for precise background removal. The Pen Tool provides the most control, allowing you to draw an exact path around the subject, producing exceptionally crisp edges-crucial for ecommerce product photography. Typical workflow: Use the Pen Tool to draw a path around the subject. Once the path is complete, convert it into a selection and apply a layer mask to hide the background. This approach takes longer but yields very clean, consistent edges. For hair, Select and Mask often remains the best companion to refine intricate strands.
Note: The Pen Tool is time-consuming but offers unmatched control for precise edges. For many editors, a combination of methods yields the best balance of speed and quality.
Method 4: The Pen Tool - Precision for Complex Edges
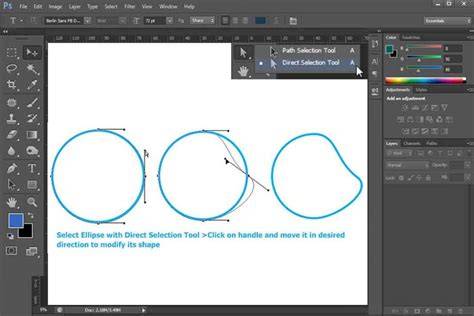
The Pen Tool is widely regarded as the most precise method for removing backgrounds, especially when you need razor-sharp edges. It’s ideal when the subject and background are not highly contrasted or when other tools fail to produce satisfactory results. To use the Pen Tool: 1) Import the photo and duplicate the background layer. 2) Select the Pen Tool, set it to Path (not Shape), and zoom in to start tracing the subject outline. 3) Click to place anchors and use click-hold-drag for curves. 4) Use the Direct Selection Tool to adjust anchors. 5) Save the path via Window > Paths, then New Path. 6) Right-click the path, Make Selection, and then click the layer mask to hide the background. For hair, you may still favor Select and Mask to refine edges after the path. This method is slower, but the edges tend to be extremely clean and consistent, which is essential for high-end ecommerce catalogs.
In many professional workflows, editors use a hybrid approach: Pen Tool for major outline precision, followed by Select and Mask or masking refinements to capture delicate details. Clipping paths and masking techniques are common terms you may encounter when preparing large product catalogs.
Method 5: Magnetic Lasso and Quick Selections for Speed
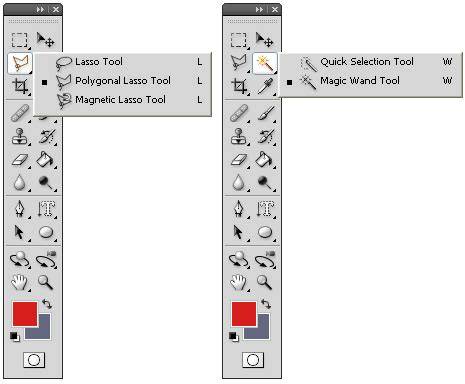
The Magnetic Lasso provides a faster alternative to the Pen Tool for images with high-contrast edges. It automatically snaps to edge transitions as you trace around the subject. Start with a rough outline using the Magnetic Lasso, then complete the loop and convert to a selection. Save the selection if you want to revisit it later, and apply a layer mask to remove the background. You can also combine this with Quick Selection for efficient results on many images. If the edge needs fine-tuning, douse the selection with Select and Mask refinements.
The Quick Selection tool is often my favorite for speed. It detects color changes as you brush, creating a fast initial mask. You can adjust brush size with [ and ], add to the selection with the plus icon, or subtract with Alt/Option. After the selection, save it, invert if needed, and apply a layer mask to hide the background. This method works well for most photos where contrast exists between subject and background and can be a strong first pass before further refinement.
Method 6: Background Eraser Tool - Controlled Destructive Edits (Use with Caution)
The Background Eraser Tool provides direct pixel removal with more control than broad erasing but is destructive if applied to raster layers. It’s useful when you need to remove a busy or partially overlapping background around a subject. Steps: Duplicate the background layer, select Background Eraser, configure brush hardness and size, set Sampling to Continuous, and adjust Limits to Find Edges with Tolerance around 20-25%. Start erasing around the subject with careful, short strokes, zooming in for detail. If needed, switch Sampling to Once, Limits to Discontiguous, and lower Tolerance to 10% for more precise sampling. This method can yield good results but is time-consuming and less flexible than masking. It’s often best to reserve Background Eraser for specific cases and prefer non-destructive masking whenever possible.
Which Photoshop Background Removal Method Should You Use?
Different images require different tools. Here’s a simple guide to help choose the right approach:
- Simple Portraits - Remove Background (fast) for quick social media and basic uses.
- Complex Scenes with Multiple Subjects - Object Selection Tool or Quick Selection, followed by careful masking.
- Hair, Fur, or Silk - Select and Mask, often in combination with the Pen Tool for best results.
- Fine Detail and Transparency - Pen Tool plus Select and Mask refinements; consider layer masks for non-destructive edits.
- Sharp Edges for Ecommerce - Pen Tool with path-based selections, sometimes aided by Magnetic Lasso for speed, and final masking refinements.
In practice, experienced editors often combine several techniques during a single edit. The Role of AI in Background Removal: AI can dramatically speed up background removal, but the “best” method still depends on your final output. Quick actions are excellent for quick social posts, while high-resolution catalogs demand precision achieved through manual masking and path-based selections. For bulk work, automation can save time, but consistent quality typically requires human refinement or professional services for large catalogs.
If you’re outsourcing, many brands rely on professional background removal services to maintain consistency across large image libraries. Our team handles background removal for ecommerce brands, photographers, and agencies worldwide, offering efficient options to keep your catalog uniform.
Finishing Touches and Edge Refinement
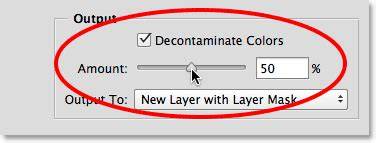
After you remove the background, you might notice color fringing or faint halos around the subject. Photoshop’s Decontaminate Colors option (in Select and Mask) is a powerful tool for removing these spills. Many brands rely on professional retouching services to handle micro-adjustments at scale, ensuring pixel-perfect edges across an entire catalog. Polish up your product shots with advanced retouching from professional services if needed, so your listings look consistently polished across the board.
Putting It All Together: Practical Comparison
Different image types map to different tools. Here is a quick reference to guide your choice:
| Image Type | Recommended Tool | Best For |
|---|---|---|
| Simple Portraits | Remove Background | Speed and social media |
| Complex Scenes with Multiple Subjects | Object Selection + Layer Mask | Control and accuracy |
| Hair, Fur, Soft Edges | Select and Mask | Edge detail |
| Fine Detail & Transparency | Pen Tool + Select and Mask | Crisp edges |
| Sharp Edges for Printing | Pen Tool + Mask Refinement | High precision |
In practice, editors frequently combine several techniques in a single edit to achieve the best balance of speed and precision. Additionally, you can leverage Adobe Express for quick background removal on simple images and to place cutouts into new scenes or templates for social posts and marketing assets.
Practical Tips for Consistent Results
- Work non-destructively by using layer masks instead of erasing pixels directly.
- Zoom in to inspect edges, especially around hair or translucent areas.
- For large catalogs, consider outsourcing to maintain consistent quality.
- Always test output on your final backdrop to ensure color and lighting consistency.
Whether you’re aiming for a quick social post or a magazine-quality product image, Photoshop provides a toolkit that can adapt to your needs. AI-assisted tools speed up simple removals, while traditional masking and path-based methods ensure high-precision results where it matters most.
tags: #adobe #photoshop #background #remover