When you type a value into the Resolution field, the values of the document's width and height also change. Congratulations! In this example, we had an image with a 300ppi resolution. As you may have guessed, our Width and Height doubled when we halved our Resolutions. We notice that the pixel dimensions never change. We started with an image at 3000 x 2000 pixels (px) and ended with the dimensions still being 3000 x 2000px. This is important to remember, because when we change resolution we are changing only how many pixels will be displayed per inch of the image, not how many pixels make up the image. Since we are not adding or subtracting any information (pixels) from our image, our image has to always balance out to its original 3000 x 2000 px.
If we increase resolution then we must decrease from somewhere! 72ppi: The document size is so large that it cannot fit onto an 8.5 x 11 sheet and is clipped. Which one to choose? The 72ppi and 150ppi images are too low of quality to produce a high-quality print, so they're out. The 300ppi and 600ppi images both looked very crisp, but the 600ppi image was way too small. If you’re a graphic designer, then you know how important it is to have control over the resolution of your images. GIMP allows you to change the DPI of an image using the Scale Image command.
DPI stands for “Dots per Inch”. If you take a print, it has many tiny dots of ink on the image or the specific print. The DPI consists of the number of dots the printer would contain for every square inch of the image. Quality of the print: The higher the dpi of an image, the higher the quality. Size of the print: The pixels and dpi have different meanings from each other. If you divide the number of pixels by the DPI, you get the width of the image. For example, if the image has 1500 pixels and 300 dpi- it indicates that the printed image would be 5 inches wide. Most printers have a DPI of 300, which is the industry standard for printing resolution. However, some newer printers boast a DPI of 600 or even 1200. When it comes to choosing a printer, the quality of your prints may not be the only factor to consider. If you have an image with a low DPI, then the quality and standard of the image would be low. If you have a lower dpi, the quality of the image would be low. If you have a higher dpi, the quality of the image would be higher. But the image would be smaller.
The standard rule for printed images is 300 dpi. For web, 72 dpi as it is the industry standard. Suppose the image is very small to obtain a print of 300 dpi, no worries! The viewing distance of the print you obtain also plays an equal role in the resolution of the image. There are exceptional cases like posters. For posters, you can choose 200 dpi as the audience would look at it from a few feet away. PPI stands for Pixels Per Inch. It indicates the display resolution and the number of individual pixels in a specific digital image. DPI stands for Dots Per Inch. Image resolution is an important concept to consider when designing images. GIMP has options to change the resolution of the image and give you the perfect image to suit your needs.
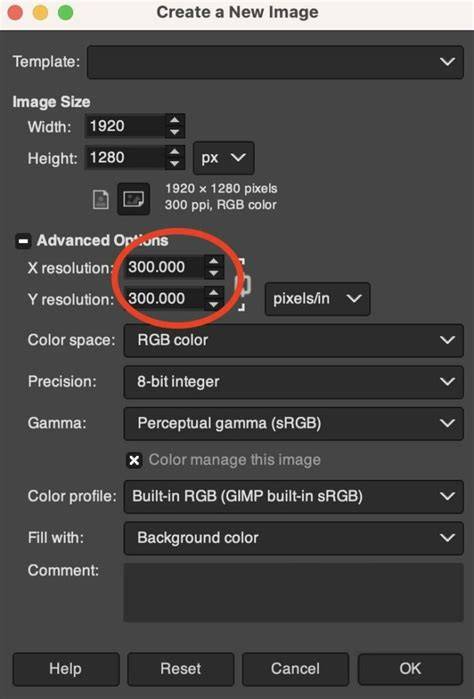
Simply go to the File menu. To begin fixing the resolution, first, you need to scale the image. By using the Scale Image command, you can adjust the resolution of the image. Here, we won’t scale the image. But, we will use the resolution setting of the scale image command. Initially, you have the Image size option. Beneath the Image size, you have two settings namely the Width and Height. Make sure not to change the Width and Height nor the px (pixel) measurement. Next, you have the X resolution and Y resolution options. Simply, update the required values for X and Y resolutions and keep them linked to one another. Unlinking the X and Y resolution is a bad idea because the corresponding measurements won’t be maintained correctly. If you make a mistake there, it affects the overall quality of the image. Apart from that, if you require a print size, you can simply change the measurement units of Width and Height. Thus, after changing the desired values, simply click Scale in the Scale Image command.
Print resolution and screen resolution are distinct from each other. The standard print resolution is 300 DPI, while the standard screen resolution varies between 100 DPI and higher. In the early days, the screen resolution was limited to technical capabilities. While dealing with high-resolution monitors and high-DPI smartphones, things are quite different. In conclusion, anyone can change their DPI in GIMP following the simple steps laid out in this article. With a few clicks, you can have your image at the perfect size and resolution. So what are you waiting for? Working with DPI and resolution is a fairly simple and straightforward task while being atleast somewhat scalable and functional. This tutorial will equip you with all the skills you need to know to edit your images as far as scale and DPI are concerned.
Right! I do not print--and if I ever did, I know how to set 'Print size'. You can set the resolution, image-by-image, as Ofnuts pointed out using Image -> Print Size, it just sets the ppi, otherwise keeps the image as-is. Thanks! That works!
1. Image -> Scale Image to open the scale dialogue. 2. Leave width and height alone. those screenshots. 3. Change the Width and Height as required (Not paying attention, I used 7.5 inches). 4. So you installed GIMP on your computer, congratulations! GIMP is a very powerful image manipulation software, but don’t let that intimidate you. It is my hope that these few examples will help to solve those small, quick modifications that you may need to apply to an image. When you first open your image in GIMP, chances are that the image will be zoomed so that the entire image fits in your canvas. In the Scale Image dialog, you’ll find a place to enter new values for Width and Height. You’ll also notice a small chain just to the right of the Width and Height entry boxes. Also notice I have shown a different option under Quality → Interpolation. A common use for this could be if you wanted to specify a new size as a percentage of the old one. You can also modify the filesize of an image when exporting it to a format like JPEG. You can now enter a new name for your file here. If you include the filetype extension (in this case, .jpg), GIMP will automatically try to export in that file format for you. You can also navigate to a new location on your computer through the Places pane, if you need to export the file to a different location. From this dialog you can now change the quality of the export. If you also have the “Show preview in image window” option checked, the image on the canvas will update to reflect the quality value you input. This will also enable the “File size:” information to tell you what the resulting file size will be. There are numerous reasons you may want to crop an image. The procedure to crop an image is straightforward. Now you can Left-Click anywhere on your image canvas, and drag the mouse to a new location to highlight an initial selection to crop. After making the initial selection of a region to crop, you’ll find the selection still active. This allows you now fine-tune the selection for cropping. Once you are happy with the region to crop, you can just press the “Enter” key on your keyboard to commit the crop.
There may be a time that you would need to rotate an image. There may also be a time that you’d like to flip an image as well. If you want to flip your image, the Transform menu offers two options, Flip Horizontally, or Flip Vertically. This operation will mirror your image along the specified axis. Don’t mis-interpret this to mean that GIMP cannot do arbitrary rotations (any angle). The simple examples shown here are just the tip of a really, really large iceberg. These are, however, common modifications that many people are often looking to make without having to learn too much about image processing.
How to change DPI/PPI of an image with Gimp | Tutorial-33
Key concepts and practical steps
- Understanding DPI and PPI: PPI indicates display resolution and the number of individual pixels; DPI indicates printer dots per inch. These metrics affect print quality and perceived image size.
- Pixel dimensions vs. physical size: Changing resolution does not alter pixel dimensions; it changes how large the image appears per inch when printed or displayed.
- Using Scale Image to adjust DPI: In GIMP, the Scale Image command lets you modify X and Y resolutions, and you should keep them linked to preserve proportional quality.
- Print size considerations: Standard print resolution is 300 DPI; screen viewing often uses 72 DPI, with exceptions for posters where 200 DPI may be acceptable based on viewing distance.
- Practical workflow: Open the image, use Scale Image, avoid altering Width/Height if you want to maintain pixel dimensions, adjust X/Y resolution, then click Scale.
Image resolution is an important concept to consider when designing images. GIMP has options to change the resolution of the image and give you the perfect image to suit your needs. If you require a print size, you can simply change the measurement units of Width and Height. Thus, after changing the desired values, simply click Scale in the Scale Image command.
Additional notes on export and edits
You can modify the filesize of an image when exporting it to a format like JPEG. You can also navigate to a new location on your computer through the Places pane, if you need to export the file to a different location. From this dialog you can now change the quality of the export. If you also have the “Show preview in image window” option checked, the image on the canvas will update to reflect the quality value you input. This will also enable the “File size:” information to tell you what the resulting file size will be.
There are numerous reasons you may want to crop an image. The procedure to crop an image is straightforward. Now you can Left-Click anywhere on your image canvas, and drag the mouse to a new location to highlight an initial selection to crop. After making the initial selection of a region to crop, you’ll find the selection still active. This allows you now fine-tune the selection for cropping. Once you are happy with the region to crop, you can just press the “Enter” key on your keyboard to commit the crop.