Crop marks help you define the final print dimensions and the trimmed area of your design. If there is a rectangular object or a group that reflects the exact position and size of a card, you could use a script that comes with InDesign to set crop marks. If not, you can easily add rectangles on an additional layer and then run the script action on the rectangles.
Using the built-in script to create crop marks
Select all rectangles, open Window > Utilities > Scripts. Under Samples > JavaScript you'll find cropmarks.jsx. Double-click its name. A new dialog pops up.
No registration marks needed, so turn off that option: Run the action with OK.
Below the result where you first removed your helper rectangles: Remove all elements that you do not need. Ensure all your artwork touches this red edge.
Configuring crop marks and bleed
Go to the third option on the left under 'Marks and Bleed' and turn on 'Crop Marks' (ID) / 'Trim Marks' (IL) as well as 'Use Document Bleed Settings' (ID & IL).
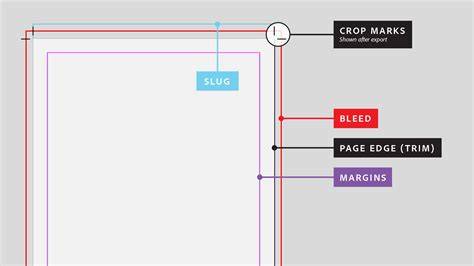
Once you've exported your artwork, you'll see the crop marks positioned over the bleed area. Type in '3mm'. You will notice that a 3mm rim has been applied to all of the artwork (see fig 3.2).
Practical tips for extending images without distortion
Extending images like photographs can leave them looking stretched and distorted (See fig 5.3). Add 3mm to the edge/edges you want to extend. Fill in the newly created transparent area with something similar to the original image.
In some cases, you may need to adjust the bleed and slug settings in the Document Setup to ensure the final trim aligns with your printing requirements. If your artwork touches the bleed edge, crop marks will help the printer know where to trim precisely.
Workflow summary
- Prepare your artwork with a clear, rectangular guide reflecting the final card size.
- Optionally create helper rectangles on an extra layer to align with the card edges.
- Run the InDesign script (cropmarks.jsx) from Window > Utilities > Scripts.
- Enable Crop Marks/Trim Marks and Use Document Bleed Settings under Marks and Bleed.
- Export with bleed, then verify that crop marks align with the bleed area.
Visual aids and further enhancements
Infographics or diagrams showing the relationship between trim lines, crop marks, and bleed can help clarify the layout process. If you need a quick reference, a simple diagram illustrating the card area, bleed extension, and crop marks can be inserted into the document as an image.
How to Add Crop Marks in InDesign
- Understanding crop marks and trim marks
- How to use the cropmarks.jsx script
- Setting bleed and document settings for precise trimming
- Extending images with safe margins
The workflow emphasizes keeping artwork within the safe margins while using a 3mm bleed to ensure clean trimming. By following these steps, you can achieve accurate crop marks and consistent results across multiple cards or pages.