Blender tips and tricks, tutorial video shows how to deselect multiple vertices in Blender. In Blender, we can go to Edit Mode to select vertices and deselect Vertices. Also we can use shortcut the deselect multiple vertices. Steps are easy to follow for Blender beginners. Happy sharing and save it for later. More Blender Tutorial are available here.
Getting Started: Enter Edit Mode and Prepare for Selection
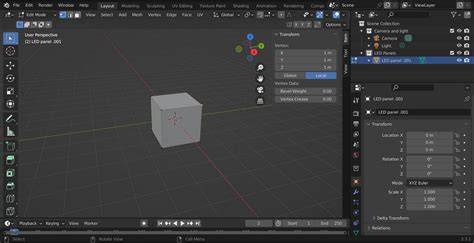
We can follow these steps to deselect Vertices in Blender, 1. Select an object, and go to Edit Mode 2. Make sure that Vertices Selection is chosen with press shortcut 1. 3. If vertices are in orange colour , it means vertices are selected
In Edit Mode, the 3D Viewport shows the active mesh, and the vertex selections are highlighted in orange. The top-left interaction mode selector is your entry point to switch between editing contexts, including Object Mode, Edit Mode, and others. The newer Blender versions keep the same fundamental behavior, with small UI shifts over time.
Single Vertex Deselect and Area Deselect
Press Ctrl + LMB, click and drag an area covered multiple Vertices. How to deselect multiple vertices in Blender 5. Then release mouse button. Multiple vertices in this this area will be deselected.
To deselect a single vertex, you can use Shift + LMB or rely on the right-click context depending on your keymap settings. The ability to paint or box-select multiple vertices remains accessible via selecting tools located in the Toolbar or via hotkeys, ensuring an intuitive workflow for both beginners and advanced users.
Video Reference and Visual Aid
Furthermore, we can find all these steps visually in this YouTube tutorial video, watch here, Timestamp 0:00 Intro - Blender deselect vertices 0:12 Go To Edit Mode 0:25 Deselect one vertex with using Shortcut Shift 0:38 Deselect vertex with using Shortcut Ctrl 0:45 Deselect multiple vertices with using Shortcut Ctrl 0:54 Deselect All with shortcuts
Feel free to watch more Blender tutorials on YouTube Playlist. Subscribe YouTube channel for more Blender Tutorials! More video will be shared with you.
Edit Mode Behavior Across Blender Versions
For the most part Edit Mode in newer versions of Blender 2.8+/2.9+ and beyond, behaves largely the same in terms of what it can be used for (meshing, editing etc.). As noted in Blender Basics the Sets the object interaction mode selector that switches between different interaction modes (editing contexts) has moved to the top-left corner of the 3D Viewport. It still functions the same way so to toggle in/out of Edit Mode click the menu and select the Edit Mode option from the list. To exit Edit Mode select another mode option, e.g. In addition to the standard selection menu top-left, different modes can also be switched between using Ctrl + Tab.
Design note: in Edit Mode Ctrl + Tab accesses the Interaction Mode selection pie menu (Object Mode, Weight Paint, Pose Mode etc.), it no longer displays the element selection options (Vertex, Edge, Face Select).
Transform Widgets and Cursor Behavior
For newer versions of Blender the 3D Cursor has a dedicated Cursor transform mode that once enabled/active, allows the 3D cursor (red and white checkered loop) to be click-positioned or dragged around the Scene/screen without interfering with other objects in the 3D View, much like the 3D Transform Widget. The default behaviour of the 3D Widget, how its used to highlight and manipulate selections has been improved in newer versions of Blender.
For Move (G) and Scale (S) the widget also includes handles that accommodate transformation along two planar axes in addition to the standard cardinal axes (Rotate (R) remains untouched). To accompany the changes a new global Transform widget (Shift + Spacebar + T) has been added that includes control handles for each Move, Scale and Rotate action so each former manipulator type has their own mode of interaction and mechanics within a single tool.
Toolbars, Shortcuts, and Menus
Design note: the manipulator shortcut keys, i.e. When Edit Mode is active a series of editing tool buttons appears to the right of the 3D View, the Toolbar (T), some expand to reveal additional options using left-click-hold. The buttons are (currently) collated into three groups corresponding to Manipulation (cf. For newer versions of Blender the mesh/element Select Mode buttons have been moved to the right of the Sets the object interaction mode selector, top-left corner of the 3D Viewport.
Here the Vertex, Edge and Face select buttons can be found, now accessed using the numbers 1, 2 and 3 (main keyboard), for Vertex, Edge and Face respectively once Edit Mode is active (use Shift + [option] to select multiple selection options e.g. Vertex and Face). To better manage certain aspects of mesh editing, the Vertices, Edges, Faces and UVs menu options are now independent menu lists, Vertex (Ctrl + V), Edge (Ctrl + E), Face (Ctrl + F) and UV (U); instead of hunting down options in the Mesh menu i.e., Mesh » Faces » Tris to Quads, the option can be selected more directly from the Face menu available upper-left of the main area, e.g. Design note: ordinarily Ctrl + V pastes content after being copied (Ctrl + C) but in Edit Mode this brings up the Vertex menu. To make working with different mesh elements easier the Vertex, Edge, Face and UV options are now available as independent menus on upper-left of the main work area - many of the options formally available per selection type can be found in each menu list, everything associated with face editing and manipulation being in the Face menu etc., e.g.
Практические советы по дезселекту
Чтобы быстро снять выделение, используйте Ctrl + I или Shift + Ctrl + I в некоторых настройках клавиатуры для инверсии выделения или дезселекта отдельных вершин, если ваша конфигурация клавиш так позволяет. Рабочий процесс можно ускорить, запоминая горячие клавиши и размещение инструментов в интерфейсе, ориентируясь на основной порядок действий: выбрать объект, перейти в Edit Mode, убедиться, что используется режим выбора вершин, и затем применить нужный способ снятия выделения.
Итого, базовый набор шагов для дезселекта вершин: перейти в Edit Mode, убедиться, что режим вершин активен, выбрать одну или несколько вершин, применить желаемый ярлык (например, Ctrl + LMB для выделения области или Shift + LMB для снятия выделения одной вершины), и при необходимости зафиксировать изменения отпусканием кнопки мыши.
How to Select Vertices, Edges and Faces in Blender
Дополнительные возможности и версии
Для более старых версий Blender доступ к режимам редактирования и быстрый переход между режимами может отличаться, однако принципы остаются теми же: управление выбором вершин, их deselect и переключение между режимами через меню взаимодействия. Более того, с добавлением новых глобальных инструментов перемещения, масштабирования и вращения стал удобнее работать с несколькими элементами одновременно, сохраняя гибкость редактирования.
Таблица ниже иллюстрирует основные сочетания клавиш для работы в Edit Mode, применимые к дезселекту и выбору вершин:
| Действие | Клавиша |
|---|---|
| Переключение в Edit Mode | Tab или меню |
| Выделение вершины | 1 (Vertex select mode) |
| Снятие выделения одной вершины | Shift + LMB |
| Дезселект области вершин | Ctrl + LMB и перетаскивание |
| Снять все выделение | A (или Ctrl + I в некоторых конфигурациях) |
Для удобства можно настроить горячие клавиши под свои привычки, учитывая, что новые версии Blender иногда перераспределяют функции между меню и клавиатурой. Важно помнить, что переход между режимами и доступ к выбору вершин доступен как через верхнее меню, так и через сочетания клавиш.
Иконки и визуальные подсказки в интерфейсе
В Edit Mode визуальные подсказки помогают понять текущее состояние выделения: оранжевые вершины означают активные для редактирования, а управление инструментами отображается в панели инструментов справа. Переключение между Vertex, Edge и Face режимами доступно через кнопки или 1, 2 и 3 на клавиатуре, что упрощает точное редактирование сетки.