Designing a great flyer is half the challenge. The other half is printing it correctly. A layout that looks crisp on screen can come back stretched, pixelated, or poorly cropped if you don’t start with the right dimensions. This guide breaks down the most common flyer sizes and how to prepare your designs for high-quality printing so your work looks as good in hand as it does on screen.
Top 10 most popular flyer sizes and what they’re best for
A5 flyer size in inches: 5.8” x 8.3”. A5 flyer size in cm: 14.8 cm x 21 cm. A5 flyer size in mm: 148 mm x 210 mm. Best for: Invitations, promo offers, inserts. The A5 flyer size offers a balance between portability and readability. It’s a great option for small business owners looking for a compact but memorable format.
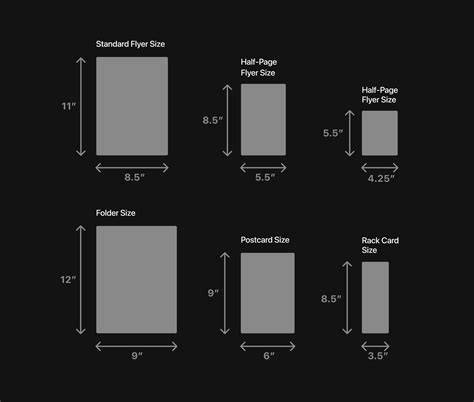
Quarter-page flyer size in inches: 4.25” x 5.5”. Quarter-page best for: Coupon handouts, small ads, quick product promos. Limited space requires concise, impactful design.
Rack cards size in inches: 3.5” x 8.5”. Rack cards Best for: Takeout menus, travel guides, marketing handouts. Information-heavy content that stays portable and eye-catching.
Large format flyer size in inches: 11” x 17”. Large format Best for: Posters, maps, events, venue announcements. Visual impact from distance; lots of space for high-resolution imagery.
Presentation folders size in inches: 9” x 12”. Not a traditional flyer, but often used to contain promotional materials. Cohesive design with inside contents adds professionalism.
Letter size (standard US letter): 8.5” x 11”. Very versatile; advertising campaigns, informational brochures, event posters. Balances space and readability with broad usability.
Legal size: 8.5” x 14”. Elongated canvas good for event schedules, concert promos, or community bulletins.
Tabloid size: 11” x 17”. See Large Format above; often used for bold, attention-grabbing displays.
DL format (long format): Used for rack cards or counter displays; requires careful layout to maximize space with one main message.
Why size choice matters
The size you choose directs the design approach, including copy length, imagery, and hierarchy. A flyer that’s too cramped may fail to convey its message, while an overly large piece can be impractical for distribution. Consider audience, distribution method, and the amount of information you need to present when selecting a size.
What to include in a flyer
- Clear and compelling headline: Concise, communicates the main benefit, and establishes a visual hierarchy.
- High-resolution imagery: Use crisp, relevant visuals at 300 DPI for sharp printing.
- Concise body copy: Bullet points or short paragraphs to aid readability.
- Call to action (CTA): Typography and hierarchy should guide the reader toward the action.
- Branding elements: Logo, brand colors, and typography to reinforce identity.
- Negative space: White space helps key elements stand out and keeps the layout clean.
How to choose the right flyer size for your needs
Start by considering your audience and distribution method. Will this flyer be handed out on the street, displayed on a rack, or included as an insert? The final dimensions should support your message and align with the delivery method. Always account for bleed, trim, and safe areas to ensure professional results in print.
Printing considerations: bleed, trim, and safe area
Bleed area: Extend backgrounds/images at least 0.125 inches beyond the edge on all sides to avoid white edges after trimming. Trim line: The actual line where the flyer will be cut; keep important content away from it. Safe area: Inner margin where critical text and images stay within 0.125-0.25 inches from the trim line.
Export your final designs as high-resolution PDFs with bleed and crop marks. When printing, ensure your file includes all necessary information for accurate trimming and color reproduction.
Printing workflow and file setup in Photoshop
- Open Photoshop and create a document at the final print size with 300 DPI.
- Design with bleed extend backgrounds beyond the trim edge by 0.125 inches on all sides.
- Place safe-area guidelines keep essential text and imagery within the safe zone.
- Export export as a press-ready PDF with crop marks and bleed.
- Optionally export a high-resolution JPEG or PNG for digital use.
Digital tools and alternatives to Photoshop
CapCut Online is a capable, free alternative for basic flyer design and resizing. It offers image upscaling, text tools, filters, background removal, and straightforward export options. CapCut Online provides accessible editing for users who need quick adjustments without a full Photoshop workflow.
Paper, coating, and finish decisions for flyers
- Lightweight text stocks are cost-effective for high-volume inserts; heavier stocks convey a premium feel for cards and sales sheets.
- Uncoated paper is easier to write on and has a warm, natural feel; gloss coatings enhance photography and color punch; satin/matte coatings reduce glare.
- For large dark backgrounds or brand colors with tight color expectations, request proofs to ensure color accuracy before a full run.
Frequently asked questions about flyer sizes and printing
- What is the standard size of flyers? It varies by region; common sizes include Letter and A4, with A5, A6, and tabloid in wider use depending on the market.
- Can I print full-bleed flyers? Yes, by including a bleed area in your file (usually 0.125 inches) so color extends to the edge.
- What paper is best for flyers? Matte or glossy coated stock between 100-170 gsm is typical; heavier stock adds a premium feel.
- Should I design for digital and print separately? Yes; maintain consistent headlines and CTAs, but adapt the layout for screen vs. print.
Practical guidance: choosing and applying sizes for different use cases
- Event promotion: A5 or Half Letter for handouts.
- Retail discounts: A5 or Half Letter for general promos.
- Menus or detailed specials: A4 or Letter.
- Real estate flyers: Letter (US) or A4 (international).
- Local services (gym, salon, clinic): A5 or Half Letter for distribution and counters.
Additional notes on common sizes and workflows
There isn’t a universal standard flyer size; choose a system (US Letter, A4, etc.) early and stay consistent across your project to streamline printing and distribution. If you design in Photoshop, consider saving output as a print-ready PDF with all bleed and crop marks. For multi-page needs, exporting two-sided PDFs with correct orientation is essential.
Table: Representative flyer sizes and specs
| Size | Inches | MM | Best For | Notes |
|---|---|---|---|---|
| A5 | 5.8 x 8.3 | 148 x 210 | Invitations, inserts | Compact, readable |
| Quarter-page | 4.25 x 5.5 | 108 x 140 | Coupons, quick promos | Limited space |
| Rack cards | 3.5 x 8.5 | 89 x 216 | Takeout menus, guides | Display-friendly |
| Large format | 11 x 17 | 279 x 432 | Posters, maps | High visual impact |
| Letter | 8.5 x 11 | 216 x 279 | General campaigns | Most versatile |
| Legal | 8.5 x 14 | 216 x 356 | Event schedules | Elongated format |
Integrating sizes into a cohesive printing plan
When planning a campaign, align multiple flyer sizes with distribution channels and messaging priorities. Use the same headline, offer, and CTA across formats while redesigning layouts to suit different canvases. For print partners, provide clear bleed, trim, and color specifications to avoid misprints and delays.
How to Set-up a File for a Large Banner
tags: #dimensions #for #flyer #photoshop