Photoshop offers powerful tools to fill areas with color, patterns, or gradients, enabling quick color changes, creative composites, and precise design adjustments. The Paint Bucket and Gradient tools occupy one cell in the Toolbar, and are represented by the icon of the last tool used. To choose another tool, right-click the triangle next to the tool and choose the desired tool from the menu that appears.
The Paint Bucket: Fill with Color or Pattern
The Paint Bucket is used to fill a selected area with a color or pattern by clicking on a pixel in that area. Parameters for the Paint Bucket are set in the Options panel. Fill. This parameter determines in what manner Paint Bucket will fill an area: with a color (Foreground) or pattern (Pattern).
Pattern. If Pattern is chosen in the Fill parameter, then clicking on the triangular button next to Pattern will open a palette of patterns to choose from. Mode. This parameter sets the mode in which an area is filled. Opacity. This parameter sets the level of opacity for the fill.
Tolerance. This parameter sets the degree to which pixel colors are influenced by a fill. It can accept values from 0 to 255. At lower values of the Tolerance parameter, the range of colors affected by the tool will decrease. Contiguous. If Contiguous is checked, then adjacent areas that are affected by the Tolerance value will be filled. Anti-aliased. When Anti-aliased is checked, a translucent border is created between filled and unfilled areas. All Layers. When All Layers is checked, all visible layers are affected by a fill.
It is also possible to execute a fill by selecting Fill in the Edit menu. To do this, first select an area using one of the selection tools and then choose the command Fill in the Edit menu. It is not necessary to make a selection if an entire layer is to be filled.
The Gradient Tool: Fill with a Gradient
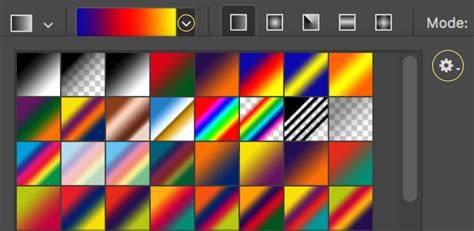
The Gradient tool is used to fill with a gradient, i.e. Step 1. Select an area to be filled with a gradient. Step 2. Step 3. Step 4. Step 5. Step 6. Press the left mouse button, and while keeping it pressed, move in a straight line. The starting point defines where the primary color will begin, the ending point defines where the background color will be. Gradient. The Gradient parameter displays gradient types from which to choose. Gradient Style. Mode. Opacity. This parameter sets the level of opacity for the gradient. Reverse. Dither. When applying a gradient with many color transitions the transitions between colors will be visible as bands. Transparency. It is possible to add transparency to the gradient.
Additional Tools and Techniques for Color Filling
The Quick Selection tool is grouped with the Magic Wand tool on the toolbar. Alternatively, you can use the Marquee Tool to make a selection. As you click each option, you'll see dashed lines around the edges. This menu item is next to File on the top-left. This option will allow you to fill the selected area with a solid color fill. Content Aware will fill the selected area with patterns derived from around your selection. You can click anywhere on the gradient to choose your color.
Practical Fill Examples
- Open an image in Photoshop. Select an area with the Quick Selection or Marquee tool. Click Fill on the Edit menu. Select Color next to Contents, and pick a color. Click OK to apply the color fill.
- Learn how to add a solid color fill to any selection or layer to enhance designs and speed up editing. Select the area you want to fill using any selection tool. Under Blending, choose the Mode and Opacity for the paint. Keyboard shortcuts: Fill non-transparent areas with the foreground color (Alt/Option + Backspace/Delete); Fill with the background color (Ctrl/Cmd + Backspace).
- Fill Color is a tone-direct tool that adds a color, letting you turn any color into the desired tone. For example, turn a blue dress into red by selecting the dress, setting Contents to Color, and Mode to Color. After filling, adjust with adjustment layers if needed (e.g., Curves, Hue/Saturation) to refine lightness or saturation.
Using Fill in Complex Scenarios
Two examples illustrate how to apply Fill Color to different subjects while preserving realistic results. First, select a subject with Quick Selection, set Contents to Color, and Mode to Color. After filling, you can fine-tune with adjustments. In another example, use Color Range to select grayscale rocks, then fill with Color in Color mode, avoiding shadowed areas to maintain depth. This approach emphasizes that precise selections and mode choices are key to convincing color changes.
If you often use Photoshop for editing and color work, consider a dedicated controller like TourBox to map shortcuts and commands to physical controls. TourBox expands what you can do by enabling macros and high customization across software workflows.
Placing an Image Inside a Shape: Shape Filling and Clipping Masks
Learn how to fill a shape with an image using clipping masks. Start by creating a new document, then place a shape from the Shapes panel, and insert an image on a new layer above it. Convert the image to a Smart Object if needed, and apply a clipping mask to restrict the image to the shape’s boundaries. Resize and reposition the image inside the shape using Free Transform with the aspect ratio linked. This technique creates a clean composite where the photo is fully contained within the shape.
To adjust the background behind the shape, add a Solid Color fill layer above the Background layer and sample a color from the image to influence the background. If desired, add a stroke to the shape via Layer Styles, setting Outside position for a crisp edge. When saving the final result with transparency, remove the Background layer and save as PNG to preserve transparency. This workflow demonstrates how fill, clipping, and layer effects collaborate to create polished composites.
How to Insert an Image into Any Shape in Photoshop (Step-by-Step)
In this walkthrough, you’ll see the progression from shape creation to image placement, clipping mask application, background adjustment, and final transparency considerations. The combination of Fill methods and gradient tools provides a versatile toolbox for designers to colorize, stylize, and integrate images within shapes.