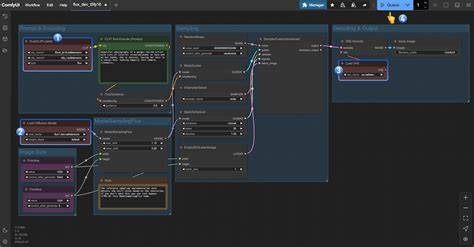
This guide explains how to install and run Flux.1 on a Windows machine using ComfyUI to achieve high-quality text-to-image generation with Flux.1, including the Dev and Schnell variants and practical workflow optimizations for large-scale image generation.
Overview of Flux.1 and its variants
Flux.1 is a family of text-to-image diffusion models developed by Black Forest Labs, known for exceptional visual quality, detailed image rendering, and refined hand depiction that reduces finger deformities common in other models. Flux.1 includes several variants, with Flux.1 Dev (12B) and Flux.1 Schnell (4B distilled) being openly accessible, while other official variants may have higher hardware requirements or be restricted by licensing. Flux.1 Fill handles inpainting and outpainting, enabling extended canvases and complex compositions.
Key characteristics of Flux.1 variants
- Flux.1 Dev: High quality, larger model (12B), best for detailed prompts, longer render times, greater VRAM usage.
- Flux.1 Schnell: Distilled 4-step model prioritizing speed, lower VRAM, suitable for rapid prototyping and fast iterations.
- Flux.1 Fill (dev): Inpainting/outpainting capabilities; full model can demand 30-34GB VRAM for 512x512 FP16, depending on configuration.
- Quantization: Reduces memory footprint and allows running larger models on modest GPUs, e.g., 7.5GB VRAM for 512x512 with a quantized variant like flux1-fill-dev-Q4_K_S.gguf.
Prerequisites: hardware, software, and versions
To utilize Flux.1 within ComfyUI, you need the latest version of ComfyUI and compatible Flux.1 weights. The guide emphasizes Open Source components for Dev and Schnell variants and notes high hardware requirements for full models. Ensure your Windows system has sufficient VRAM, or plan to rely on quantized variants to stay within practical limits. ComfyUI Manager is the recommended method to update ComfyUI easily.
Recommended setup steps for Windows
- Install the latest ComfyUI and enable model loading via the ComfyUI Manager.
- Download Flux.1 Dev or Flux.1 Schnell weights, as well as the Flux.1 Fill (dev) model for inpainting/outpainting tasks.
- Place the downloaded model files in the appropriate ComfyUI directories:
- Diffusion models: ComfyUI/models/diffusion_models/
- GGUF unet files: ComfyUI/models/unet/
- Text encoders: ComfyUI/models/clip/
- VAE: ComfyUI/models/vae/
- Download the necessary t5xxl_fp8_e4m3fn.safetensors and clip_l.safetensors and place them in ComfyUI/models/clip/ (texts encoders).
- For quantized workflows, start with flux1-fill-dev-Q4_K_S.gguf (or similar) to reduce VRAM usage, then adjust batch size and prompts as needed.
Quantization and VRAM optimization: practical guidance
Quantization dramatically reduces memory footprint, enabling high-quality Flux.1 generation on GPUs with modest VRAM. For example, on an RTX 2080 Ti, a quantized flux1-fill-dev model can generate 512x512 images with around 7.5GB VRAM, while the full FP16 model may require 23.8 GB. However, higher resolutions (1024x1024+) or large batch sizes can trigger CUDA out-of-memory errors, especially with complex ComfyUI workflows. When using quantized models, monitor VRAM usage and adjust resolution, batch size, and workflow complexity accordingly.
Designing workflows in ComfyUI for Flux.1
ComfyUI’s node-based interface allows you to connect components like Image Loader, CLIP Text Encoder, and GGUF Loader to form a Flux.1 workflow. The following outlines a practical baseline workflow and how to tailor it for Flux.1 Dev or Schnell variants.
Baseline workflow components
- Image Loader: loads prompts or reference images
- Diffusion model loader (GGUF or safetensors)
- CLIP text encoder (clip_l or t5xxl_fp8_e4m3fn)
- VAE model (ae.safetensors)
- ControlNets or LoRAs (optional) for guidance
- Upscaler (optional) for higher resolution
A typical setup uses the Load Diffusion Model node to pick the Flux.1 weight file, the Load Clip/Encoder nodes for text processing, and the Load VAE node for decoding. If you’re new to ComfyUI, you can start with a ready-made example workflow and then customize prompts, steps, and guidance scales as needed.
Adjusting workflow parameters for Flux.1
- Steps/Guidance: Flux.1 Schnell often uses fewer steps for speed; Flux.1 Dev uses more steps for higher fidelity.
- Resolution: begin at 512x512; increase to 768x768 or 1024x1024 only if VRAM permits.
- Batch size: start with small batches (e.g., 1-4) and scale up with confirmed stability and available VRAM.
- Memory management: consider enabling fp8/quantized weights to reduce memory footprint with minimal quality loss.
Workflow automation and large-scale generation
You can automate image generation with Python scripts integrated into ComfyUI workflows. For example, you can convert a JSON workflow to Python, adjust batch sizes or prompts, and run thousands of image generations as part of an automated job. The article shows how to move a downloaded .json workflow into the ComfyUI/ComfyUI-to-Python-Extension folder and run a conversion script to generate a Python workflow file.
Practical notes on Flux.1 variants and performance
The Flux family supports several modes to balance speed and quality:
- Flux.1 Schnell: Fast, few-step generation with FP8 precision; useful for rapid prototyping.
- Flux.1 Dev: Higher quality and more controllable outputs, better at complex scenes and hands.
- Flux.1 Fill (dev): Inpainting/outpainting; quantized versions reduce VRAM requirements.
Notes on compatibility and updates
ComfyUI has native Flux support since August 2024. The easiest update path is via the ComfyUI Manager. If new Flux.1 variants are released, they can be integrated into your workflow by updating the model files and ensuring the corresponding CLIP/text encoders and VAE models are present.
Illustrative workflows and example configurations
Below is a simplified example workflow explanation for a quantized Flux.1 Fill [dev] setup in ComfyUI, highlighting the steps to install, load, and generate.
- Install and launch the latest ComfyUI via the ComfyUI Manager.
- Place the quantized Flux.1 Fill [dev] model in ComfyUI/models/unet/ (GGUF) or ComfyUI/models/diffusion_models/ (safetensors type).
- Place required CLIP models in ComfyUI/models/clip/ and the VAE in ComfyUI/models/vae/.
- Connect nodes: Image Loader → Load Diffusion Model → CLIP Text Encoder → Diffusion → Output Image
- Optionally connect ControlNets or LoRAs for conditioning and refinement.
- Run the workflow and adjust steps, guidance, and prompts to taste; if using quantized models, monitor VRAM usage and performance, especially at higher resolutions or larger batch sizes.
Example prompts and tips
- Use descriptive prompts to leverage Flux.1 Dev’s fidelity for hands and textures.
- Experiment with different guidance scales to balance creativity and fidelity.
- Leverage inpainting/outpainting for extended scenes using Flux.1 Fill [dev].
Table: VRAM considerations and model variants
| Variant | Model size | Recommended VRAM (512x512, FP16) | Notes |
|---|---|---|---|
| Flux.1 Dev | 12B | High | Best quality, higher hardware needs |
| Flux.1 Schnell | 4B (distilled) | Moderate | Faster, lighter on VRAM |
| Flux.1 Fill (dev) | Inpainting/outpainting | 30-34GB (full); quantized variants much less | Inpainting; quantization reduces memory footprint |
| Quantized Flux.1 Fill (Q4/Q8) | GGUF or smaller | ~7-8GB | Suitable for mid-range GPUs |
Tips for troubleshooting and common issues
- If CUDA out of memory occurs, switch to quantized Flux.1 Fill, reduce resolution, or decrease batch size.
- Ensure the correct paths for model files in ComfyUI (diffusion_models, unet, clip, vae).
- Update ComfyUI via the Manager to ensure compatibility with Flux.1 features and new workflows.
- Keep CLIP and text encoders aligned with Flux.1 versions to maintain coherence in prompts and outputs.