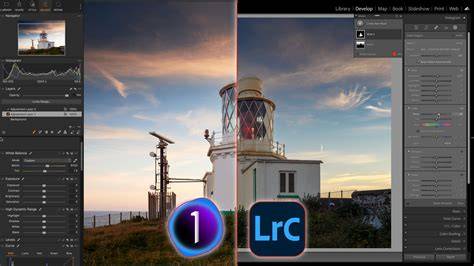
Left a picture sample from Capture One, and the same (right) in Lightroom. I tried to match them as much as possible, but not being scientifically precise. This is the third version of the original article. I added more thoughts and some samples. I have been an avid user of Lightroom for many years, and like everyone else, I have been kind of lazy and just used this software for my editing.
When you’re shooting with a Leica M, you’re not just taking photos-you’re capturing moments with one of the most iconic cameras in the world. There are IA tools in both L. Capture One: Known for its exceptional colour accuracy, Capture One builds custom colour profiles for supported cameras. Lightroom: Adobe’s profiles are solid, but often generic (update - The Leica M9 handling in Capture One is also generic). Capture One: Delivers crisper detail, better highlight recovery, and more nuanced tonal control. Lightroom: Still excellent, but tends to apply more aggressive noise reduction and sharpening by default, which can soften fine detail.
Capture One: Offers both Catalogues and Sessions, giving you flexibility whether you’re managing a full archive or a single shoot. Ideal for professionals and project-based workflows. Lightroom: Uses a catalogue-only system. Capture One: Built for pros. Offers deep control but has a steeper learning curve and isn’t as intuitive to learn as Lightroom. However, the big advantage, if you’re like me and have used Lightroom, is that you can change and rearrange how the different actions and palettes are displayed on the screen, making it customizable and closer to Lightroom. Lightroom: More intuitive and beginner-friendly.
If you’re a Leica M shooter who values colour accuracy, RAW fidelity, and professional‑grade control, Capture One is the clear choice. Addendum · March 2026: Capture One vs. Lightroom Classic, one year on (and why I’m leaning Capture One now). A year ago, I wrote that Lightroom felt faster for my street and everyday portrait work, while Capture One gave me the truer colour and micro‑detail I like for more considered files. Since then, both apps have moved on-but Capture One has made the bigger, more practical steps for my kind of editing. Here’s what’s changed, what actually matters in use, and a short note on why we edit at all.
What’s new in Capture One since mid‑2025
Negative Film Conversion (built‑in) - direct, batch‑consistent conversion of camera‑scanned negatives without plug‑ins. Masking & retouching got deeper and tidier - Combine Masks (add/subtract/intersect as groups), Retouch Eyes and Retouch Teeth, Include Neck Area for skin tools, Clothes Masking, PSB support, and a simple Contact Sheets creator for quick client PDFs. Layers to Photoshop: better hand‑off - export your masks as alpha channels in PSD/PSB, plus small but welcome UI touches like mask thumbnails per layer; some AI tools now use Snapdragon NPUs on supported Windows laptops. I stay away from AI as much as possible, but I may rely on masking, which by hand would take an awful lot of time, by using AI to do the job. But any altering, removal or amendments to a photo is strictly forbidden in my world, where honesty and art must go hand in hand.
Sessions and on‑set organisation - Session Builder can pre‑create a complex folder structure before the first frame; Retouch Faces gives quick, natural slider‑based clean‑up that carries forward during tethered “Next Capture Adjustments.” (I still keep it subtle.) Mobile is finally workable - sessions on iPad/iPhone, external‑drive backup on the go, and People Masking on mobile. It’s not the Lightroom cloud, but it’s now useful when travelling. Performance & quality‑of‑life - faster exports, quicker People Masking, keystone loupe for precise alignment, and cloud‑sync of styles/workspaces/presets across your own machines. Tethering & camera support - continued day‑one support for new bodies (including Leica M EV1) and meaningful tethering upgrades (Fujifilm focus tools, Live View tweaks). Panasonic LUMIX joined the official tethering club.
What’s new in Lightroom Classic (2025 → early 2026)
Speed & handling - better preview responsiveness while hovering presets/History, smoother crop, and (importantly) GPU‑accelerated preview generation if you have a decent card. AI‑assisted culling & stacking - early‑access Assisted Culling, Auto Stack by time/visual similarity, and an Auto Dust Removal mode in Remove. Lightroom left - Capture One right.
In this example, I dragged down the highlights a lot, and both colours and the edges of the hand are crushed in Lightroom. In Capture One, doing the same, the colours stay true, and the highlights keep the colours intact. This is the same in many other adjustments, where Capture One is much gentler in handling colours and contrasts. At the end of the day, it matters what you are doing and why.
Side-by-side conclusions
After making more one-to-one comparisons, I will add that Capture One and Lightroom each have their strengths and weaknesses. Capture One is great at colour rendering and is now even better than I experienced before, and when looking closely, it handles colours better. If you are a portrait photographer or shoot commercials, this might be the go-to tool. And, now, also as a street photographer, I will lean on CaptureOne (video at the end with more examples and explanation).
This part is a major game‑changer for me. They may have been focusing too much on speed and didn’t really look at the big differences. On a past street shoot, I experienced a huge difference, which made me shift towards Capture One. As a street photographer and photojournalist, I have found it difficult to edit with Capture One on the fly. I didn’t need that extra care about colour rendition for my kind of work. I needed speed, I needed good highlight and shadow handling, and to my surprise, Lightroom did a far better job on that than Capture One did. Until now.
Color & tonality
Capture One keeps its edge for clean, camera‑faithful colour with the control to nudge it exactly where you want-why product and portrait people swear by it. Lightroom’s Point Colour with Variance helps for targeted tweaks, but it’s still a different rendering philosophy out of the gate. In general, I also found that simple pictures with close to no editing stand out in Capture One more pleasing than in Lightroom.
Masking & local edits
Lightroom’s object/people/sky detection and AI Remove tools are mature and fast, and Assisted Culling is useful if you want the machine to pre‑sort. It takes a little time to adjust the workflow in Capture One, but as with everything else, it’s a matter of repetition, and it gets easy to work with. For my files and the way I like to work, Capture One now fits better overall. Lightroom Classic is still excellent-especially if you live in the Adobe ecosystem or want cloud‑everywhere and AI‑assisted culling.
Choosing the tool that serves you now
This isn’t about loyalty-it’s about choosing the right tool for the job, right now. If you’re editing large batches, working in high ISO, or want AI tools that truly speed up your editing process, Lightroom Classic in 2025 is an incredibly strong choice. Capture One still shines for high‑end control, commercial editing, and workflows where ultimate precision matters. Eye‑AF and subject tracking in wildlife photography have become integral features, but they are only as effective as the photographer behind them.
Two teams stand out in the RAW post‑processing world. Lightroom remains the cloud‑forward, beginner‑friendly option with excellent AI enhancements and a vast ecosystem. Capture One offers unparalleled color control, robust tethering, and a customizable workspace that suits power users and studio workflows. In practice, the best choice depends on your shooting style, gear, and whether you value speed and mobility over ultimate color control.
Practical guidance for decision making
If you shoot street or daily portraits and prioritize speed, cloud access, and a gentle learning curve, Lightroom is typically the more practical default. If you shoot studio work, commercial projects, or rely on precise color management and extensive tethering, Capture One often pays dividends in color fidelity and workflow customization.
Tech notes on workflow formats
Catalogs vs. Sessions: Lightroom uses catalogs; Capture One offers both catalog-like workflows and Sessions for project‑based editing. For mobile editing, Lightroom’s ecosystem and cloud sync are highly developed; Capture One’s mobile app remains feature‑limited but evolving. This is a key factor for editors who travel or work across devices.
Editing tools and RAW processing
Capture One’s color editor, localized color controls, and layer-based editing provide nuanced control that many professionals prefer for tricky lighting. Lightroom’s AI masking, selective edits, and neural denoise have grown to rival dedicated tools, making Lightroom a formidable generalist platform while still leaving room for Capture One’s horsepower in color and workflow depth.
In tethered workflows, Capture One generally remains the more capable option, with more reliable live view and better camera control. For non‑tethered work, both programs shine, but the choice often comes down to color management preferences and how you structure your edits.
Finally, if you are undecided, try Capture One with a 30‑day trial to assess its session workflow, and revisit Lightroom Classic for its AI tools and cloud features. The best choice is the one that fits your current projects, budget, and preferred editing rhythm.