Another significant update in Adobe InDesign launched in Beta recently. Generative Expand - now available in the most current version of InDesign (19.5) - intelligently extends and adds more content to missing areas of an image. The update is only available in InDesign versions of English International and English North America.
This AI-powered tool was unveiled to Photoshop in 2023 and is now available right in the InDesign app. So how does it work in InDesign?
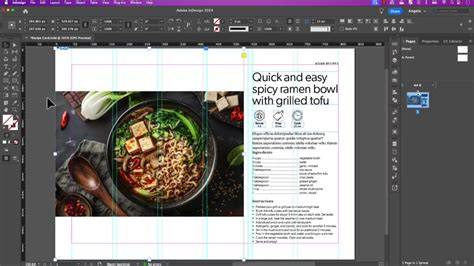
In this tutorial, we'll use a landscape photo that needs to be cropped into a square frame. Naturally, you can always increase the size of the content within the frame to fill it to the frame. But what if you didn't want a tight crop? That's where Generative Expand comes into play.
Click the link below to download the InDesign document and image to follow along in this tutorial. Generative Expand.
Open the InDesign document saved in the lesson files. It's saved as Generative Expand.indd. Import the image saved as Spicy Tofu.jpeg. Use the frame fitting option Fit Content Proportionally. This will fit the width of the frame, leaving space above and below the image.
Click the frame once with the Selection Tool. There are two ways to access the Generative Expand option in InDesign. The first is by using the Text to Image panel which is located under Window > Text to Image (Beta). The second is using the Contextual Task Bar, which can be accessed by going to Window > Contextual Task Bar.
With the frame selected, click on Generative Expand. You can add a text prompt or just click Generate to extend the missing areas of the image. Three variations will be generated and if you're not pleased with the results, click generate again to produce three more options. When you choose one of the variations, you will notice the linked jpg in the Links panel. This means when you package a document, the AI-generated image will be export in the links folder. The original image - in this case Spicy Tofu - is overwritten with the generated version.
Select Generative Expand from the Contextual Task Bar. Select the left or right arrows to view and select different variations of your prompt. The original image is now replaced with the selected variation. You can select Window > Generate to view all the past variations. Once you select Hide Context Bar, the Contextual Task Bar will not open by default.
Determine the intended frame size. Position your image within the frame, taking into account where it will be expanded. For example, if you position the image at the far left of your frame, it will extend to the right boundary. Stick with simple and direct language with your text prompt, approximately 3-8 words that include a description, color, or scene. Don’t worry about adding commands like add or remove. The original image in the document will be replaced with the generated image.
One of the most common problems for InDesign users who need to print on a commercial press is “bleed” - the fact that colors or images must span not just to the edge of a page, but beyond it. If you have a frame with a colored fill, it’s really easy to make it bleed: you just extend it out to the bleed guides, or a bit on to the pasteboard. First, make the graphic frame bigger than the image.
InDesign uses its Firefly GenAI tools (which, as far as I know, require you to be connected to the internet) to expand the image - adding new data where the frame is empty. It gives you three variations you can choose from, but because this is all going outside the page edge, it rarely matters which one you choose. It’s almost too good to be true.
NOTE: At the time of this writing, Adobe is listing this feature as “beta” technology. So use it with caution! It only works when you start with a JPG or PNG file. The expanded image is an embedded RGB JPG. Your image is replaced with the new GenAI image. For that reason, it may be better to clone your image (create a duplicate of the image), then select the bottom image and expand that one.
[Narrator] Now that we know how to use text-to-image technology directly within Adobe InDesign, it's time to look at the other available options. Now I'm going to go back and revisit the same project that you have finished in the previous exercise, but we're going to change your minds. I mean, isn't design about changing our minds or just incorporating the changes that our customers want to have in their documents?
So what are we going to do? Well, apparently, my customer didn't quite like this fictional skyline image that we had in the previous exercise. Instead, we just need to expand what we had here underneath that image. And so what we're going to do is we're going to make sure that we just basically generate additional image for this one, and we're just going to put some text on top of it, okay?
You've likely seen the power of Generative Fill in Adobe Photoshop (Beta) over the last couple months. Adobe released yet another AI-powered photo-editing tool which works similarly. Generative Expand uses the Crop Tool to expand the dimensions of an image and add more content using AI. InDesign users especially will find this new Ps feature even more helpful and in this tutorial, we'll go over an example.
Imagine you're working on a social media campaign that requires an Instagram Stories sized design. You found the perfect photo, but the problem is it won't fit for a 1080x1920 post dimension. Follow along in this tutorial as we'll run Generative Expand on an image for a fictional "Visit Lake Louise" social media promo and apply it to the creative in InDesign.
Do you want to follow along with the video tutorial? You can find the lesson files by clicking the link below to download them. Generative Fill is only available in the latest Photoshop (Beta) app, which can be downloaded by going to the Creative Cloud desktop app, clicking the Beta tab on the left side menu and installing Photoshop. Once Photoshop (Beta) is downloaded, open the image called Lake Louise.jpeg. This is the image we'll be applying the Generative Expand to.
Generative Expand: Click on the Crop Tool located in the Tool Bar. In the Aspect Ratio fields, located in the Options bar at the top of the workspace, type 1080 in the width field and 1920 in the height field. You can also choose 16:9 from the Aspect Ratio dropdown options. While holding Option (Mac) or Alt (Windows) click and drag the top handle of the crop dimension until the sides of the crop preview is snapped to the sides of the image. In the Options bar, in the Fill dropdown, choose Generative Expand. Click the checkmark to commit to the crop. Sit back and watch the AI magic happen.
Here's a slide show of the steps explained above: Each time you generate, Photoshop will give you three Variations to choose from. Not satisfied with the results? Click Generate again to get three more Variations to look at. Here are the three options for the Generative Expand example above: In this tutorial, we'll also look at how to add a Sky Replacement adjustment to the image to soften the sky. This will allow us to add a logo in the negative space of the image, so having a soft sky will add more contrast and bring out the logo and text in the InDesign creative. Sky Replacement Open the Layers panel and click the Generative Expand layer. Go to Edit > Sky Replacement. In the Sky Replacement options, adjust the sliders to your requirements. Click OK. Export the image by going to File > Export and then choose Export As. Choose JPG from the format and use the Scale dropdown to adjust the size of the export. Click Save and save the image as Lake Louise-2.jpg.
The final step is adding the new image to the InDesign project. In the lesson files, open the InDesign document saved Visit Lake Louise.Indd. The layout as the original Lake Louise image in the Instagram Stories design, but you will notice the crop is much too tight. When Adobe released the July 2024 version of InDesign, I was glad to see the program finally getting some love after years of insignificant updates. However, after having some time to test it, I think most people should avoid using one of the new features, Generative Expand, because it has some significant drawbacks at present. To be fair, the feature is labeled “(Beta)” and for some good reasons described below. That’s the bad news. The good news is, there’s an easy alternative that avoids most of the problems: simply use the Generative Expand feature in Photoshop instead. When you use Generative Expand in InDesign, the image that is produced is different in many aspects from the original. Here are the ones I’ve seen so far.
The generated image is embedded in the InDesign file, replacing the original, so the link to the external file is lost. It’s also given a generic name with no indication of what the original was called. If you have a color-managed workflow, this could be a biggie. The generated image has no color profile. Any profile that the original image was tagged with is discarded. Without diving too deep into color management here, one problematic scenario is if you’re working on a document that has a different working space than the one that was embedded in the original image. That embedded profile was the key to keeping the image color consistent through output, regardless of the working space of different documents it might be placed into. When that key is discarded, other things can happen. Bad things. InDesign will have no idea how it was supposed to interpret the colors, and it will assume the current working space is correct. This can lead to color shifts when you print or output a PDF.
Here are some examples of the shifts that can occur when you expand images that were originally tagged with various RGB profiles and placed in an InDesign document with the Adobe RGB working space. It might be hard to see the difference in these compressed screenshots, but it can be very noticeable in the actual files. If you use a PDF preset that leaves the colors unchanged, you may be able to keep out of trouble with a good print service provider. But if you use a preset that converts all colors to the destination space (e.g. Press Quality, X1a), the damage is done, at least in the PDF. Not to mention that if you started with a CMYK original, it will be replaced with an untagged RGB file. Generated images will be 72 ppi actual resolution, though they’ll be scaled down in InDesign to have a higher effective resolution, which may or may not match the original.
You can see all the differences in the Links panel if you duplicate the original image in the layout before expanding it. Another consequence of losing the image’s metadata is that Live Captions will be lost. InDesign creates Live Captions on the fly by checking the metadata in an image and placing that metadata in a text frame. When the generated image replaces the original, the Live Caption will disappear. Previously created Static Captions will remain, but you will lose the ability to create new Static Captions. Generative Expand works on JPEGs and PNGs, but it will always return a JPEG. What compression settings are used to make that JPEG are a mystery. Many people are very concerned about generative AI being used for disinformation, propaganda, etc. How do you trust anything you see when you have to assume everything might be fake? That’s one of the reasons Adobe came up with Content Credentials. If you enable Content Credentials in Photoshop and use Generative Expand, the image will include metadata revealing that it contains generated content. Images generated in InDesign will not contain that metadata, even if you unembed the image using the Copy Links To feature and open it in Photoshop.
Despite the fact that they’re named the same, the Generative Expand features in Photoshop and InDesign have very different consequences for workflows. Using the feature in Photoshop avoids the most significant problems mentioned above. So, if any of those things matter to you, do your generative expanding in Photoshop. It’s easy. Choose a variation from the Properties panel. The generated content is added in a nondestructive manner, via a new layer. That’s a good thing, but it means you’ll have to perform an extra step to flatten the image. Obviously, the pace of change with Adobe’s generative AI tools is fast and furious. They may release an update that addresses some or all of these issues. Members get a special discount on registration!
Extend images with Generative Expand in Adobe InDesign
tags: #generative #expand #indesign