Lightroom is a catalog-based photo manager and post-processing tool, and the import process is the essential first step to begin editing your images. This article compiles and arranges the most practical guidance from the provided draft to give you a step-by-step, highly detailed workflow for importing photos into Lightroom Classic and optimizing subsequent organization and performance.
Understanding the import workflow
When you import photos into Lightroom Classic, you create a link between the photo itself and the record of the photo in the catalog. You work from left to right in the import window: first identify the source files on the left, then decide how to bring them into the catalog in the middle, and finally specify the destination and options on the right. To begin efficiently, think through how you want to organize your photos and where you plan to store them before you start.
Setting up Lightroom Catalog and storage
Processing images is an essential part of photography but before you can dive into the editing process, you need to understand how to properly import your photos into Lightroom CC Classic. If you do not follow a few basic rules, you will almost certainly lose track of your images. To avoid confusion, create a few folders to store the catalog and photos: STEP 1 File > New Catalog, STEP 2 name the catalog, STEP 3 decide whether to store on internal or external drives, STEP 4 create folders for the catalog on the chosen drive. Remember: Lightroom references photos rather than storing them inside the program, so do not rename or move files Lightroom references. This helps prevent broken links and missing files later on.
For simplicity, many photographers prefer keeping all files on a single drive under a single parent folder. If you move or rename a file or folder that Lightroom references, you must manually reconnect the image or folder.
Choosing a source and preparing for import
Import begins with selecting the source from which you will import: your computer, a memory card, a camera, or an external drive. If a device is connected, Lightroom will recognize it as a source. Use the Include Subfolders option if you need to bring in nested folders. Lightroom will gray out photos that have already been imported when file naming matches, helping you avoid duplicates.
To import efficiently, you can either copy, copy as DNG, move, or add. Copy creates a duplicate in the destination while leaving the original in place; Move relocates files (not available for memory cards); Add places existing files into the catalog without moving or copying; Copy as DNG converts to Adobe’s DNG RAW format. For cards and cameras, Copy is typically the default choice unless there is a specific reason to convert to DNG.
Destination and folder structure
Specify where you want to save your copied photos. It is ideal to use an external hard drive dedicated to your photography, and then create a folder structure that helps you locate files later, such as LR Photos with subfolders by date and description (e.g., 2020-04-01 - Yosemite Valley). When setting a destination, you can create new folders in the import dialog and assign a clear, logical structure to your destination directory.
Import options to customize your workflow
In the Import window, you’ll find several panels on the right that tailor how Lightroom handles your images:
- File Handling - Don’t Import Suspected Duplicates to prevent re-importing the same image.
- File Renaming - Rename on import using templates (e.g., Date - Filename); you can customize templates to fit your workflow.
- Apply During Import - Apply Develop Settings to presets on import (e.g., color, sharpening) and add metadata or keywords. You can set a default Develop preset or metadata template if you prefer.
- Destination Folders - Organize where the copies go, including subfolders under the main destination folder.
- Build Previews - Choose preview quality: 1:1 previews render full-size images for fast browsing; Standard previews adapt to monitor resolution; Minimal previews use embedded previews to save space. 1:1 previews improve performance after import but take longer to create.
- Build Smart Previews - Useful if RAW files remain on an external drive; enables post-processing even when originals aren’t accessible, and you can export at web-friendly sizes.
Apply during import and metadata planning
The Apply During Import section allows you to apply a Develop preset to images as they are imported, and you can add or edit metadata templates to embed keywords that help you search later. If you plan to reuse common keywords across images, create a metadata template with those keywords for quick application during future imports.
Renaming and organizing after import
After import, Lightroom may automatically place you in the Previous Import collection. You can rename folders in the Library module to maintain a consistent naming convention, typically including date and a brief description. This helps maintain a clean catalog and consistent retrieval later in your workflow.
Efficient importing practices and tips
Shortcuts and preferences can speed up the process: set Lightroom Classic to start automatically when a card is detected, and use keyboard commands to select multiple photos (Shift-click for contiguous, Cmd/Ctrl-click for non-contiguous). If you’re upgrading from another workflow, you can reduce friction by learning to use Add Photos or Set up Auto Import for a more hands-off approach after you configure a watched folder. Auto Import copies originals to your cloud-connected location and can simplify ongoing workflows if you regularly import from a consistent source.
When you import from Apple Photos (iPhoto) or other apps, a drag-and-drop technique can be particularly effective: overlap the Apple Photos library window over Lightroom Classic and drag images into Lightroom. This method can feel tricky at first, but a quick fullscreen view helps you manage the process comfortably.
Performance and workflow optimization
Store active work on a fast internal drive (e.g., SSD) while archiving completed projects to slower external storage. This approach helps Lightroom perform more smoothly during editing sessions while maintaining a safe offload for older projects. Remember to optimize Lightroom’s performance by adjusting previews, metadata, and catalog storage as part of your routine maintenance.
Additional considerations and related features
Lightroom supports various metadata interactions with other Adobe applications. If you modify metadata in Bridge or Camera Raw, Lightroom can reflect those changes, though it may warn you when a file has changed externally. You can choose to import those external metadata changes or preserve Lightroom’s database edits. The software also supports a wider range of file formats and has limits on pixel dimensions and color depth for certain formats.
For users who need continuous synchronization or collaboration, Lightroom’s features like Auto Import and collection synchronization offer an alternative to tethered capture scenarios, especially when a camera is not supported directly.
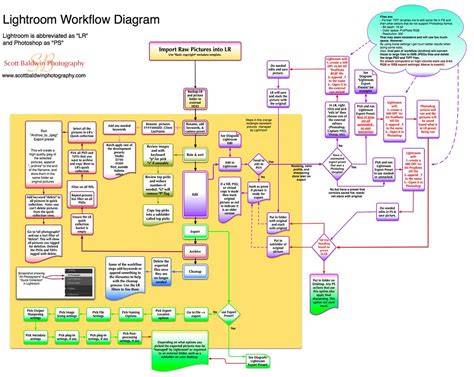
Sample workflow recap
- Create and name a new Lightroom catalog on your preferred storage drive, preferably external for easier backup and portability.
- Connect your source device, choose Include Subfolders if needed, and select the images to import using the Copy, Copy as DNG, Move, or Add options.
- Choose a destination folder structure and build appropriate previews for your workflow.
- Apply Develop Settings and metadata templates during import if desired.
- Organize imported images by date and description, and save an Import Preset for future consistency.
- Consider enabling Auto Import or Synchronize Folder for ongoing projects, and back up your catalog and photos regularly.
Whether you’re starting from Apple Photos or importing directly from a memory card, the key is to plan your destination structure, select the correct import method, and set up helpful metadata and presets to streamline future work.