From the Text Wrap panel you can change the wrap options of each object and control how text flows around images, shapes, and other elements in your InDesign layouts. By default, objects are set to No Text Wrap, but you can switch to options like Wrap Around Bounding Box or Wrap Around Object Shape to achieve precise typographic control. If text wrap behaves unexpectedly, a quick examination of the Text Frame Options and the Ignore Text Wrap setting can save a project from tedious rework.
Activate and understand the Text Wrap options
From the Text Wrap panel you can change the wrap options of each object (The same options are also available in the menu bar). Click on Window and then Text Wrap to activate the panel. Wrap the text by selecting an object and choosing one of the wrap modes: Wrap Around Bounding Box, Wrap Around Object Shape, Jump Object, or Jump To Next Column. This determines whether text goes around the object, jumps above or below it, or moves to the next column.
By default, any object you place in InDesign is set to No Text Wrap (A). You can change it to Wrap Around Bounding Box (B), or to Wrap Around Object Shape (C), which can detect edges of an image for a natural boundary. Jump Object (D) forces text to avoid the object entirely, while Jump To Next Column (E) shifts surrounding text to the top of the next column.
Adjust the distance and edge detection
You can set the distance between the text and around the object by changing the offset values and the wrap options. This creates a boundary that you can personalize using the Direct Selection tool or the Pen tool. If you choose Wrap Around Object Shape and Detect Edges as type, InDesign can generate a boundary that wraps the text around the image precisely, with edge detection adjustable via Object > Clipping Path > Options.
Wrap text around images with captions and anchored objects
A group of objects acts like a single object. To wrap text around an image with a caption, group the image and the caption, then set the Text Wrap to the group (and anchor the group if needed). For anchored or inline objects, the text wrap properties affect only the lines after the anchor marker, not the line with the anchor itself.
Text wrap and master pages, layers, and hidden content
Text wrap can be applied to master pages so that wrapped text consistently flows around images on all pages. You can choose Apply to Master Page Only to limit the wrap to master-page text. By default, wrap objects affect text frames on all layers, even if a layer is hidden. To change this, disable the option Suppress Text Wrap When Layer Is Hidden in the Layer Options dialog.
Ignore text wrap in a text frame
To set a text frame to ignore any wrap option: select the text frame, open Text Frame Options (Object > Text Frame Options or Cmd/Ctrl+B), and enable Ignore Text Wrap. This is a quick way to prevent wrap from affecting a specific frame, which is particularly useful for headlines or sidebars.
Wrap inside an image or shape (invert text wrap)
To wrap text inside an image or shape, use the Invert option - wrap around the inside of a shape. Place the text above the shape, adjust the offset to your needs, and customize the wrap boundary with the Direct Selection tool or Pen tool.
Troubleshooting text wrap
If InDesign is producing inconsistent text wrap behavior, consult a checklist such as InDesignSecrets’ guide to identify the issue, or consider exporting to .idml, reopening, and saving as a new .indd file in case of file corruption. To avoid recurring wrap problems, create a template file with all required styles and parent pages for various page layouts. Build issues on the template so every new document starts from a clean, first-generation copy. Avoid reusing problematic files from past issues to minimize wrap-related headaches.
Practical usage: common scenarios
To place content and control its wrap behavior, you can:
- Place an image and apply Wrap Around Object Shape; Detect Edges to tailor the boundary.
- Group an image with a caption and apply wrap to the group for cohesive results.
- Anchor objects and understand that wrap affects subsequent lines after the anchor marker.
- Use Ignore Text Wrap on a frame to preserve its standalone typography, such as headlines.
When to use wrap and when to ignore
Remember: wrap is powerful for integrating images with text, but there are times when you want to preserve a block of text without interference. In those cases, use Ignore Text Wrap on the specific text frame, or manage wrap at the master-page level for consistent layouts across documents.
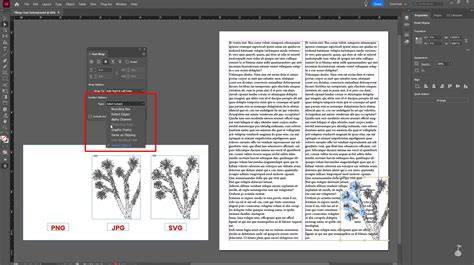
Infographic idea: a visual guide to Text Wrap options, showing No Wrap, Wrap Around Bounding Box, and Wrap Around Object Shape with edge detection and offset examples.
InDesign How-To: Use Ignore Text Wrap (Video Tutorial)
Video idea: short walkthrough of activating and adjusting InDesign Text Wrap with real objects on a spread, including an anchored image and a caption.
Implementation notes and tips
- Export to .idml and re-open as a quick fix for suspected file corruption.
- Use a clean template with defined styles and master pages to minimize wrap conflicts across issues.
- Group images with captions when wrapping around captions to maintain a cohesive boundary.
- Apply Ignore Text Wrap selectively to text frames that should remain independent of object boundaries.
- Activate the Text Wrap panel: Window > Text Wrap.
- Choose your wrap option (Bounding Box, Object Shape, Jump, or Jump to Next Column).
- Adjust offsets and edge detection as needed.
- For master pages, decide whether wrap applies to all page text or only master-page text.
- If wrap misbehaves, export to .idml and re-save as a new .indd to fix potential corruption.