Still using Photoshop's image adjustments and damaging your photos? Photoshop includes lots of great image adjustments that make it easy to improve, or just change, the look of an image. And most of these adjustments come in two flavors. We have standard image adjustment commands, and we have adjustment layers. Here we find adjustments like Levels and Curves which are mostly used for correcting the tone of an image. We have color adjustments like Vibrance, Hue/Saturation and Color Balance. And there are special effects-type of adjustments like Posterize, Threshold and Gradient Map.
I’m not going to explain how every image adjustment works because that’s not the focus of this tutorial. Let’s say I want to apply a single color to the image. I’ll click the Colorize option in the dialog box. Then I’ll choose a color by dragging the Hue slider. I’ll click OK to close the dialog box. And now the image is colored in blue.
But in the Layers panel, there’s a problem. The adjustment was applied directly to my image on the Background layer. This is what’s called a destructive edit because it made a permanent change to the image. Also, there's no way to edit the adjustment. What if I don’t like that blue color and want to try a different color? I could go up to the Edit menu and choose Undo Hue/Saturation, but that’s only because I haven’t done anything else to the image. So image adjustments make permanent and destructive changes to the image with no way to edit the results. The original image is still there on the Background layer with all of its original colors.
And if I want to fade the adjustment so the new color is mixing with the original colors instead of replacing them completely, I can lower the copy layer’s opacity. But what if we want to edit the adjustment? What if I decide I don’t like this blue color and I want to try a different color? To try a different color, I would need to either undo the Hue/Saturation adjustment (if that was still an option), or I would need to delete the layer, make another copy, then go back to Image menu, back to Adjustments, choose Hue/Saturation again, and this time reapply it with a different setting.
So while applying image adjustments to separate layers is better than applying them to the original image, it’s still not the best way to work because there’s no way to edit the adjustment after we apply it. One more issue we need to look at before moving on to adjustment layers is the document’s file size. In the lower left of the document window is a status area showing information about your document. Click the arrow to see all the different types of information you can display. Why are there two different sizes? The smaller number on the left is what the file size would be if we flattened all of our layers. My file size increases quickly, jumping from 125 MB to roughly 750 MB. Depending on your computer, too many layers can slow Photoshop down. So that’s one more drawback to applying adjustments to copies of a layer.
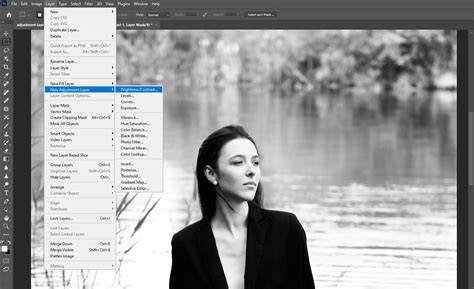
So how can we apply Photoshop’s image adjustments in a way that is non-destructive, makes no permanent changes, gives us access to the adjustment’s blend mode and opacity, and lets us edit the adjustment after we apply it? It’s easy! All we need to do is stop using image adjustments and switch to using adjustment layers. Unlike standard image adjustments, Photoshop’s adjustment layers are not found under the Image menu. Not every image adjustment is available as an adjustment layer. If we look at the list of image adjustments again, the ones from Brightness/Contrast down to Selective Color are available as an adjustment layer. But below that, the ones from Shadows/Highlights down to Equalize are not. Along with finding them under the Layer menu, you’ll also find the adjustment layers in the Adjustments panel.
The first three options at the top (Solid Color, Gradient and Pattern) are not adjustment layers. They are what’s called Fill layers because they fill the document with either a solid color, a gradient or a pattern. The adjustment layers are found below them. Photoshop adds a Hue/Saturation adjustment layer above the image. Unlike standard pixel layers which display a preview thumbnail showing the layer’s contents, adjustment layers display an icon depending on the type of adjustment. Instead of a dialog box popping up, the settings for an adjustment layer appear in Photoshop’s Properties panel. With the adjustment layer back on, we have access to the layer’s blend mode and opacity. So I can change the blend mode to Color just like I did before. The one thing we could not do earlier was edit the adjustment after we applied it. But with adjustment layers, we can.
The adjustment layer’s mask can be used to control which areas of the image below the adjustment layer are affected by the adjustment. So in the toolbar, I’ll choose either the Object Selection Tool, the Quick Selection Tool or the Magic Wand Tool. Then in the Options Bar, I’ll click the arrow next to the Select Subject button and I’ll choose the new Cloud option which runs Select Subject on the cloud for better results. Looking at the layer mask thumbnail, the white part of the mask is where the adjustment is affecting the image below it and the black area is where the adjustment is hidden. Since each adjustment is on a separate layer, I can turn the Levels adjustment layer on and off to compare the result without affecting the Hue/Saturation adjustment.
Finally, let’s go back to that file size issue we looked at earlier. Remember how, with each copy of the image layer we added, we saw a big jump in the document’s file size? And notice that even with three more adjustment layers added above the original two, the file size with the adjustments has not increased at all. And there we have it!
What is an Adjustment Layer in Photoshop? In the realm of digital image editing, Adobe Photoshop stands as a hallmark of innovation and efficiency, offering an array of powerful tools to enhance and manipulate photographs. Among these tools, adjustment layers are particularly vital for non-destructive editing. With adjustment layers, we have the ability to apply a wide range of color and tonal adjustments to our images without permanently altering the underlying pixels. Adjustment layers sit above the standard image layers and act as overlays that can adjust brightness, contrast, hue, saturation, and more, without directly affecting the actual image. This is invaluable because it allows us to experiment and fine-tune our edits, maintaining the flexibility to tweak or remove changes at any stage of the editing process.
In this section, we're going to examine what adjustment layers are and how they function within Photoshop. Adjustment layers in Photoshop are powerful tools that allow us to make image adjustments without permanently altering the original image layers. These layers sit above our image, and any changes we make are applied nondestructively. To create your first adjustment layer, we'll start by navigating to the Layers Panel. At the bottom of this panel, click the "New Adjustment Layer" button and select the type of adjustment you want to apply. This action will add an adjustment layer to our project, and from here, we can manipulate our image nondestructively.
Adjustment layers in Photoshop are powerful tools that allow us to apply diverse edits without altering the original image data. To enhance the visual impact of an image, we often adjust its exposure and contrast using adjustment layers. By adding a Brightness/Contrast adjustment layer, we can make an image appear lighter or darker and increase or decrease its contrast. When addressing color issues, we rely on adjustment layers such as Hue/Saturation, Vibrance, or Color Balance. These allow us to correct color casts and enhance the image's overall color quality without compromising the underlying pixels. Layer masks and blending modes offer nuanced control over how adjustment layers affect the image. We can use a layer mask to apply changes to selective areas of the image. By painting on the mask with different opacity levels of the brush tool, we can blend the adjustments smoothly. When we seek to enhance our images, we often turn to Curves and Levels for fine control over the lighting and color balance. Curves: By creating points along the curve line in the Adjustments panel, we can manipulate specific tonal ranges. Levels: We use Levels to set the white point, black point, and midtones of an image.
Adjustment layers offer a versatile array of effects that can retouch images or contribute an artistic flair. To create an adjustment layer in Photoshop, we can click the New Adjustment Layer button at the bottom of the Layers panel. Photoshop offers various adjustment layers such as Levels, Curves, Exposure, Vibrance, Hue/Saturation, and Color Balance. Adjustment layers apply color and tonal changes to all the layers below them without permanently altering the original image. In Photoshop, we utilize the adjustment panel to fine-tune the properties of each adjustment layer. Yes, we can non-destructively adjust the color balance by using a Color Balance adjustment layer. If the adjustment panel is missing, we can find it by going to Window > Adjustments. This is the simplest panel in Photoshop and the easiest way to add an Adjustment Layer.
1. The Adjustment Layer shows up in the Layers Panel. 2. The properties and controls for that adjustment show up in the Properties Panel. Two of the icons for the adjustments you should be using the most, Levels and Hue-Saturation, are shown in the diagram. 1. 2. 1. 2. Clip to Layer - Most of the time, it’s best to leave this one alone. By the way, these will make more sense once you start creating and “shaping” Layer Masks. Color Range - This is a shortcut to the “Color Range” tool. All written content (and most images) in these articles are copyrighted by the authors. Copyrighted material from Apogee Photo Mag should not be used elsewhere without seeking the authors permission. This is the simplest panel in Photoshop and the easiest way to add an Adjustment Layer. 1. The Adjustment Layer shows up in the Layers Panel. 2. The properties and controls for that adjustment show up in the Properties Panel. Two of the icons for the adjustments you should be using the most, Levels and Hue-Saturation, are shown in the diagram. 1. 2. 1. 2. Clip to Layer - Most of the time, it’s best to leave this one alone. By the way, these will make more sense once you start creating and “shaping” Layer Masks. Color Range - This is a shortcut to the “Color Range” tool. All written content (and most images) in these articles are copyrighted by the authors. Copyrighted material from Apogee Photo Mag should not be used elsewhere without seeking the authors permission.
If you use Photoshop, you probably already know that layers are a great non-destructive way to edit. Within the realm of layers, there exists a group of very useful editing tools called Adjustment Layers that allows for easy editing of your images. As with most Photoshop tools, there are several ways to achieve the same result. When you use Photoshop adjustment layers (as with other layer types), you can make changes, save it as a Photoshop file (PSD) and undo/change it many years later. Since no pixels are destroyed or changed, your original image stays intact.
1. 2. 1. Brightness and Contrast allow you to make simple adjustments to the brightness and contrast levels within your photo. When you adjust brightness, the overall lightness (or darkness) of each pixel in your frame is changed. To increase a photo’s tonal values and increase the highlights, slide the Brightness to the right. 2. The levels tool adjusts the tonal range and color balance of your image. It does this by adjusting the intensity levels of the shadows, mid-tones, and highlights in your image. Of note, if you use the Image menu to open the levels tool (Image->Adjustments->Levels) a separate layer will not be created and the changes will be committed directly (destructively) to your image layer. 3. While the Levels adjustment allows you to adjust all the tones proportionally in your image, the Curves adjustment lets you choose the section of the tonal scale you want to change. The Levels Adjustment works well if you need to apply a global adjustment to your tone. To apply more selective adjustments, you are better off using Curves. 4. When you think of exposing an image properly, you are concerned with capturing the ideal brightness, which will give you details in both the highlights and shadows. 5. Use the Vibrance Adjustment Layer to boost the duller colors in your image. Look at the difference in the greens between this image and the one above. 6. You can change the hue (color) of your entire image by keeping “Master” selected in the dropdown (this is set by default). Alternatively, you can pinpoint the color you would like to change the hue of. In addition to adjusting the obvious hue and color saturation of your image, this Photoshop Adjustment Layer allows you to adjust the lightness of your entire image as well as work with specified colors. Check the Preserve Luminosity box to preserve your luminosity values (brightness or darkness) and maintain the tonal balance as you change the color in your image.
There are many ways to achieve black and white image processing. The Black and White Photoshop Adjustment Layer is one of the better ones. It allows you to lighten or darken specific color ranges to enhance your black and white conversion. Example: If you want the blues of your color image to stand out more when converted to black and white, simply toggle that slider. 1. When you choose the Black & White Adjustment Layer, you get a default black & white conversion 2. You can tweak the image based on selective colors. In this example, the blues and yellows were adjusted 3. Important Note: While most of these adjustments are available under the Image menu (Image->Adjustments), using them from there does not work the same. The main difference is that these are applied directly to the image (destructively) as opposed to when done under Adjustment Layers.
Photoshop Adjustment Layers are a great group of tools that allow you to smartly edit your image in a non-destructive way. Your original pixels are preserved, so you are able to come back and change your edits years later. Photoshop adjustment layers are powerful tools that allow you to make non-destructive edits to images. In this tutorial, we'll delve into the fundamental concepts and usage techniques of the Photoshop adjustment layer, helping you enhance your image editing skills. Are you ready to explore more possibilities? To do this, in the icon bar below the Layers panel, click on the "Create new fill or adjustment layer" icon. In this "Create new fill or adjustment layer" menu, apart from the first three options, the rest are all options for creating adjustment layers.
1. 2. If you have some experience with post-processing, this is the recommended way to use Photoshop. In the adjustment layer menu or the Adjustments panel, you will see names of adjustment layers like Brightness/Contrast, Levels, and more. The main difference between the "Image → Adjustments" command and adjustment layers is the ability to work on separate layers. The adjustment commands under "Image > Adjustments" directly modify the pixel data in the selected layer. The best part is that adjustment layers allow you to modify parameters at any time. If you need to apply the same adjustments to multiple layers, you can create an adjustment layer above these layers. A clipping mask allows an adjustment layer to affect only the layer directly below it. For example, setting it to 50% will weaken the adjustment effect by half, as shown in the image below. We have created detailed and user-friendly tutorials on commonly used Photoshop adjustment layers. With TourBox, you can swiftly create the adjustment layers you need with the press of a button. The precision and efficiency that TourBox offers are beyond what you can achieve with just a keyboard.
Adjustment Layers in Adobe Photoshop Urdu / Hindi [Eng Sub]
tags: #adjustment #panel #photoshop