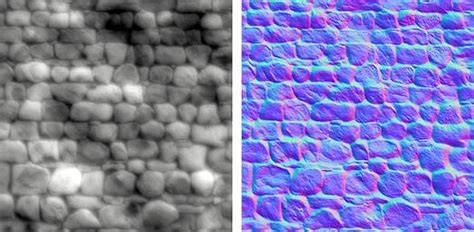
In the world of PBR Texturing, many different texture maps are used to create a realistic material. Every map has its role to provide realism to the material. Some of these maps are Normal, Bump and Displacement. These maps are responsible to give an additional resolution or detail to the surface of geometry where the material is applied. Some of these details are real and some are just illusions.
Understanding bump maps and their role
A bump map is one of the more traditional types of maps we’ll look at today. The first thing you should know about bump maps is that the detail they produce is simulated. A bump map does not add any additional resolution to the model. Bump maps are typically grayscale images with only 8 bits of colour information. There are only 256 different shades of black, grey, and white. These values in a bump map tell the 3D software essentially two things: either up or down. When the values in a bump map are close to 50% grey, there is little to no detail visible on the surface. Details appear to pull out of the surface as values become brighter (more towards white). In the opposite case, as values become darker and closer to black, they appear to push into the surface.
Bump mapping is just one of many texture mapping techniques animators and VFX artists use to create stunning 3D models. A bump map affects shading only, while a height map can physically displace mesh surfaces in some engines. Bump maps are fantastic for adding small details to a model, such as pores or wrinkles on the skin. They are also relatively simple to create and edit in a 2D application like Photoshop because they only use grayscale values. The issue with bump maps is that they easily break if the camera is positioned incorrectly. The silhouette of the geometry that the bump map is applied to will always be unaffected by the map because the detail they create is fake and not real resolution or any geometry has been added to the mesh.
Normal maps: advancing beyond grayscale
Normal maps are a newer and improved sort of bump map. The detail they generate is also simulated. There is no additional resolution or mesh data added to your model’s geometry. A normal map creates the sense of depth detail on a model’s surface, but it does it differently than a bump map. A bump map uses grayscale values to deliver either up or down information. A normal map uses RGB data that matches directly to the X, Y, and Z axis in a 3D space. This RGB data tells the 3D application which direction the surface normals are orientated in for each polygon, and the direction of the surface normals, also known as normals, tells the 3D software how to shade the polygon.
When studying about normal maps, you should be aware that there are two distinct varieties. Tangent Space normal maps, the most widely used, are mostly purples and blues and are best suited for meshes that would deform during animation, such as characters. Object Space normal maps are used for things that do not need to deform and have a rainbow of varied hues; they often offer somewhat better performance than Tangent Space maps. Normal maps, unlike bump maps, may be difficult to produce or alter in 2D tools and are usually baked from a high-quality model. There are exceptions for modifying these maps, as some tools like MARI can paint the surface normal information seen in a normal map.
Displacement maps: real geometry, higher cost
Displacement maps physically displace the surface to which they’re applied, and, to add detail based on a displacement map, the mesh is generally subdivided or tessellated so that actual geometry is generated. Displacement maps can be baked from a high-resolution model or hand-painted and can also be created procedurally. They are grayscale like bump maps, but the key difference is that they add real geometry, affecting silhouettes and shadows.
While an 8-bit displacement map can be used, a 16- or 32-bit displacement map will nearly always produce superior results. However, adding all that extra geometry in real-time is demanding on hardware, so many 3D programs compute final displacement during render. The decision to use displacement maps must weigh the added geometry and render costs against the visible benefits in detail and silhouette accuracy.
Comparing the maps and practical workflow
Utilizing these maps often involves a strategy that combines large-scale geometry changes with fine surface detail. The ideal approach is to use displacement for large changes in geometry and then normal or bump maps for fine detail. Regardless of the map, understanding how each map works and its benefits and shortcomings can help you make a better decision. The map you choose should meet the necessities of the situation you’re in. In production, some studios use a blend approach, leveraging displacement for large features and bump or normal maps to simulate microdetails without subdividing excessively.
We provide all the required texture maps for our entire library of PBR Textures and Decals. Bump mapping, as a technique, offers a good balance of visual fidelity and performance, enabling faster renders while still delivering rich surface texture. Remember that bump maps affect shading only, while displacement maps physically alter geometry, impacting silhouettes and shadows. Normal maps improve shading without changing geometry, with tangent-space maps favored for animated characters and object-space maps offering potential performance benefits for static surfaces.
Practical tips and considerations
- Consider the rendering cost: displacement adds geometry, affecting render times and memory.
- Choose the right normal map type: tangent space for deforming meshes; object space for static surfaces.
- Use bump maps for fine surface details when geometry subdivision is expensive or unnecessary.
- Combine maps thoughtfully: large-scale changes with displacement, micro-details with normal or bump maps.
- Ensure texture formats and bit-depth (8-bit vs 16/32-bit) align with the desired quality and hardware constraints.
In the end, the best map choice depends on the visual goals and performance constraints of your project. By understanding the strengths and limitations of bump, normal, and displacement maps, you can craft materials that balance realism with efficiency.