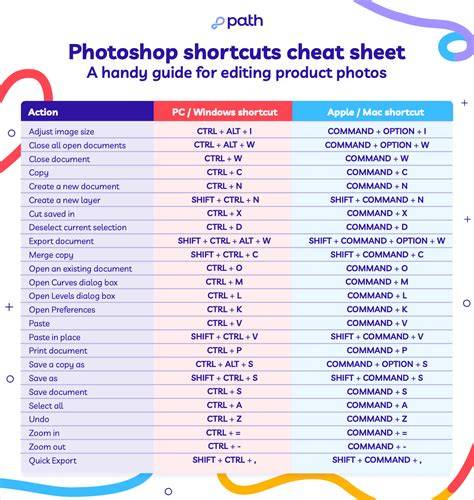
Looking to speed up your post-processing with some Photoshop shortcuts? Working in Photoshop can be quite time-consuming, whether you’re a beginner or an advanced editor. We start with simple Photoshop shortcuts; these commands are commonly used and easy to pull off. Note: If you’re not used to using keyboard shortcuts with Photoshop, they might seem a bit fiddly at first. Like learning to touch type, the more you practice, the easier it becomes, and the less you have to think about where you are putting your fingers. Ready to double (or quadruple) your Photoshop workflow speed?
Basic navigation and viewing shortcuts
The Hand tool lets you pan around a zoomed-in image. The Zoom tool lets you zoom in with a single click. Use it to inspect your file for quality issues and to check composited areas for realistic placement.
Toggle Full-Screen modes quickly to maximize your workspace. Use this command to switch between the normal screen, the full screen with a taskbar but without a title bar, and the full screen with a black background.
We all make little mistakes. Sometimes, the Photoshop interface can get too cluttered. Press the Tab key to hide all palettes; that way, you can concentrate on the image you’re editing.
Brush and masking fundamentals
The Brush tool lets you dodge and burn, add artificial color, and mask out edits. Need a bit more precision when brushing? With the Brush Tool selected, if you tap the Caps Lock key, the cursor will transform into crosshairs. This allows you to position your Brush more effectively. (It’s also a good shortcut to know how to undo!)
When working with the Brush tool, you’ll often need to get into tighter spots. If you need to expand the Brush size, tap the ] key. Need a harder brush for masking along fine edges? If you’re masking along rougher edges, use a soft Brush. The left-hand toolbar will show your foreground and background colors. If you change your foreground and background colors, you can always force things back to normal with this easy shortcut.
Opacity and dropdowns
When using the Brush tool or the Clone Stamp tool, you may wish to adjust the opacity for subtle (or not-so-subtle) effects. Simply press the number keys to set the opacity to any value between 1 and 100. This works just like the opacity shortcut above, but with the Shift key held down.
Curves, selections, and points
When working on a Curves graph, you can place multiple points and adjust them accordingly (using the Up and Down arrow keys). However, if you wish to select an already-placed point for adjustment, you may struggle to click without accidentally moving the point’s position.
Layers, copying, and merging
Want to quickly create a new layer? If you’re working with several layers and need to copy the entire project to your clipboard, simply press these keys. You’ll get a merged copy of the file sent to your clipboard, which you can then paste into a new layer or file. Need to duplicate a background layer or increase the intensity of an adjustment? You can always duplicate an existing active layer with this easy shortcut. This command will copy all visible layers, merge them, and add them as a new layer to your layer stack. It’s basically the same as the copy-merge command (see above), except it places the copy directly in the layer stack. This command groups selected layers under a single folder (which you can then name). In my experience, it’s pretty handy when you’re working with a lot of different layers you need to keep organized. Adding Shift to this shortcut will ungroup layers when the grouped layer is selected.
Fill, masks, and selections
Looking for a quick way to fill in a layer? Use this shortcut to fill the layer with the current foreground color. When working with masks, you may want to see the before and after effects. This Photoshop command will show you the selected mask as a grayscale image; that way, you can see what you’re working with. If you first create a mask, this shortcut will immediately select the white part of the mask (while grays will be partially selected). It’s very useful if you want to duplicate a mask or its inverse. If you’ve already made a selection, use this command to select the opposite of your selection. After working with your selection, use this combo to discard it! This will restore the last active selection.
Quick access to panels and tools
Worried you might forget one of these shortcuts? Don’t be! I’ve been using Photoshop on a near-daily basis for the better part of a decade now. Over the years, I’ve picked up a ton of shortcuts, and I wanted to share some of my all-time favorites with you. These shortcuts help you navigate tools, panels, and workflows with speed and precision.
Additional context and tools
Correction from the video: For the brush resizing trick, the PC instructions I gave didn’t seem to be working for most users. The correct translation (this is for PC users only) is to hold down the Alt key, then click and drag using the right mouse key. Well? Is your mind blown!? The brush resize and zoom shortcuts seriously changed my life when I learned them. Hopefully, you appreciated at least a handful of these shortcuts! So memorize them - and incorporate them into your own workflow. Did I miss any critical Photoshop shortcut commands? Which do you use? And which of these commands do you plan to use regularly?
Unlock Adobe Photoshop’s full potential with these essential keyboard shortcuts. Designed to streamline your workflow and boost productivity, these Photoshop commands will help you easily navigate and manipulate your canvas. In the fast-paced world of digital design, efficiency is everything. Adobe Photoshop, a powerful tool for creators, becomes even more formidable when paired with the right keyboards for Photoshop. This guide presents a curated list of essential Photoshop tool shortcuts that will help you work smarter and faster, allowing you to focus on what truly matters - your creativity. Shortcuts save seconds. The right tool saves hours. For over three decades, Adobe Photoshop has set the benchmark in digital creativity, offering robust tools for designers and artists. With its latest AI capabilities, Photoshop simplifies complex processes like image generation and content addition through features like Generative Fill and Generative Expand. These tools use the Adobe Firefly engine to enhance creative freedom and efficiency, allowing users to add or alter content with simple text prompts or to expand images seamlessly.
Popular mid-level shortcuts
Select Top Layer: Alt + . (period) (Windows), Option + . Fine-tuning images often involves adjusting various properties to get the perfect look. Brightness and Contrast: The shortcut Ctrl + M (Windows) or Command + M (Mac) opens the Curves dialog, not Brightness/Contrast. Efficient workspace management is crucial for a smooth editing experience in Photoshop. Toggle Full-Screen Mode: Press F (Windows and Mac) to cycle through different screen modes (Standard Screen, Full Screen with Menu Bar, Full Screen). Toggle Panels: Press Tab (Windows and Mac) to show or hide all open panels, including the toolbar and options bar. Layers Panel: Access or close the Layers panel by pressing F7 (Windows and Mac). History Panel: Open or close the History panel with Ctrl + Z (Windows) or Command + Z (Mac) for quick undo and redo actions. These Photoshop shortcuts streamline your workflow, providing rapid access to panels and tools essential for editing. Fill with Foreground Color: Alt + Backspace (Windows), Option + Delete (macOS).
Towards a pragmatic workflow
Most marketing graphics don’t need Photoshop. Incorporating these Photoshop keyboard shortcuts into your daily workflow can dramatically enhance your productivity and creative efficiency. By minimizing time spent navigating menus and maximizing your hands-on design time, these shortcuts empower you to produce stunning visuals with greater ease and precision. Mastering these essential keyboard shortcuts will not only save you time but also improve your overall Photoshop experience. With faster access to tools and more streamlined workflows, you can focus more on the creative aspects of your projects. By integrating these powerful keyboard shortcuts for Adobe Photoshop into your routine, you’ll be able to work more efficiently and creatively. Whether you’re adjusting layers, refining selections, or navigating the interface, these Photoshop quick keys will help you achieve your design goals more swiftly.
Notes on platform differences
macOS vs Windows: The same shortcuts can have different modifier keys depending on the OS. Do a combination of number keys for a specific percentage (i.e. 1 and 2 for 12% opacity). When the Move tool is active, press any arrow keys to move 1 pixel in that direction. Blending Modes have shortcuts as well!
People and resources
Jesús Ramirez, the Photoshop Training Channel founder, shares practical insights on speed-boosting shortcuts and workflows. He emphasizes that practice and a core set of shortcuts can dramatically improve editing speed and accuracy, making these tricks valuable for both beginners and advanced users.
- Create a new layer = Command/Ctrl+Shift+N
- Get the eyedropper to pick colours = I
- Reset colour palette to black and white = D
- Switch the colours = X
- Show the mask overlay = \
- Create a straight line = hold down Shift before and during the stroke
- Create a straight line between 2 points = Click once, hold down Shift, click at the ending point
- Fit image to screen = Command/Ctrl+0
- Zoom to 100% = Command/Ctrl+1
- Select multiple layers = Click on one layer, hold Shift, click on the layer at the opposite end of the stack
- Group selected layers = Command/Ctrl+G
- Ungroup a group = Command/Ctrl+Shift+G
- Merge layers but retain them too = Command/Ctrl+Shift+Option+E
- Merge selected layers = Command/Ctrl+E
- Merge all visible layers = Command/Ctrl+Shift+E
- Duplicate any layer = Command/Ctrl+J
- Create a clipping mask = Hover mouse between the two layers, hold Option/Alt, click once
- Remove a clipping mask = Hover mouse between the two layers, hold Option/Alt, click once
- Get the crop tool = C
- Switch the crop orientation = X
- Scale the crop on all sides = Hold Options/Alt while pulling one side
- Cycle through crop overlays = O
Like everything in photography, and in life, practice makes all of the difference.