Procreate offers an intuitive platform to create stunning digital artwork with ease, one critical aspect being the creation of a transparent background in Procreate. Making a transparent background in Procreate is a relatively simple process.
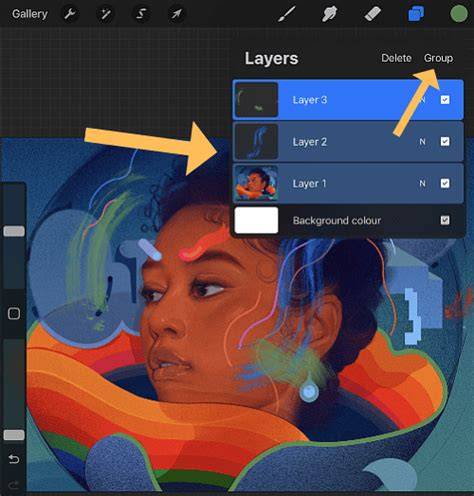
On the Procreate home screen, a simple tap on the “+” symbol lets you choose a custom canvas size. Setting up a higher resolution allows for greater detail in your artwork. When you start a new project, you’ll notice there’s already a default background layer with a white fill. To make your background transparent, simply tap on the checkmark next to this layer to disable its visibility. The background layer, by default, is filled with a solid color, typically white.
In Procreate, working with layers is an essential aspect of creating digital art. The layers menu houses the background layer, which by default, is filled with a solid color. To make the background transparent, tap the checkmark icon next to the background layer to uncheck it. Remember that transparency holds in a rasterized format, so ensure your artwork is saved as a PNG if you want to preserve transparent areas.
Layers allow you to easily organize and manage different elements of your art, such as characters or grid lines. For example, if you’re working on a complex illustration with multiple characters, you can create separate layers for each character. Create a new layer and draw your grid lines on it, then lower the opacity of the layer so it’s less intrusive. Don’t be afraid to experiment with your layers - you can easily reorder, merge, or delete them as needed. Merely swipe left on a layer to access these options. Remember to name your layers to help you quickly find and identify the various parts of your composition.
To start, open a new project with a custom size and toggle off the background color switch to ensure your canvas is transparent. When working on logos, ensure you group your layers efficiently and use layer masks as necessary. This will enable you to edit and refine your design easily. Use high-quality brushes and tools to create clean, crisp lines and shapes that stand out. Procreate is an excellent tool for creating logos with transparent backgrounds.
When exporting your artwork to preserve transparency, PNG is your best bet. This file format keeps transparency intact, unlike JPEG which cannot store transparency. For designs like logos or stickers, exporting as PNG ensures the transparent areas remain clear. Open the Actions menu, represented as a wrench icon in the top-left corner of the screen, and select Share to choose PNG from the list. Then name your file and designate a location to save it.
It’s important to note that JPEG doesn’t support transparency, and PDF exports may not preserve transparent backgrounds in Procreate. If you need to export with layers intact, you can export as PSD, which maintains layer information. However, for final transparency-ready assets, PNG is the standard choice. The background layer is at the bottom of the Layers list and is white by default; to achieve transparency, turn off its visibility but the background itself isn’t deleted-it's simply hidden for export.
Exporting as PNG is a straightforward way to ensure transparency remains intact when sharing or integrating your artwork into other projects. If your goal is to place your art over another design or use it as a sticker or logo, turning off the background layer’s visibility and exporting as PNG will yield the clean transparent background you need. The transparency feature is built directly into Procreate, so there’s nothing else to purchase. Procreate is a one-off app, usually around £12-13 (~$15), with no subscription, giving your art more flexibility without recurring fees.
When creating artwork, it’s sometimes required that we preserve areas of transparency in the finished design. Turning off the visibility of the background layer is a good start as it creates a transparent background within the Procreate app, but to save/export our artwork with transparency intact, export as PNG. It lives at the very bottom of your Layers list, and by default it’s filled with a solid white color. This change is temporary; the background hasn’t been deleted, just temporarily made invisible. This tutorial assumes you’ve already established areas of transparency on your artwork that you’d like to preserve.
In conclusion, the secret to saving with a transparent background in Procreate is to export your work as a PNG file. PNG, which stands for Portable Network Graphics, is the only rasterized file format that allows for transparent backgrounds. By creating a new canvas, turning off the background layer visibility, and exporting as PNG, you gain a flexible asset suitable for logos, stickers, and overlays in other projects.
Knowledge of how to save with a transparent background in Procreate empowers you to craft professional-grade graphics that integrate seamlessly with diverse media. To refine your workflow, you can use layer masks, alpha lock, and precise layering strategies to isolate elements and preserve transparency across complex compositions. This approach helps you produce clean, crisp results whether you’re designing logos, stickers, or illustrations that need to sit on various background colors or textures.
Transparent PNG Tutorial for Procreate // Watercolor for Procreate UPDATED
- Open a new project with a custom size and ensure the background color is off for transparency.
- Use multiple layers to separate artwork elements and consider layer masks for clean edits.
- Turn off the visibility of the dedicated background layer to achieve transparency.
- Export your artwork as PNG to preserve transparency in the final file.
Thus, transparency in Procreate is not a separate product or feature to purchase; it’s a built-in capability that, when used with PNG exports, delivers transparent assets ready for logos, stickers, and overlays. It’s essential to understand how layers influence transparency, how to position artwork on separate layers above the hidden background, and how to export in PNG to retain the transparent areas across platforms and use cases.
tags: #procreate #logo #transparent #background