Shape layers in Photoshop offer a versatile way to create, edit, and animate vector graphics directly within raster workflows. This article synthesizes practical instructions on working with shape tools, color and stroke options, path operations, alignment, stacking, and advanced features like smart objects and gradient strokes.
Starting with Fill, Stroke, and Shape Content
Click the Fill and Stroke color swatches to choose the type of content: None (for a transparent shape), Solid Color, Gradient, or Pattern. When adding strokes to a shape, click the downward pointing chevron to change Align, Caps, and Corners options. To save all of the Options for a shape tool (fill, stroke, size etc.), create a Tool Preset.
Shape Tools and Keyboard Shortcuts
The Rectangle Tool: ‘[‘ or ‘]’ decreases or increases the corner radius by one pixel. The Polygon tool: ‘[‘ or ]’ decreases or increases the number of sides by one. The Line tool: ‘[‘ or ‘]’ decreases or increases the line Weight value by one pixel. Or, instead of using the Options bar to change setting specific to each Shape, single click with the shape tool in the image area and set the desired options in the Create (Shape) dialog.
Transforming Shapes: Scaling, Rotating, and Corner Radius
Drag any control point to scale the shape. Constrain proportions is off by default. Position the cursor outside of a control point (the icon will change to a double headed arrow) to rotate. To reset a rotation, use the Properties panel. Drag the Corner Radius control point to increase/decrease the radius of the shape. By default the corner radii are linked: Option -drag (Mac) | Alt -drag (Win) to change a single corner radius. Note: the Triangle and Polygon tools have a single Corner Radius control point handle which modifies the roundness of all corners equally.
Real-Time Updates and Panels
To view changes made using the Properties panel in real time, instead of entering values into the text boxes (which require tapping Enter or Return to preview changes), use Photoshop’s Scrubby sliders (position the cursor over the name of the feature: when the cursor changes to hand with arrows pointing in both directions, click-drag left/right to decrease/increase values).
Managing the Properties Panel and Shape Creation
Preventing the Properties Panel from Auto-Expanding when Drawing Shapes - When the Properties panel is collapsed to “icon” view, adding a shape automatically expands the panel (making it easier to access Shape Properties). To prevent the Properties panel from automatically expanding, from the Properties panel’s fly-out menu, uncheck “Show on Shape Creation”.
Coloring and Stroke Customization
Changing a Shape’s Color using the Layers Panel - Double click the Shape Layer’s thumbnail to change the color of the shape’s fill. Adding Arrowheads to a Line - Click the Gear icon in the Options bar to add and customize the width, length and concavity of the arrowhead(s).
Selection, Path Tools, and Layer Management
Clicking on a shape in the image area with the Path Selection tool will automatically select that layer in the Layers panel. Shift -click on another shape to add it to your selection. Use the Path Selection tool to drag-select shapes in the image area. Use the Direct Selection tool to drag-select portions of a shape/path(s). To isolate the selection to only the currently selected Layer (or layers), set the Selection option (in the Options bar) to Active Layers. To assign a custom Keyboard shortcut to toggle between selecting the Active Layers and All Layers, choose Edit > Keyboard Shortcuts and set Shortcuts For: Tools.
Copying Attributes and Hiding Paths
Copy and Paste Fill and Stroke Attributes - To copy and paste Fill or Stroke attributes from one shape to another, right -click ( or Control -click Mac) on the Layers panel (to the right of the layer name), and select Copy Shape Attributes. Hiding a Shape Layer’s Path - Command + H (Mac) | Control + H (Win) hides the Shape Layer’s path.
Viewing and Managing Shape Layers
Viewing Shape Layers in the Layers Panel - When working with complex documents that contain several small shape layers, changing the Thumbnail Contents from Entire Document to Layer Bounds can make it easier to see the contents of a layer. Converting Shapes to Smart Objects - To prevent the conversion of a shape with Live Shape Properties to a regular shape, first convert the shape into a Smart Object, then apply the transformation. And, if you first create a Shape Layer and convert it to a Smart Object and then duplicate the Smart Object, when you edit the contents of the Smart Object (to change the color or corner radius of the shape for example), all instances of that Smart Object will be updated.
Path Operations and Layer Grouping
Applying Path Operation Shortcuts - By default, the shape tools draw a new Shape Layer every time you click and drag with the tool. Use the Path Operations drop-down list in the Options bar in order to add additional shapes to a single Shape Layer. Holding the Option (Mac) | Alt (Win) and dragging a shape adds a newly drawn shape to the current shape layer and subtracts the new path from the previous shape(s) if the two shapes overlap (Subtract Front Shape). Tap the * (multiply) key to set the path operation to Exclude Overlapping Shapes. Path Arrangement - The arrangement of shape/paths (sometimes referred to as their stacking order), as well as path selection is critical when assigning path operations.
Fill and Stroke on a Single Shape Layer and Clipping
Fill and Stroke attributes - All shapes on a single Shape Layer will have the same Fill and Stroke attributes. To apply different attributes to shapes, put each shape on its own layer by selecting the shape and choosing Layer > New > Shape Layer Via Cut. This enables various compositing effects such as clipping a photo to a shape or using a vector mask to hide/reveal content.
Guides, Snap, and Pixel Grid
Create New Guides from Shape - To create new guides based on the bounding box around a Shape Layer, select the Shape layer and choose View > New Guides From Shape. Snap Vector Tools and Transforms to Pixel Grid - If you Zoom into an image above 500%, a Pixel Grid is automatically displayed on top of the image. By default, Photoshop “snaps” shapes drawn with the Shape tools (as well as shapes drawn with the pen tools) to the Pixel Grid. This prevents the creation of soft, anti-aliased edges on shapes such as rectangles and can help when precise alignment of shapes is required. Note: If you need to disable the “snapping” behavior for any reason, choose Preferences > Tools > Snap Vector Tools and Transforms to Pixel Grid and uncheck the preference. To toggle the Pixel Grid off, uncheck Pixel View under View > Show > Pixel Grid.
Gradient Strokes and Advanced Styling
Adding a Gradient Stroke on a Shape Layer - When adding a Gradient stroke to a shape layer, Photoshop simply draws a gradient and then displays it within the width of the stroke. You can change the look of the gradient by changing the style (Linear, Radial etc.), but if you want a gradient to be applied either along a stroke or across a stroke, then you might want to step into Illustrator.
- Use the Shape tools to create a Path, then adjust via the Create (Shape) dialog for precise options.
- Apply Path Operations to combine, subtract, or exclude shapes within a single Shape Layer.
- Convert shapes to Smart Objects when you anticipate repeated edits across multiple instances.
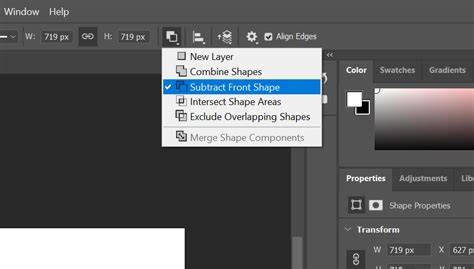
How to combine shapes to get one shape in photoshop | Merge shapes with path operation
In summary, Photoshop's shape layer capabilities blend vector precision with raster flexibility, enabling intricate compositions, efficient editing workflows, and scalable graphics suitable for both web and print contexts.