The Marquee tool is a versatile and essential feature in Adobe Photoshop that allows users to make various selections within an image. Located on the default toolbar, it helps users create accurate selections in various shapes such as rectangles, ellipses, and single-pixel lines. The Marquee tool enables you to select areas of your image (or the whole image) so that you can edit or modify that area, and it can also be used for copying sections from one part of the image to another or making a stamp.
Shapes and basic usage
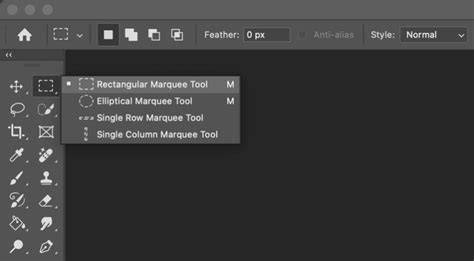
The Marquee tool has a flyout with four options: Rectangular, Elliptical, Single Row, and Single Column. Rectangular Creates a rectangular shaped selection; Elliptical Creates a circular or elliptical shaped selection; Single Row Creates a selection that is one pixel high across the width of the image; Single Column Creates a selection that is one pixel wide across the width of the image. Creating a selection is simple-move your cursor over the image and left-click and drag, then release when you reach the desired size. To create a perfect square or circle, hold the SHIFT key while dragging. Holding the ALT key centers your selection at the click point; SHIFT + ALT + CLICK + DRAG yields a perfect constrained square or circle centered off the click point.
To access these tools quickly, you can press the shortcut M to activate the Marquee Tool, and then hold Shift to switch between rectangular and elliptical as needed. The ALT (Option on Mac) key centers your selection at the click point. These keyboard commands speed up your workflow and are common across many tools in Photoshop.
Repositioning and fine‑tuning selections
To reposition a rectangular or elliptical marquee, first drag to create the border with the mouse button still held down. Then you can hold the spacebar to reposition the selection while continuing to drag. You can nudge the selection by one pixel at a time with the arrow keys, or by ten pixels at a time while holding SHIFT for larger moves. The Add to, Subtract from, and Intersect with options allow you to modify the current selection: add with Shift, subtract with Alt/Option, or intersect with the current selection for more complex shapes.
Fine tuning is useful when a selection is slightly off-center. If needed, you can use the arrow keys to move the selection, or use the Free Transform controls (CTRL/CMD + T) to adjust its size and shape. The Snap To feature (found under the View menu) helps edges align to guides or other elements on the image, increasing precision during edits.
Advanced techniques and practical uses
Several practical operations can be performed once a marquee selection is active. Delete erases the selected area and fills with the background color; Cut and Move allows you to move the selected area within the image by dragging it while holding CTRL (CMD on Mac); Duplicate copies the selected area to a new location; Cut and Paste copies or moves the selection to a new layer. You can also copy, cut, or paste using the standard keyboard shortcuts (CTRL/CMD + C, CTRL/CMD + X, CTRL/CMD + V).
With the Marquee tool, you can create selections to isolate subjects, crop parts of an image, apply masks, or copy and paste portions into new layers. This tool is often used for framing subjects, creating borders, or preparing selections for color ranges and adjustments. In addition to rectangular and elliptical shapes, the Single Row and Single Column marquees enable precise one-pixel selections across a row or column, which can be useful for fine-detail work or for creating frames and guides.
For more advanced use, you can combine Marquee selections with other tools like the Lasso tool to refine irregular edges or with the Quick Selection tool for automated selections based on textures and colors. The feathering option in the Options Bar softens the edges of a selection, which is helpful when creating smooth transitions between edited areas. The Marquee tools support selections that can be filled, edited, or transformed to suit your project needs.
In summary, the Marquee tool in Photoshop provides geometric selections-rectangles, squares, ellipses, circles, and single-pixel rows or columns-that enable precise editing, copying, masking, and compositing. Mastery of the Marquee tool, along with its shortcuts and modifier keys, helps you work faster and more creatively, as you learn how these selections interact with other tools and features in Photoshop.
Key concepts and quick reference
- Rectangular Marquee: rectangles and squares
- Elliptical Marquee: circles and ellipses
- Single Row/Column: 1-pixel-high or 1-pixel-wide selections
- Shift: constrain to square or circle
- Alt/Option: center the selection at click
- Spacebar drag: reposition existing selection
- Add/Subtract/Intersect: modify current selection
- Delete: erase selected area to background color
Tips & Tricks of the Marquee Tools in Photoshop CC - #PSin30
Note: If you want to practice, you can download a simple seagull image and apply these marquee techniques to become proficient with the tool. The Marquee Tool is a versatile and essential feature in Photoshop that lays the foundation for many selection-based workflows, from simple crops to complex composites.