Color grading plays a pivotal role in giving your video projects a professional and polished look. DaVinci Resolve, renowned for its robust color grading capabilities, offers various tools and techniques to achieve the desired aesthetic. One such technique is copying color grades, which allows you to replicate the color adjustments from one clip to another seamlessly. If you’ve meticulously crafted a color grade for one clip and want to effortlessly apply it to others?
Before delving into the specifics of copying color grades, it’s essential to grasp the fundamentals of color grading. Color grading involves adjusting the color, contrast, and overall look of a video to evoke a particular mood or enhance its visual appeal. To access through this workaround, navigate to the Edit Page. In the screenshot, observe that blue marked clips already possess color grades, while green ones lack color grading. To copy a color grade, select the desired clip and press and hold with the pencil tool (right-click). Begin by selecting the clip containing the desired color grade. To apply the captured grade to one or more clips, first select the clips intended for grading. For multiple selections, utilize the Shift key on your keyboard. Navigate to the Gallery panel located at the top left corner of DaVinci Resolve. Within the Gallery, options for Stills and PowerGrades are available.
Methods for copying color grades in DaVinci Resolve
Method 1: Copy and Paste Nodes
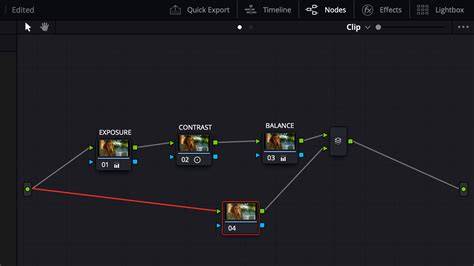
Open the Color Page and highlight the clip that has the grade you desire to copy. In the node editor, the display of your node structure in the top-right corner, right-click on the node you wish to copy and select Copy Node. Click on the desired clip in your timeline and right-click in the node editor on the desired clip and select Paste Node. That is it. The node will now reside in the node structure of the target clip with the same settings (including any curves, qualifiers, power windows, or tracking data).
Alternatively, you can replicate the entire node structure. Instead of right-clicking a single node, right-click in the node editor background and select Copy All Nodes. Then paste them onto the desired clip the same way. This is useful when your grade is composed of multiple serial or parallel nodes operating together.
Keyboard Shortcuts: Highlight your graded clip, press Control + C or Command + C on a Mac to copy, then select the desired clip and press Control + V or Command + V. By default, this will copy the complete node structure. If you are rapidly passing through a timeline and grading dozens of clips, keyboard shortcuts convert a laborious process to a relatively fast process.
When to Utilize Copy-Paste: Copy-Paste nodes are optimal when you are only implementing a grade to a handful of clips and you don't anticipate needing the grade again. While this is a quick and direct method to implement a grade, it is limited. Once the nodes are pasted, the target clip's grade is independent. Therefore, if you later modify the source grade, those modifications will not be propagated to the previously copied clips. For smaller projects, this is completely acceptable. For larger projects with hundreds of clips, you will want a more systematic method.
Method 2: Saving and Applying Stills
Stills represent DaVinci Resolve's method of saving a snapshot of a clip's grade and applying that grade to any other clip, even in a different project. Think of a still as a bookmark for a grade. A still resides in your Gallery waiting for you to apply it to another clip.
Saving a Still: Highlight the clip that contains the grade you wish to save on the Color Page. Right-click on the viewer (the large preview of the clip) and choose Grab Still. The still will then appear in the Gallery Panel located on the left side of the screen. You can rename the still by right-clicking on the still and selecting Change Label. Developing good naming practices will help you locate a still quickly later, therefore name your stills descriptively. Something similar to "Interview_DayExt_Warm" will tell you more than "Still 1."
Applying a Still: Highlight the target clip in your Timeline. Open the Gallery and right-click on the still you saved earlier and select Apply Grade. The entire node structure from the still will then be applied to your clip overwriting anything that existed prior. If you wish to add the grade to the existing nodes instead of overwriting them, hold the middle-mouse button and drag the still onto the node editor. This will append the still's nodes to the end of your current nodes. You can also apply a still to multiple clips at once. Highlight multiple clips in the timeline thumbnail strip, hold Control or Command while clicking each clip, right-click on the still and apply.
Power Grades and Organization: DaVinci Resolve's Gallery allows you to organize stills into albums and folders. You can also create Power Grades, which are stills that persist across all projects in a global gallery. If you develop a look that you use on every corporate event or wedding, save it as a Power Grade and it will be available in all your projects. The disadvantage of stills is the same as copy-paste: once applied, the grade is independent. Updating the source still will not update the clips to which you have already applied the grade.

Method 3: Shared Nodes for Linked Grades
DaVinci Resolve's best feature is that it allows you to build a live connection between any number of video clips that share the same node. You can change this node and the changes will immediately reflect in all of the connected clips.
Saving a Node as a Shared Node: To begin, you can take any node that you have created (build a grade) and right click on it and choose Save as Shared Node, this will save the node as a "shared" node with a given name. Next, go to any other clip (in the timeline) and right click in the node editor and choose Add Shared Node, the shared node will appear with a slightly different icon so you know it's a shared node and not a standard node.
Live Links and Speed: Imagine you have created a shared node called Base Grade and you have applied it to 30 interview clips. The client reviews the first 10 minutes of the rough cut and states that the entire piece needs to be a bit warmer. Rather than adjusting 30 individual clips, you make a single adjustment to the shared node on any one of the clips and all 30 are updated instantly. This is why shared nodes are worth learning.
You can have multiple shared nodes in a project. For example, you may create a Base Grade shared node for the technical aspects of your color grading and a Creative Look shared node for the artistic aspect of your color grading. Therefore, you can easily switch between different looks and your base grade will remain intact. The only limitation is that shared nodes apply the same grade to every clip. If one clip requires a slightly different version of the grade, you cannot alter the shared node for that clip. To allow for per-clip variations, you must add a corrective node either before or after the shared node.
Method 4: Groups and Clip Color Tags
Groups provide the greatest flexibility for batch grading in DaVinci Resolve. With groups, you can apply grades to groups of clips and therefore apply a grade to all of the clips within that group simultaneously, however, you can still make adjustments to individual clips within the group.
Creating and Using Groups: Select the clips that you would like to group in the Color page timeline. Right-click and choose Add to New Group. You can also add clips to existing groups. After you have selected your clips, you will see three different grading modes in the node editor: Group Pre-Clip, Clip, and Group Post-Clip. Group Pre-Clip applies to each clip before its individual grade is applied. The Clip mode is used for the individual grades for each clip, just like with normal grading. Group Post-Clip applies to each clip after its individual grade has been applied. For example, if you are creating a film with footage from Camera A and Camera B, place all Camera A footage in one group and Camera B in another. Apply camera-specific corrections at the Group Pre-Clip level, grade individual clips as needed, then apply your final creative look at the Group Post-Clip level.
When to Use Groups: Groups are the best option for any project that involves multiple cameras, multiple locations, or any complex grading scenario where you require layered corrections. DaVinci Resolve also provides a simpler tool called Clip Color Tags for quick visual organization, though it is not as structured as groups. Groups are overkill for a short, five-clip social media edit, but for anything longer they will save you considerable time.
Hardware That Can Speed Up Your Color Grading
You do not need special hardware to copy grades in DaVinci Resolve. A keyboard and mouse can accomplish this. However, if you plan to spend a significant amount of time working in the Color page, having a physical interface to interact with will greatly increase your productivity.
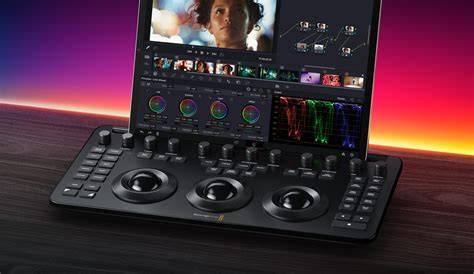
The DaVinci Resolve Speed Editor has a search dial and dedicated keyboard shortcuts that significantly speed up navigating between clips, which is extremely important when you are applying grades to a long timeline. It also includes a DaVinci Resolve Studio license, so if you do not currently have a Studio license, the Speed Editor is essentially paying for itself. Colorists who want more direct control over the actual color wheels will love the DaVinci Resolve Micro Panel. The Micro Panel has three high resolution trackballs and twelve primary correction knobs and connects via USB-C.
The act of rolling a trackball to nudge the lift towards blue is far easier and faster than dragging a point around on the screen with a mouse. B&H reviewers that produce content consistently report that purchasing the upgrade to Studio and the hardware panels changed their color grading workflow. If you're curious whether your computer hardware is capable of handling the demands of real-time playback in the Color page, especially when stacking multiple nodes with qualifiers and power windows, your GPU is the biggest factor. Having more video memory results in smoother scrubbing through graded timelines.
Combining methods for optimal workflows
Most working colorists end up using all four methods depending upon the project requirements. You may use groups for the initial base corrections for your camera(s), shared nodes for the creative look, stills saved in your Power Grade Library for approved looks by the client, and quick copy-paste for making one-off adjustments to similar shots. If you are creating a LUT-based workflow for Blackmagic cameras, these grade-copying techniques also work in conjunction with LUTs. Apply your LUT to one node and your manual corrections to another, then copy the entire chain.
Frequently Asked Questions
- Can I copy color grades in the free version of DaVinci Resolve? Yes. Node copy-paste, stills, and basic shared nodes all work in the free version. However, some advanced features require DaVinci Resolve Studio. The four methods outlined above are all available for free.
- Will copying a grade also copy the tracking information and power window settings? Yes. All associated data is copied along with the nodes, including power windows, tracking data, qualifiers, and curves. However, tracking data is specific to the source clip's motion, so you will need to re-track power windows on each target clip.
- What is the difference between a still and a Power Grade? A still is stored in the current project database, accessible within that project. A Power Grade is saved to a global gallery across all projects, enabling cross-project reuse.
- Can I copy grades between different timelines or projects? Yes. Stills and Power Grades can be transferred between timelines and projects. Specifically, Power Grades are designed to be accessed across different projects. Node copy-paste works within the current timeline only.
- How do I copy a grade to multiple clips at once? Select multiple clips in the Color page timeline, then apply a still from the Gallery or paste nodes. For efficient batch application, use Groups to apply a grade to all clips in the group at once.
To pull this off quickly in practice, you might combine ColorTrace for rapid cross-project transfers, or leverage a compact workflow with Memories for bulk adjustments. As you gain experience, you’ll find your preferred balance among copy-paste, stills, Power Grades, and shared nodes to fit each project’s needs.
DaVinci Resolve is widely regarded as one of the best professional video editing and color grading software available, offering multiple efficient routes to copy color grades across clips and projects. Whether you prefer the simplicity of copy-paste, the portability of stills and Power Grades, or the dynamic control of shared nodes and groups, Resolve provides a path that aligns with your workflow and project demands.