The Lasso tool is a selection tool that favors speed over precision. If you are working with hair, low contrast colors or look for surgically defined selections, you will find other options in your Photoshop toolbox. If you want to act fast and a rough selection will do, the Lasso Trio are your new best friends!
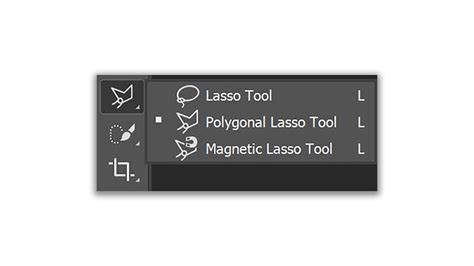
You can find the Lasso tool in your left Toolbar; it’s identified with an easy to remember… lasso icon. You can click and hold with your mouse over the lasso icon to pick these one by one. You can also use the shortcut Shift + L (on both Mac and PC) to cycle through them. As a tip, the shortcut “Shift +” works for all tools that have the same keyboard shortcut, such as the Marquee (M), Selection (W) or Brush (B). Try them out, it’s great!
The Lasso Trio: Quick, Polygonal, and Magnetic
Let’s have a look at them one by one in the following step-by-step guides. Lasso Tool - Quick selecting image elements. Quick and easy. The Lasso tool basic feature allows you to draw freehand shapes to create your selection. You can use it to pick an element from an image, over basic shapes, or when you’re working with Generative Fill and you simply want to show Photoshop the part of the image you want to modify.
Let’s have a look at this example below. We want to select one of these graphics and duplicate it on our canvas super-fast, there’s a deadline coming up and we need to finish this in less than a minute. Let’s hit the “L” on our keyboards or pick the Lasso tool from our left Toolbar. As a footnote, be sure to have “New selection” active when you start; it’s that first filled square on your tool options bar. Keeping or setting the “Feather” value to zero, will make your selection sharp and accurate. “Anti-alias” should be active to avoid jagged edges. All we must do is draw a shape around our graphic, it doesn’t have to be perfect, remember we are working on Turbo mode.
Now here’s a cool thing: let’s say that our hands slipped and we missed some bits of our graphic while drawing the selection. How do we fix it? Do it all over again? Of course not! Photoshop allows us to expand or reduce parts of our selection area to better fit our elements. With our Lasso Tool selected, we can hold the Shift key to expand our selection and include those bits left out. We can also hold the Alt key on a PC, Option on a Mac, to reduce our selection and remove that empty gap on the right.
Right now you are probably thinking: “why are these selection tools so important in Photoshop?” and “how can I use these skills other than copying and pasting stuff”? Well. check out this photography article on compositing and get ready to be amazed!
Polygonal Lasso Tool - Straight and sharp. This one is great for straight and sharp edges; it won’t do curves and smooth waves. Let’s select that arrow shaped graphic and duplicate it. We won’t be drawing our selection, this time. We’ll click our left mouse button to set anchor points and straight lines all around our graphic. We can draw over the graphic’s edges or leave a small gap with the background color, choosing what is best for your project. With your selection area defined you can copy and duplicate your graphic in less than 60 seconds.
Magnetic Lasso Tool - We stick together like glue. The last variation of the Lasso Tool is perfect for more complex selections. You must use it when freehand drawing isn’t an option and you have more than straight lines and edges to work with. Oh, and it sticks to the object or subject you are selecting. Awesome! Let’s have a look at how it works, once again with one of our graphics.
Let’s pick the Magnetic Lasso Tool from the left toolbar or smash that Shift + L shortcut. As before, make sure that the “New selection” square is active at the start, if “Feather” is set to zero you’ll have a sharp selection from what you define with the tool, Anti-aliasing should always be active as well and here’s what’s different: Width, Contrast, and Frequency. Width defines the tool’s brush size and guides the path with a target sign to help keep it in contact with the edge. Adjust the width to the edge’s size for better accuracy. Contrast helps Photoshop identify edges by lightness and hue, especially when the subject doesn’t stand out from the background. Frequency defines how many anchor points will be created; higher values help with uneven shapes, while lower values suit straight edges.
There’s more to explore, but this post can’t cover all settings. You can always sign up for my Photoshop Advanced Course at Bring Your Own Laptop and find tutorials and projects to satisfy all your learning desires. Don’t miss it!
Next, let’s select this Camera Lens graphic by clicking and dragging. See how the path sticks to the object and all the anchor points defining its shape. If along the way we let the mouse slip and the anchor points go outside the object’s edges we won’t have to start over. Our selection is done, we can copy and paste it and move it to a new layer, all in no time!
Another cool thing you can do with the Lasso Tool and its siblings: Let’s say you have an object with a few irregular shapes and a few sharp corners and straight lines, you can combine the Basic, Polygonal and Magnetic Lassos to come up with the most perfect - and still fast - selection. We’ll duplicate that vest with some awesome Photoshop teamwork. Now we have a straight line ahead, so we’ll hold the Option key on a Mac, or Alt on a PC, click along the edge and drag down to the curve again. Then we continue with the basic lasso for smoothing, and you can see how combining tools speeds up work.
Remember, even though Photoshop has other selection tools, the Lasso tool can be very helpful when you are working with complex textures, lots of different elements on a single canvas or when resolution isn’t the best for automatic quick selections. The variations add flexibility, letting you adapt the way you draw your selection to the subject and the document.
Practical Tips and Workflow Enhancements
To complete a selection, simply wrap back around to the original point where you began and release the mouse button. The Lasso Tool is not the most accurate, but it shines when you need speed and the ability to refine with additive and subtractive methods. To zoom for precision, use Ctrl+Space (Win) / Command+Space (Mac) to zoom in, and Ctrl+Space again to switch modes as needed. You can add to a selection by holding Shift and subtract from it by holding Alt/Option. Inverse selections with Ctrl+Shift+I or Command+Shift+U to work on the rest of the image.
What’s next? Explore additional tutorials on making selections in Photoshop, including the Pen Tool for precise curves and the Quick Selection Tool for fast base selections. Use selections to create layer masks, apply adjustments, or isolate subjects for composites. With practice, the Lasso Tool becomes a reliable part of your editing toolkit, especially when dealing with irregular shapes and challenging edges.
Additional Elements
To help you compare methods, you can also reference the broader context of tools like the Marquee, Magic Wand, and Pen Tool, but the Lasso trio remains the quickest way to outline irregular shapes when speed matters. In practice, you’ll often switch between tools to optimize accuracy and efficiency, particularly for complex textures or noisy backgrounds.
Lasso Tool & Polygonal & Magnetic Lasso - Toolbar Explained & Demonstrated [Photoshop for Beginners]
- Basic Lasso for freehand selections with Add to and Subtract from options.
- Polygonal Lasso for straight-edged selections and anchor points.
- Magnetic Lasso for edge-snapping selections with adjustable Width, Contrast, and Frequency.
In summary, the Lasso Tool and its three variations offer fast, flexible ways to capture irregular shapes, refine selections with additive and subtractive modes, and combine tools for tricky edges. Practice with different images to understand when each variation shines and how to blend them for the best results.