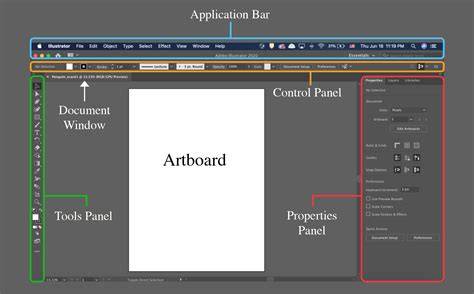
Artboards let you streamline the design process and work on designs on an infinite canvas. In Adobe Illustrator, an artboard is like a sheet of white paper that forms the base for your artistic work. You can use the provided presets for popular devices or create custom-sized artboards to design your artwork. When you create a document or open a new file in Illustrator, you can select your artboard’s preset and dimensions. If you have more than one design, you can add or create multiple artboards. To begin working with artboards, make sure the Artboards, Properties, and Control panels are easily accessible.
There are several ways to add a new artboard and position it among existing ones. You can add the new artboard, then reorder the artboards in the panel. From the panel menu, choose Rearrange all Artboards. Select options and Okay. Or type “Shift+O” for the Artboard tool and drag the artboards into position. If you use the Artboard tool, the new artboard won’t slip into position - the others also have to be dragged to a new position. Drag and drop should work, but it doesn’t always, so you may need to reposition existing artboards first.
Working with multiple artboards
Artboards are your blank canvas in Illustrator. This is where you’ll create every design that you intend to make. You can think of artboards as sheets of paper of any size stacked on top of one another. You can use it to create multiple artworks for different purposes. You can design elements on different artboards, and then export them individually. This will save you the trouble of creating multiple documents for one project.
Step-by-step methods to add and arrange artboards:
- Option 1: Create a document with multiple artboards from the start. Launch Illustrator, create a new file (File -> New). Choose the amount of artboards by entering a number in the Number of Artboards field. Choose how to arrange them (grid, row). Specify spacing and artboard size, then OK to create the document.
- Option 2a: Add new artboards in an existing project. If you already have a document with one artboard, select the Artboard Tool (Shift + O) and click and drag to create a new artboard. To place it between existing artboards, use the Artboard Tool for the new board and then rearrange the order in the Artboards panel.
- Reordering: In the Artboards panel, you can drag artboards to reorder or use the panel menu to Rearrange All Artboards, then adjust options as needed.
Keep in mind that artboards and layers serve different purposes: artboards define design canvases, while layers organize the artwork within each canvas. You can customize width and height by manually inputting values into Width and Height, and you can export each artboard as a separate asset when needed.
By mastering the Artboard tool and the rearrangement workflow, you can efficiently manage multiple designs in one Illustrator document. This approach is particularly useful for creating logos, device mockups, or comparing color and typography choices across several boards on a single screen.
In summary, you can:
- Add new artboards via Shift+O or the Artboard tool, then click and drag to create and place them.
- Reorder artboards in the Artboards panel using Rearrange All Artboards and adjusting positions.
- Create documents with multiple artboards from the start or add boards to an existing project.
- Export individual artboards to keep variants organized without creating separate files.
How to Add Artboards in Illustrator (Tutorial)
Tip: Practice adding and rearranging artboards to become comfortable with the layout, ensuring your panels (Artboards, Properties, and Control) are easily accessible for a smooth workflow.