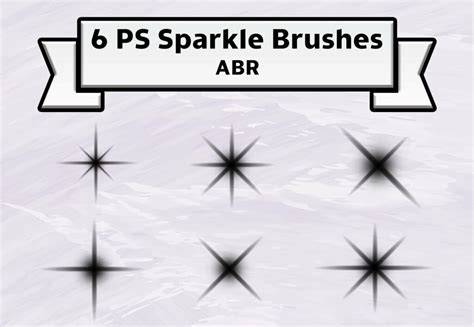
Add a little sparkle and your photos become magical. You can make snow glisten or add a starlight effect. A stick becomes a magic wand, stars streak across the sky, and fireflies fill the night. This article will show you how to create a sparkle effect in Photoshop step by step. We are going to create a sparkle brush. This will give you the most flexibility. We will save it so you can easily apply sparkle to your photos. You can brush over your whole photo as an overlay, or you can add a magic touch to a small area. The sparkle brush that you make will be unique to you. Only you will have this touch of magic!
The steps are extremely easy. Let's start by making the brush. Open Adobe Photoshop and create a new document. Go to the File menu and select File > New Document (Ctrl/Command+N). In the New Document window, set the width and height to 2500px. We will make our new brush using a combination of brushes available in Photoshop. Some of the best brushes to use when making sparkles are legacy brushes. These may be hidden in your version of Photoshop. Here is how you can find these legacy brushes. (If you already see a folder called 'Legacy Brushes' in the Brush Preset Picker drop-down menu, you can skip this step.)
- To show the legacy brushes, click on the Brush tool in the toolbar. This opens the Brush Settings panel.
- In the Brush Settings panel, select the Brushes tab. Then, click the three-line icon in the upper right-hand corner. Photoshop will ask you if you want to restore the legacy brushes to the list of brush presets. Click OK.
- When you go to the Brush Preset Picker in the Options bar, you should now have a new set of brushes to choose from. Open the Legacy brush folder to reveal nearly 20 additional folders of brushes.
Before you start creating your brush, set the foreground color to black. To do this quickly, click the D hotkey. This will set your foreground and background colors to their defaults. The default foreground color is black. Or click the foreground color square towards the bottom of the left toolbar. This opens the Color Picker window. Click on the Brush tool in the toolbar. In the Options bar on top of the workspace, choose a star-shaped brush from the Brush Preset picker. For my sparkle brush, I started with the Star 70 brush located in the Default Brushes folder. There are many other options available in the Legacy Brush folder. Feel free to experiment with other brushes. Shapes like diamonds and triangles also work well as part of the sparkle brush. You can also use a soft round brush for a circular shape. But use a low Flow rate. A dense center will pull the eye.
Also, you can download other brushes from the web. Some are free, and others you must purchase. Choose a large brush size, around 300px, to start. Click on the white background layer and add three or four shapes. Change the brush size and add a few more brushstrokes. You can change the brush size in the Options bar or use the bracket keys. The left bracket key ( [ ) makes the brush smaller. The right bracket key ( ] ) makes the brush larger. Don’t add too many brushstrokes. Select a different-shaped brushstroke. I used the Crosshatch 1 brush located in the Assorted Brushes folder. Choose a large brush size and add three or four shapes. Try not to overlap with other shapes and leave a lot of white space between brushstrokes. Change the brush size and add a few more brushstrokes. Select a third brushstroke shape. I used the Starburst - Large brush located in the Assorted Brushes folder. Choose a large brush size and add three or four shapes. Change the brush size and add a few more brushstrokes. You can use more than three shaped brushes. But be careful not to overdo it. You do not need too many different shapes. Choose three or four different shapes. For each shape, choose two or three different sizes.
Keep the shapes within the white frame of your background layer and leave a lot of white space between shapes. When you are happy with the shapes and their positions on the background layer, save it as a brush preset. This will let you access the brush anytime you want to add a sparkle effect or overlay. Go to the Edit menu. Select Edit > Define Brush Preset. Give your brush a name and click OK. Close the file that you used to create the sparkle brush. There is no need to save it. Your work is saved as a brushstroke that you can use whenever you want. That's it! You have your own personal sparkle brush. You should see it at the bottom of the list of brushes.
In Photoshop, open a photo that needs a bit of sparkle. The sparkle brush that you created is flexible. You can use it to add a sparkle overlay to the entire image. Or you can add sparkle to a selected area of a photo. Open your photo in Photoshop. Add a new layer by going to the Layer drop-down menu. Choose Layer > New > Layer (Shift+Ctrl/Command+N). Set the foreground color to white. To do this quickly, first, click the D hotkey. This will set your foreground and background colors to their defaults. The default foreground color is black. Then Click the X key. This inverts the foreground and background colors. Or you can click the foreground color square towards the bottom of the toolbar. This opens the Color Picker window. Click on the Brush tool in the toolbar. In the Options bar on top of the workspace, choose the sparkle brush you created in the Brush Preset picker. By default, it will be at the bottom of the list. Once you select the sparkle brush, you are ready to start painting. You can size the brush and click once on your image. Sparkles appear!
But if you click and drag across your photo, the effect is lost. So, you first want to space and randomise the shape of your brush. This will reduce obvious patterns and make the sparkles appear more naturally when you drag the brush across your image. Open the Brush Settings panel by clicking the folder icon next to the Brush Preset Picker. In the Settings panel, select the Brushes tab. In the Brush Tip Shape panel, set the Spacing to 50%. Click on Shape Dynamics. Click on the label to open the panel. Set Size Jitter to 50%. Jitter defines how much randomness Photoshop adds to the brushstroke. You can also change the Angle Jitter and Roundness Jitter. Click on Scattering. The preview box at the bottom of the panel shows how the brush looks for each change. Experiment with the spacing, jitter, and scatter. There are many other Brush Settings options to explore. Add a lot of sparkles to concentrate areas, and you will get a glitter effect.
Select the top layer. Choose a large size for your sparkle brush and paint across your photo. Duplicate the Sparkle layer by going to the Layer drop-down menu. Select Layer > Duplicate Layer (Ctrl/Comad+J). Add a Gaussian blur to the duplicate layer. Go to the Filter drop-down menu. Select Filter > Blur > Gaussian Blur. Select a blur radius of between 5 and 10px. It will be difficult to see the blur in the preview window. But you will be able to see the blur in your image. It is okay to add a little more blur than you need. Add a colored glow to your sparkles by double-clicking on the Sparkles layer. In the Layer Style window, select Outer Glow. Set the Blend Mode to Overlay or Soft Light and lower the opacity between 30% and 50%. Click the colored square to set the color of the glow. Use the Eyedropper tool to choose a color from your image. Or, select a color by clicking in a colored box. Set the ‘Spread’ to 5% and the ‘Size’ to 5px.
You can add sparkles to an object or a targeted area of an image to create a fantasy effect. Let's add sparkles to the glass ball held by a costumed model at the Venice Carnival. Follow the steps outlined above for Steps 1, 4, 6 and 7 below. If you want to place the sparkles inside or on an object, use the Select Object tool. Highlight the background image and choose the Select Object tool from the toolbar. This tool is bundled with the Quick Selection tool. Draw a square around the object you want to select. When you release, there will be marching ants around your selection. Highlight the top layer and activate the Brush tool. Choose the sparkle brush that you created from the Brush Preset picker. When you are finished, deselect the area. Go to the Select drop-down menu. Choose Select > Deselect (Ctrl/Command+D).
You can experiment with different-sized brushstrokes. Place the sparkles randomly and try not to overlap them too much. To refine the sparkles, add a layer mask to the sparkle layer. Then, using a soft, black brush, remove extra sparkles. You can add sparkles to jewellery using your brush. Or you can use the Lens Flare filter. Photoshop makes it easy to add a bit of magic to your photos with a sparkle brush. Creating a versatile sparkle effect is surprisingly easy. Use the star-shaped, legacy brushes installed in Photoshop. Brush different sizes and shapes onto a white canvas. And save the canvas as a brush. Once you have created your own sparkle brush, you can add sparkle to a targeted area of a photo. Or you can brush the sparkle over the entire photo as a sparkle overlay. Adding sparkle effects to your still images is a fantastic way to highlight the beauty in a shot while adding depth and context. Sparkle effects create a feeling of celebration, adding a magical touch to your compositions.
In this tutorial, we’re going to show you how to add sparkle effects to individual elements and how to create a stunning sparkle overlay for your compositions. Adding single sparkles to elements in your image can help draw the audience’s focus to an area of your photo. Create a New Project, 1200×1200 pixels, with a white background. Click on the New Layer icon, then select the Elliptical Marquee tool. Change the Color to Black. Create a thin Oval shape in the center of your canvas; right-click > Fill > Foreground with Color. Click anywhere on your screen to remove the marquee boundary. Go to Filter > Blur > Motion Blur, then set the Angle to 90 and increase the Distance to stretch your blur, ensuring it is still within the canvas. In the Layers panel, drag the layer to the New Layer icon to duplicate it. With the duplicated layer selected, go to Edit > Transform > Rotate 90º Clockwise. With the top layer selected, go to Layer > Merge Down. Open your photo in Photoshop, and add a New Layer. Select your Sparkle Brush tool from the Brush menu. Go to Window > Brush Settings to open up the brush controls. Adjust the Scale of the brush to suit your image, and click on the screen to add a sparkle. When you have added your sparkle, double-click on the layer in the Layers panel to open the Layer Style controls and select Outer Glow. The sparkle overlay effect is fantastic for creating a feeling of magic and wonder in your compositions.
Open up your image in Photoshop, then create a New Layer. Make the photo invisible for now. Grab the Paint Bucket tool and fill the new layer with Black. Go to Filter > Noise > Add Noise, then set the Amount to 100% and Distribution to Uniform and check the Monochromatic box. In the Adjustment Layers panel, click the Curves icon: drag both ends of the Curves line to the highest point of the background graph, creating a vertical line in the box. Go to the Noise layer and choose Filter > Blur > Gaussian Blur; play around with the Radius setting until you have a starry sky look. Select the Curves layer and click Ctrl+Shift+Alt+E (Cmd+Shift+Option+E on Mac) to create a Duplicated merged layer. Do this a second time, so you have 2 versions, and hide all of the layers except the top one. Press Cmd+T or Ctrl+T and increase the layer’s size to create large flecks of white. Go to the Channels tab, hold Cmd+click, or Ctrl+click any layers. Go back to the Layers tab, create a New Layer, and Fill it with White color. Delete the bottom of the 2 layers, and you’ll see the black background has been removed.
Not all images will suit sparkle effects, but for the right project, the fun, glittering particles can help grab your audience’s attention. Whether it’s to celebrate a festive occasion or highlight the glam in your shot, this effect is sure to add a magical touch. Download FREE Sparkle Overlay Photoshop to make the scene more enchanting on your photos. Free sparkle overlays available in .PNG and supported by Adobe Creative Cloud, Photoshop 4, 5, and 6 editions, GIMP, Paint Shop Pro. By means of these creative sparkle overlays, the images become unique and special. Kids, family pictures and portraits acquire some exceptional shine. Sparkle Photoshop overlays turn usual scenes into original ones providing amazing results. If you want to create unique invitations for your guests which will definitely impress them, sparkle overlay Photoshop set will come in handy. These overlays will improve any of your creative projects whether it is scrapbooking or printable. There should be a contrast to see the glimmer effect, so use dark background working with these digital sparkles. Apply sparkle overlay photoshop to highlight the main object of the photo. You may turn any nature image into a colorful piece of art with free sparkle overlay. It adds little spangles to the image and makes the color brighter. Transparent sparkle overlay will make the image brighter and lighter. You may confidently combine this sparkle overlay with other effects and Photoshop actions, such as bokeh, sun flares, and sun rays. Features of Transparent Sparkle Overlay Our free collection of 100 sparkle overlays will help you create a fairy magic shot fast and realistically. Some of the sparkle overlays for Photoshop we offer are available with a bokeh-like effect, gleaming streams, and galaxy systems. They may play with position, intensity, size, and blur. Shining circles and stars add some allure to your images. No matter what photo genre you are engaged in ‒ portraiture, landscape, architecture or fantasy ‒ these sparkle overlays will turn your average photographs into magical photography. All you need is to drag the Photoshop sparkle overlay to your image and adapt the size. That’s it! Your masterpiece is ready.
Do your images need that magical touch of sparkles and glitter? Are you looking for an easy way to add a bit of flair to your shots? You’re in the right place. In this article, I explain everything you need to know to create a sparkle effect in Photoshop. Ready to create some stunning sparkles? A sparkle effect features one or more twinkly points of light, which can range from highly realistic to cartoonish and cutesy. You can use the sparkle effect to add a twinkle to someone’s smile or eyes; you might also add a sparkle to a diamond or metallic object. Another popular edit is to add a starburst to lights or the sun. The sparkle effect is also a great way to add some magic to your images. There are two ways to apply a sparkle effect in Photoshop. Second, you can create a brush. This allows you to apply one or more sparkles in a controlled way. Below, I explain how to work with both methods. An overlay is a layer that you can apply to any picture. Once you’ve created your sparkle overlay, you can quickly and easily add the effect to your files. Start by creating a new document. Choose black as the background color, and click Create. Smart Objects allow you to modify filters (known as Smart Filters) after they’ve been applied. To do this, simply right-click on your background layer and select Convert to Smart Object in the menu. Select Filter>Noise>Add Noise. Once the dialog box appears, use the slider to determine how dense you want the noise to be. Make sure you have the noise set to Uniform and Monochromatic. Now it’s time to modify the noise. Start by adding a Levels adjustment layer (select Layer>New Adjustment Layer>Levels). In the Levels histogram, use the handles to adjust the contrast. You can also try moving the midtones to the right and the highlights to the left. There isn’t a specific formula; just experiment and see what you can come up with. Since you’re working on a layer, you can always modify the Levels adjustment later if there’s something you don’t like. You’ll need to further modify the effect with a Sponge filter. Go to Filters>Filter Gallery>Sponge, and use the sliders to adjust the effect to your liking. Next, you’ll want to make adjustments using a Brightness/Contrast layer. Go ahead and select Layer>New Adjustment Layer>Brightness/Contrast. At this point, you have created the basic sparkles, and in a moment, I’ll show you how to add a glow effect. Note that, if you want your overlay to have more or fewer sparkles, this is the time to go back to the Noise filter and make adjustments. You can also modify your adjustment layers to achieve slightly different looks. Once you’re satisfied, create a new layer that contains your existing sparkles. I’d recommend turning off the visibility of the other layers so you’re only viewing your merged (topmost) layer. Now you should only see the sparkles. Duplicate the layer by dragging it to the Plus sign at the bottom of the Layer panel. In the dialog box, choose the direction of the blur and the distance. Experimentation can be helpful here, or you can use the settings displayed in the image above. If you’re struggling to see the effect, you can add a Solid Color adjustment layer underneath your sparkle layers. Repeat the previous step a few more times, changing the direction and distance of the blur as you go. Merge the Sparkle layers together and delete all the other layers. Make sure you save it as PNG; otherwise, it will save with a white background and the sparkles will be lost.
And that’s it! Note that, in order to create a sparkle brush, you’ll need to follow Steps 1-7 in Method 1 (above). From your existing overlay, choose a cluster of sparkles that you like. You can use a single sparkle, but using a cluster will help you create multiple brushes with zero extra effort, so it’s more efficient. Select your sparkle cluster using the Lasso tool. Then copy it onto a new document. Duplicate your main layer and add motion blur (see Step 8, above). You will do this four times, taking care to change the direction of the blur to create a starburst effect. Then choose Image>Adjustments>Invert. At this point, you have a sparkle brush, which you can save by selecting Edit>Define Brush Preset. But you can save additional brush tips by making different selections. For example, you can select just two sparkles and save the selection as another preset. Then you can select three sparkles and save the selection again. This is why I recommended you use a cluster of sparkles! You’ve created a brush tip, so if you apply a single click to an image, you’ll get a sparkle. But if you apply a brush stroke to an image, it’ll hardly look like many sparkles - just a smudge! To get a better effect, you must change the properties of the brush. In the Brush Settings panel, start by going to Shape Dynamics. I added a blue layer so I could see the brush strokes more clearly. Now drag the Minimum Diameter slider until you like how the brush looks. Go to Scattering in the Brush Settings panel. Once you like the effect, save it as a brush preset by going to the hamburger menu and choosing New Brush Preset. That’s it! Every time you open a photo or a document, you’ll have these brushes available to create a sparkle effect in Photoshop.
In this section, I explain how you can add the sparkle effect in Photoshop using the tools you’ve built. Before we dive in, make sure you’ve opened the image to which you’d like to apply the effect; for this example, I’m using a photo of a candle. First, choose the color of your sparkles by clicking on the swatches to open the color picker. Add a new blank layer by selecting Layer>New>Layer. This is where you’ll paint the sparkles. Activate the Brush tool; you can either press the letter B on your keyboard or click on the Brush icon in the toolbox. Now you can add your sparkles! You don’t have to stop there - you can add the sparkle overlay you created, too! Just go to File>Place Embedded. For a more authentic final result, I’ve added a graded layer mask so the effect fades toward the top. I hope you had fun adding a magical touch to your images with a sparkle effect! Yes, there are a lot of steps involved, no matter the approach you use - but the good thing is that you only have to do it once. Once you’ve created your overlay or your brush, all you have to do is apply the effect to your image and customize it as needed. So enjoy working with your overlays and brushes. How do you plan to use the sparkle effect?